For a long time I had been running a Squid proxy on my Linux server, opening an SSH tunnel to the server from my wireless laptop with the -L3128:127.0.0.1:3128 SSH option to create the local tunnel, and then configuring my browser to use the 127.0.0.1:3128 HTTP proxy. This method worked well for a long time, however it had its disadvantages -- namely the extra configuration involved.
Probably the most difficult was the setup and configuration of the Squid proxy (getting the access rights configured correctly in squid.conf), but equally as challenging was explaining the whole process to someone else -- impossible if they were not familiar with Linux.
Recently, my Squid server stopped working and I wasn't able to use the tunneling method mentioned above to secure my wireless connection while I was at Panera Bread (currently the largest provider of free WiFi in the USA). For this reason, I didn't feel safe logging into my WordPress administration interface to work on a blog entry. So while I was searching for Squid configuration instructions, I came across a much easier way of securing my wireless connection. How simple? This simple: ssh -D 9000 [email protected].
Yes, really that simple. Nothing needed to be configured on the server (besides having the SSH server running, which most Linux installations already have by default). I then opened my browser and configured it to use a SOCKS v5 proxy to localhost using port 9000 and bingo, all web traffic was now encrypted over the SSH connection! I confirmed this by running the netstat command on my Linux server and found several new connections to websites I was browsing on my wireless laptop.
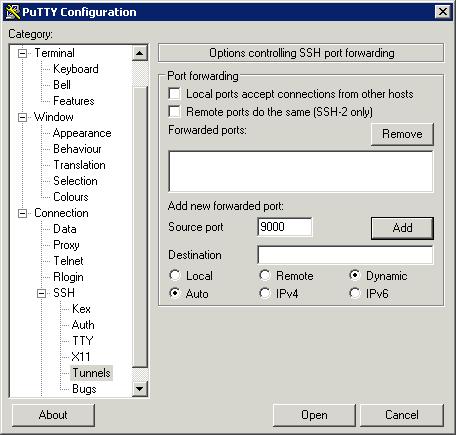
If you're running Windows, and don't have access to the wonderful Linux command line utilities such as SSH, you can download Putty. The latest version, v.59, has support for the -D SSH option. After you download and install Putty, enter the connection details to your SSH server (or find a service that provides a free shell account and allows port forwarding/proxying and use that), then click on Connection -> Tunnels in the options on the left. What you need to do is add a dynamic port. You do this by filling out the Port field and choosing Dynamic. Leave everything else blank and click Add. The screen should look like this right before you click Add:

Once you're done, you can save your connection information and then connect. Once you have logged into your shell account, you will need to configure your web browser to use the tunnel instead of a direct connection. I have included directions for configuring Firefox and Internet Explorer (IE isn't as straight forward as you'd expect, go figure).
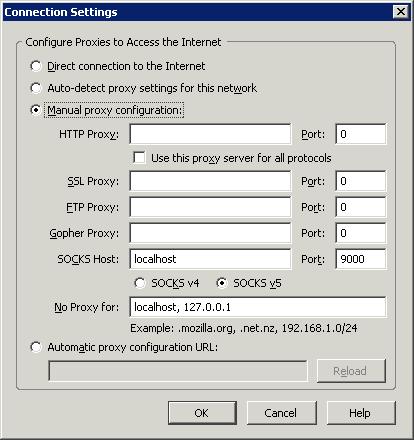
In Firefox, simply choose Tools -> Options -> Advanced -> Network Settings. Choose "Manual proxy configuration:" and in the SOCKS Host field enter "localhost". For the port, enter "9000". I choose SOCKS v5 from the options below the SOCKS Host field, but I'm not sure if that matters. Here is what your screen should look like:

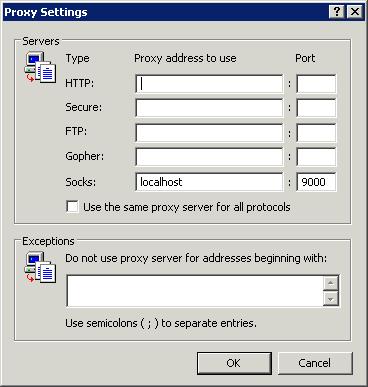
For Internet Explorer, it took me a bit of trial and error to get it working properly. Here is what you do. Tools -> Internet Options -> Connections -> LAN Settings. Choose "Use a proxy server for your LAN" and click Advanced. Erase everything in all fields, except the "Socks" and corresponding "port" field. Enter "localhost" in Socks field and "9000" in the port. Here is what the screen should look like:

Click OK all the way out to your browser, press refresh and you should be loading the web page through your secured tunnel!
This is the easiest method of securing a wireless connection I have come across. Using only WEP or WPA encryption is a joke. If someone is interested in your wireless traffic enough to be monitoring it, you can be certain they know how, and will, break your WEP encryption. At home, I use WEP encryption in addition to this method of tunneling, so effectively I have two layers of encryption protecting my traffic. And if I'm accessing a website through HTTPS, that adds yet a third layer of encryption.
Although you can also use this SOCKS connection to encrypt your E-Mail (at least in Mozilla Thunderbird), you can also use the SSH -L option to encrypt specific connections for which you have no local control over. However, I will leave that for the next HOWTO.