Internet Explorer: Incorrect Password During Certificate Import

While importing a P12 certificate into Internet Explorer today, I got a message saying "The password you entered is incorrect.":

Internet Explorer - Incorrect certificate password

However, I successfully imported this same certificate, using the same password, on Firefox and Safari. But Internet Explorer (both IE7 and IE8) continued to tell me I was using the wrong password. After checking, double-checking, and quadruple-checking the password, I was 1000% sure the private key password that I was using was correct and that Internet Explorer itself was to blame.

After much trial and error, I discovered the problem: Internet Explorer has a maximum private key password length! The password I was using (modified for security purposes, but identical in length) was as follows:

603979ba15c2097f8f7fy35ec0ucfbeb

That's 32 characters, the same length as an MD5. However, Internet Explorer appears to have a problem with that! I changed the password to the following 26 character password and the certificate imported with no complaints from IE!

ae869d263e267593286188b638

If you're having the same problem, you may be wondering how to change the password on your P12 file. To do this, you'll need access to OpenSSL. If you have a Mac, you might be able to find OpenSSL in /opt/local/bin/openssl. But more likely you're on Windows and you will need to download and install the OpenSSL binary for Windows.

You can use the OpenSSL program to convert the P12 file to PEM format, and then convert the PEM certificate back into a P12 file, using a shorter 26-character password when prompted. Here's how:

First, convert the original P12 file to PEM format:

[sourcecode lang="bash"]
openssl pkcs12 -in my-original.p12 -out certkey.pem -nodes -clcerts
[/sourcecode]

This should give you a file called certkey.pem. This file contains both the certificate and the private key. However, the next command requires that the key be contained in a separate key.pem file, so you'll want to edit certkey.pem with a text editor and extract the private key portion (it should be the bottom half of the file). The key.pem file should look somewhat like this:

[sourcecode lang="bash"]
Bag Attributes
localKeyID: EE 35 CB 41 81 23 4C 89 FF 43 42 E0 3C 3B FF 93 9E 0E B7 AA
Key Attributes:
-----BEGIN RSA PRIVATE KEY-----
MIIoOwLBAAJBANSdWgmhySZsCD/koC6nST/JzH/Uqjm6NXsQwtTwx493rhM/90BB
JyfdkfDQCHR/XP0szI1LqS/AXfSx1q25/3MCAwEAAQJBAM0Iu+Mm7zJTT7nqDgfv
VW+4RaRVp05JHaWQdeerpBnWJI+2NDsiKrovyrvYjglJcdpXHhoM95T5qm8x65XP
MhkCIQD5vQ2dNGoFGn0yL0ELDU39PrVvfZyJV3wXedjrQm9utwIhAN0FRk/qIWzz
p9ZP9DjIpIRj6BdWLRrZmLqxdnUXifSlAiBy6fb1u0RJjK7HBM9dPK7+NHiQEJCS
8dp7wZl5d1xnCSIhANLoF6pmnyLil4QwgVlOTv9ufqjSZ+w5GD7a3Vj678RpAiAV
6rTJ3mAZAeQiaRHhgRP7SuvQS6EDWDPxbMBMwYklfA==
-----END RSA PRIVATE KEY-----
[/sourcecode]

With these files in place, you can run the following command to convert the PEM certificate back into a P12 format, providing a new password (maximum 26 characters) when prompted for the Export Password:

[sourcecode lang="bash"]
$ openssl pkcs12 -export -in certkey.pem -inkey key.pem -out my-new-certificate.p12 -rand /dev/random
2048 semi-random bytes loaded
Enter Export Password:
Verifying - Enter Export Password:
[/sourcecode]

That's it! Now you should be able to install the certificate in Internet Explorer without any "incorrect password" complaints.

HOWTO: Make iTunes Read Ogg Files

After downloading the only available torrent of Hang Drum music I could find, I was shocked to discover that iTunes wouldn't read the Ogg files it contained. I was so close to losing a ton of respect for Apple until I searched Google for a solution. Hooray for the xiph.org open-source community! Simply visit their site and download QuickTime Components binary package. After opening the .dmg file (Windows users should be able to just download and run the .exe file), copy XiphQT.component to ~/Library/Components (user-only) or to /Library/Components (system-wide).

Update: Randy Cox noted in the comments that on Snow Leopard the path to copy the file is actually /Library/Quicktime/ If iTunes is open, restart it and viola! You've got .ogg support in iTunes!

Another personal best Windows uptime

This screenshot was taken from my office computer, which is running Windows XP SP2 and has been up for 131 days without a reboot. Previously, my home Windows XP computer held the record. If this was a *NIX-based system, I wouldn't even bother keeping track of the uptime. I've had some of my Linux machines running for over 8 months. 😉

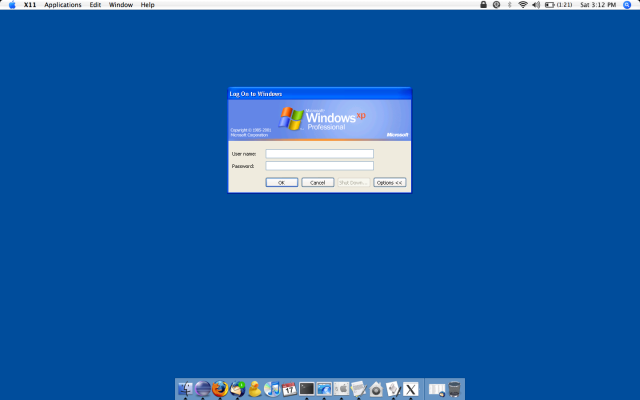
rdesktop running inside X11

I've been using the Remote Desktop Connection for Mac from Microsoft to connect to my Windows machines on my Mac. I've used the open source client rdesktop on Linux machines in the past, but I figured since Microsoft provided a free client I might as well take advantage of every free thing I can get from the company that loves to charge for everything. But then I heard about how the performance of the Microsoft Remote Desktop client on the newer Intel Rosetta Macs was not that great, and that rdesktop worked much better.

So I installed rdesktop using MacPorts (sudo port install rdesktop) which installed rdesktop in /opts/local/bin/. Then I had to start X11 (I already installed X11 from my Mac OS X CD) and using the X11 terminal run rdesktop from the command line to connect to my Windows PC (running open-x11 /opt/local/bin/rdesktop my-server-ip from iTerm did not work). Obviously this was a lot of work to simply open a connection to my Windows server, so I searched for a simple workaround. I found one here. For sake of maintaining a consistent source of information, and because I modified some of the steps, I'll recreate the steps here:

1) Create ~/my-windows-pc.sh (important difference in this step is the addition of the -K option):


#!/bin/sh
/opt/local/bin/rdesktop -K -f -a 16 my-windows-pc-ip

2) Make the file executable:

chmod +x ~/my-windows-pc.sh

3) Apparently the default xinitrc settings get in the way when running rdesktop full screen, so lets place a copy in our home directory and make some changes to it:

cp /etc/X11/xinit/xinitrc ~/.xinitrc

Edit the file and remove the line that says xterm &

4) Finally, we can do some cool stuff. Lets create a single .app (Mac's application file) that can do all the work of opening X11 and running our my-windows-pc.sh script. Start by opening the Script Editor (Finder -> Applications -> Apple Script -> Script Editor). You should be presented with an Untitled script editor window (if not, choose File -> New). Type the following into the editor window:

do shell script "open-x11 ~/my-windows-pc.sh &"

Choose File -> Save As. Then change File Format to Application. Type a name to save your application (such as My Windows PC), select a place to save the application (such as your home directory or Desktop), and click Save. Now you should be able to double click on the My Windows PC file to open your Remote Desktop connection.

Full screen issues

The first major difference between this method and using Microsoft's Remote Desktop client was that I could not press Apple+H to hide the Remote Desktop connection window, and then Apple+Tab to switch back to it, while running Remote Desktop in full screen mode (the -f option in the rdesktop command). Also, in full screen mode the Apple+H shortcut doesn't work by default. The -K option (keep window manager key bindings) we added to the rdesktop command allows us to still use the Apple key to do things while we're connected to the Windows PC (including Apple+H), however it doesn't work the way it's supposed to! Another huge annoyance is that when running Remote Desktop in full screen mode, its not truly full screen because we still see the Apple Dock and the X11 bar across the top.

The way to fix these problems is by enabling full screen in X11 (X11 -> Preferences -> Output -> Enable the Enter Full Screen menu). Keep in mind, Alt+Apple+A switches between full screen and windowed mode in X11 (in full screen X11 mode, you can't see the X11 menu bar to get back into the Preferences without changing back into windowed mode!). Also, I can't remember, but I might have also checked the "Enable keyboard shortcuts under X11" option. Now, if you start your full screen Remote Desktop connection, it should really look full screen (nothing visible except your Windows PC).

Finally, it would be really nice to be able to switch between the Remote Desktop connection and applications running on the Mac. I currently use Witch as my application switcher, instead of the default application switcher that comes with the Mac (so I can't tell you if this issue applies if you're not using Witch (and if you're not, you should be!)).

To make the X11 application show up in the Witch list, choose System Preferences -> Witch -> Behavior. Then enable the "Show an Activate Item for windowless/hidden applications". Now when you're inside a full screen Remote Desktop connection, you can press Apple+H to hide the full screen window, and you should see an "Activate X11" option in your Witch list, which you can use to switch back to the full screen session. This method also works if you're using a windowed rdesktop session.

Recovering from CTRL+S in Putty

Every once in awhile, I'll press CTRL+S by accident while I'm inside a terminal window. For the longest time, this simple accidental keystroke meant I had reconnect to my Linux server, kill whatever program I was running, and then start it again. Eventually I got sick of this happening and decided to do what I should have done in the first place: Google It.

Apparently CTRL+S actually does XOFF, which means the terminal will accept key strokes but won't show the output of anything. It will appear as if your terminal is dead when it's really just waiting to be turned back on. The fix? Simply press CTRL+Q to turn flow-control on (XON). If you pressed a whole bunch of keys before pressing CTRL+Q, you'll see the output from those keystrokes.

In the Windows world, CTRL+S is used as the Save command. Over the years, I've developed the habit of pressing CTRL+S every few minutes while working on a document, simply because I've had too much work lost from stupid errors. Thankfully, this habit will no longer get in my way of working in the Linux world.

Update: A commenter suggested a way to disable CTRL+S from sending XOFF altogether:

add this to your .bashrc (man stty for more options):
stty ixany
stty ixoff -ixon

Update: A commenter provided a tip for making CTRL+S actually save the file in Putty'd VIM.

Putty Tray

I've switched from using the basic Putty to using a customized version called Putty Tray. Why? Because Putty Tray allows me to click on URLs! This is extremely useful while using naim, the console based Linux messaging client I use in conjunction with Bitlbee (I use Bitlbee to communicate on GoogleTalk through IRC).

Finally, no more selecting, clicking, and then pasting URLs into a new Firefox tab!

Internet Explorer "Remember my password" Checkbox Missing

On my office laptop, I discovered the Internet Explorer "Remember my password" checkbox option was missing. This was quite annoying, as I started using Eclipse's internal browser to test my development work on the staging server I setup at home. The staging server is protected by a simple .htaccess file, which prompts you for a username/password with a dialog box like the one below:

As you can see, its missing the "Remember my password" option, which means I have to reenter the credentials every time I want to login. After a lot of research on Google, I finally figured out the problem: the Protected Storage service needs to be running. Either I disabled the Protected Storage service or a Windows security update did. Either way, after changing the "Startup type" to Automatic and restarting all IE browsers, here's how the password dialog looked:

I have a feeling that a Windows, or an Internet Explorer, security update changed the way IE stores passwords. For most users, the update had no effect since the Protected Storage service is set to Automatic by default. But not for me; I love tinkering with stuff. I disabled a lot of unnecessary Windows XP services on my laptop last year to help keep it secure while I'm on the move.

Update:
In the comments, Haiman posted the following alternate fix. Several users reported his fix worked for them, so I'm including it here. (You'll need to use the registry editor to make this change, Start->Run->regedit.exe, but be sure to make a backup of your registry before fooling around with it!)

Your office pushes out a GPO or registry change to disable users from caching passwords.

User Key: [HKEY_CURRENT_USERSoftwareMicrosoftWindowsCurrentVersion
Internet Settings]
Value Name: DisablePasswordCaching
Data Type: REG_DWORD (DWORD Value)
Value Data: (0 = default, 1 = disable password cache)

Linux Power on Windows Machines

The other day I needed to update a bunch of links inside several files for a website, which was hosted on a Windows 2000 server (ugh!). I had no idea which files needed to be updated, and there were well over 60 files. You may recall I had to do the very same thing a week earlier, however that website was hosted on a Linux machine.

Then I realized I had installed Cygwin on the Windows 2000 server awhile back, but never got around to using it! I copied and pasted the search and replace command I had used on the Linux machine and pasted it in the Cygwin console, changing the directory to the one I needed to search. Ten seconds later, all the files were updated!

After this event, I have a new found respect for Cygwin.

pathping: A Faster Trace Utility than tracert

Last week I was testing network connectivity with another engineer and he used pathping instead of tracert on a Windows machine. I had never heard of pathping so I was quite interested to see how it was different. After using it, I realized that it's much faster than tracert on Windows! When I run the traceroute command on Linux, it usually completes the trace lightning fast. Using tracert on Windows, however, usually takes at least 10 - 15 seconds to complete a trace.

Here is what Wikipedia says about the pathping command:

"Pathping is a network utility supplied in Windows NT, Windows 2000, Windows XP and Windows Vista. It combines the functionality of Ping with that of Traceroute (in Windows: tracert), by providing details of the path between two hosts and Ping-like statistics for each node in the path based on samples taken over a time period, depending on how many nodes are between the start and end host."

So, I have officially replaced pathping with tracert in my mental toolbox of diagnostic commands for Windows machines.

Replaced the View Source Editor for my Browsers

Up until now, on my PC, Internet Explorer and Firefox have had different "View Source" editors -- that is the editor used when you right click on a web page and click View Source. To keep things consistent, I decided to find a quick, syntax highlighting, notepad replacement which I could use to quickly view source code on both browsers.

After some quick research, I decided to go with Notepad2. I may eventually switch to gvim, as I'm an avid vi fan, however for now I'll see how things work out with Notepad2. I've already replaced my Windows Notepad with Metapad, which I think is a perfect replacement, however I wanted something with syntax highlighting for the View Source editor.

To change the editor which is used for View Source in Internet Explorer, do the following:

Start -> Run -> regedit.exe

Click OK, then open the following key:


HKEY_LOCAL_MACHINE
|- Software
|-- Microsoft
|---- Internet Explorer
|----- View Source Editor
|------- Editor Name (Default) = C:Program FilesNotepad2Notepad2.exe

You can change Editor Name to the path of whatever editor you want to use.

Close the registry and now Internet Explorer's View Source editor will use the editor you specified above!

To change the View Source editor in Firefox:

Type about:config in the URL box, press enter.

You should see a whole list of different options you can change. In the filter box, start typing view_source.editor.external until you see it in the list. Double click it to change the value to true.

You should also see view_source.editor.path. Double click it and enter the path to the editor of your choice.

Click OK, restart Firefox, and you're all set!

A Late DST Update for Windows 2000 Server

I forgot to update the Windows 2000 server running at a business in Lowell, which resulted in the wrong timestamps for employees when they punched into the time clock system. It's no big deal, as the number of hours worked is correct -- it just shows the wrong time. After everyone punched out for the day, I proceeded to remotely update the server with the new DST settings.

Apparently, since Microsoft stopped supporting Windows 2000 Server a few months ago, they refuse to release the patch to update the DST, and instead want you to pay something in the order of $4,000 to purchase the patch. Ha. Sure.

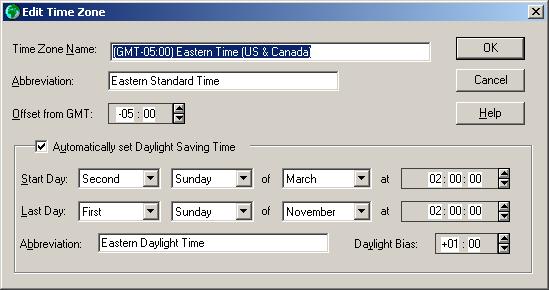
A quick Google search turned up a very simple solution, using a free tool that Microsoft released back in the days of Windows 95! It's a cool tool that allows you to edit the timezone information:

I didn't even need to reboot the server after making the changes! I simply double-clicked the clock to open the Time & Date Settings, changed the timezone to something other than Eastern, clicked Apply, then selected Eastern again and clicked Apply once more. Bingo, the time was updated! Once I restarted the web service, the time clock software also showed the correct time.

Download TZEDIT from Microsoft.

Windows and OSX Folder Replacement: Different!

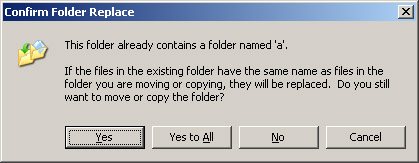
In Windows, when drag and drop a folder into another folder that contains a folder with the same name, Windows asks you the following:

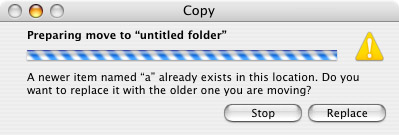
If you do the same thing on Mac OSX, you are prompted with a similar warning and question:

Notice the title of the Windows dialog box? It says "Confirm Folder Replace". See the OSX dialog box? It says "Copy". Now, you'd think that answering "Yes" in Windows and "Replace" in OSX would do the same thing, right? Well they don't!

In OSX, the folder is "Replaced" by the contents of the folder you are moving. So lets say you have a folder called "My Photos". Inside there you have a folder called "2006 Pictures". You also created a folder on your Desktop called "2006 Pictures" and you just finished moving pictures from your digital camera to the folder on your Desktop. When you're finished deciding which pictures to keep and which to throw away, you drag the "2006 Pictures" folder into your "My Photos" folder. Since there's already a "2006 Pictures" folder in there with all the other pictures from that year, you are asked what to do.

In Windows, if you choose "Yes" or "Yes to All", your pictures are simply added to the existing "2006 Pictures" folder; any pictures that were already in there will remain there (assuming they don't have the same name as the files you're moving). In Mac OSX however, choosing replace would remove the current "2006 Pictures" folder and replace it with the one you're moving! You would lose all your other pictures from that year and the "2006 Pictures" folder would only contain the images you just got off your camera!

It took me about an hour to figure this out. I was installing Eclipse on my MacMini and then adding the PHPEclipse plugin. To add the plugin, you simply have to copy two folders into your Eclipse installation folder. On my Windows PC's, I just dragged and dropped, so when I did the same on the Mac, I expected the same result. Every time I tried launching Eclipse after installing the plugin, I would receive all kinds of errors. I finally figured out it was because all the default plugins that are required for Eclipse to run, were being replaced by a plugins folder that contained nothing but the PHPEclipse plugin!

I won't let Microsoft win!

Well tonight I decided to take a leap and actually upgrade my Windows XP system to Service Pack 2 and install all the Microsoft Updates that are well over due. Why have I waited so long? Well, when SP2 came out, I heard about (and saw first hand) applications that would fail to work with SP2 installed. I'm a strong believer in the saying "if it ain't broke, don't fix it". My Windows XP system runs without problems for long periods of time, so I never bothered updating anything. Why have I suddenly decided to upgrade? I just had a feeling it was about time.

Another reason I have been putting off updating my system is because of the new Genuine Validation tool that Microsoft is including in the system updates. This tool checks to make sure you're running a valid copy of Windows XP and since I'm not, I didn't want anything to happen to my system. A few days ago I came across this post describing many different ways to circumvent this new feature from Microsoft.

With renewed confidence that I could update my system without any catastrophic consequences, I downloaded the WGAFixer1.5.530.0.exe tool and ran it after I let the Genuine Advantage application be installed by Microsoft Update. I was then able to download all the updates from Microsoft Update without it complaining that I wasn't running a valid version of Windows XP.

I have also read that selecting Tools>Internet Options>Programs>Manage Add-Ons and disabling Windows Genuine Advantage Validation Tool will fix the problem. I already installed the WGAFixer, so I haven't tested that method yet. I'll let you know as soon as I try it out on another PC.

For the most part, the Genuine Validation tool is designed for those people who know very little about computers and might have been sold a used PC by a friend who installed a pirated version of Windows XP on the computer. It's designed to scare them into purchasing a valid license for Windows XP ($189, I believe).

There will always be a way to circumvent protection, but that shouldn't be necessary. Thats why I love, and use, free, open-source software so much.