Raam Dev

Hello, future.

Restricted Growth: The Butterfly in a Kevlar Cocoon

Up until recently, the volume of information that I have had to deal with has been manageable and I haven't felt as though anything was interfering with my growth. However, that’s beginning to change.

As the volume of information I consume increases, the volume of stuff I want to get out -- ideas, things I want to learn, stuff I want to create or share -- seems to increase exponentially. Trying to manage this torrent of stuff, both incoming and outgoing, on a day-to-day basis leaves my head feeling cloudy and disorganized — just thinking about it is overwhelming.

I'm beginning to recognize certain aspects of my life that are growing out of control and some that need obvious improvement.
Continue reading

How I Revamped My Web Hosting Business

During the past two months or so, I’ve pushed really hard to finish a project that I’ve been “working on” for the past year. The project was to rename, streamline, and solidify my web hosting business. This included registering the business as a trade name with the state, opening a business bank account, opening a post office box, designing a new website, and setting up and integrating the billing system into the website.

The hosting business originally started as a side-project — something I set up to host my own websites and those of friends and colleagues. I hadn’t anticipated the business growing and not putting much thought into setting it up properly from the start was a mistake.

As the number of hosting clients grew, I found it increasingly difficult to keep track of account balances, payments, contact information, account statuses, etc. I realized that I needed something that would automatically generate invoices and send them out, accept payments through my website, and handle new account signups.

I researched various billing systems and eventually settled with WHM.AutoPilot: It was relatively inexpensive and appeared to have everything I needed. However, after adding all my clients and reconciling the accounts, I struggled to get the system working just the way I wanted. There were many bugs and newer versions weren’t being released in a timely manner. It felt as though the billing software just made things more complicated rather than improving them.

All the while, my hosting business continued to grow. Despite bad accounting and being very unorganized, clients were continuing to roll in by word-of-mouth advertising. Every time a new client would sign up, I felt embarrassed that I didn’t have something more professional to present to them. I was beginning to dislike the thought of setting up new accounts!

That’s when I realized I really needed to streamline everything and make growth less of a burden. (Growth should be easy, not something you dread!) So almost exactly a year ago, I decided to change the name of the business to ActualWebSpace, open a bank account so clients could make checks payable to the business instead of my personal name, and get everything set up properly once and for all.

After researching billing systems once again, I decided on and purchased WHMCS. The developers seemed more “on top of things” and the community around the software appeared very active. It used a very simple PHP templating system that would make integrating the billing system into the website very simple.

So that I could offer domain registration and SSL certificates, I signed up for an eNom reseller account. WHMCS included full integration with eNom, so automating domains and SSL certificates was easy.

For the website, I decided to use WordPress as a back-end and design a WordPress theme from scratch. It was both the first time I had set up WordPress as a CMS and the first time I had designed a WordPress theme from scratch. While it extended the amount of time it took the launch the site, it was an invaluable learning experience.

Setting up the website was probably the most difficult part of the entire process for me. I’m a perfectionist and it’s difficult for me to create something and be happy with it. But, after much persistence, I discovered ways of getting out of my perfectionist state of mind and I made enormous progress in the past few weeks.

I launched the new website for ActualWebSpace yesterday. It has been almost a year in the making and it feels great to finally follow through with a project to the end. I’m going to use the lessons I learned to start, and finish, my next project (still deciding what that will be).

The biggest lesson I learned from this year-long project: When starting any kind of venture that has the potential to grow, set things up properly from the beginning. Plan for and anticipate growth instead of waiting until the growth begins to happen.

Removing the GMail "On Behalf Of" Sender Header

Like many of you, I have several email accounts and while using GMail as my primary email client would be nice, one of the things that has kept me from doing so is the annoying "On Behalf Of" that the GMail SMTP servers add to outgoing email. Some of the accounts are work related and the "On Behalf Of" comes across to me as unprofessional.

GMail On Behalf Of

That "On Behalf Of" part is caused by the Sender: header that GMail's SMTP servers add:

Sender: [email protected]
Date: Sun, 13 Dec 2009 10:33:18 -0500
Subject: Re: Project Details
From: [email protected]
To: [email protected]

Having your personal GMail address show up looks totally unprofessional and prevents you from being able to keep your personal email, uh, well, personal. Unfortunately, Google has already said it's part of their SMTP server specs, so they won't change it.

For a long time, your only option was to use a desktop email client like Outlook or Thunderbird to send email using your own domain's SMTP server. However, this meant accessing your GMail account using IMAP/POP and basically defeated the purpose of the web client (unless you didn't mind switching between the web and desktop client).

When Google offered GMail for Domains (now called Google Apps for Domains), I eagerly set up a free account using one of my domains and tested to see if email sent still included the Sender header. Sadly it did and I abandoned the idea of using GMail as my primary email client.

A few days ago I accidentally discovered that now both the standard GMail and Google Apps for Domains have the ability to specify your own SMTP server when you add an external email address to your GMail account. (Here's the announcement from a few months ago on Google's Blog.) This means you can receive email from [email protected] and also reply to emails from within GMail as [email protected] and the receiver won't know that you're using GMail!

Here's how to get this set up:

Login to GMail and click Settings at the top right. Then click the Accounts and Import tab:

GMail Settings - Accounts and Import

Now make sure the "Reply from the same address the message was sent to" is selected and click "Send mail from another address" to add your external email account.

GMail - Send mail from another address

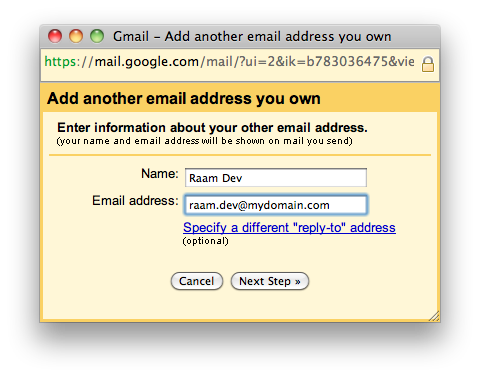
Fill in the name you want to show up when you send email from this account. This will probably be your name, but it might also be something like "Company Support" or "Sales". Now enter your full external email address in the second box and then click Next Step.

GMail - Add another address - Step 1

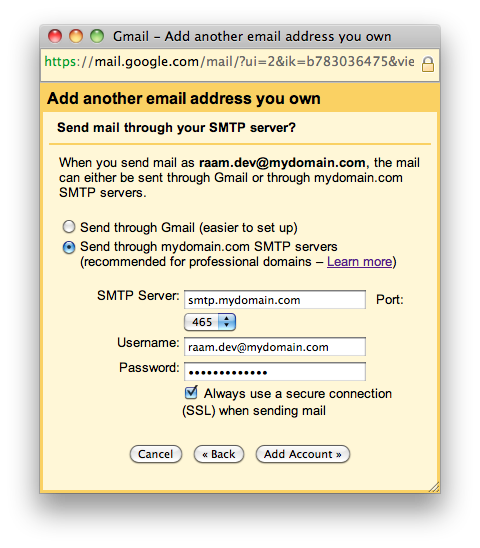
On the next screen, select the second option box, "Send through SMTP servers" and fill in the SMTP Server, Username, and Password fields. When you click Add Account, Google will try connecting to the SMTP server using the credentials you supplied. If it successfully connects, you'll be brought back to the Accounts and Import tab with your new account added. Otherwise, Google will display the error it had when trying to verify the SMTP connection details.

GMail - Add another address - Step 2

Now you should see the new account listed on the Accounts and Import tab, along with a note at the bottom showing that email will be sent using the SMTP server you specified:

GMail - New account listed on Accounts and Import tab

Now, you can send and receive email using this external account and the receiver won't see that annoying "On Behalf Of" message! Your GMail address won't even be visible in the email headers if they choose to view the email source (they'll see that the email was routed through a Google server, but Google is well known enough that they probably won't care).

Mac OS X: Fixing 'Always Open With'

After installing the TextMate editor I wanted all shell scripts (files ending with the .sh extension) to open in TextMate. Unfortunately, selecting Open With -> Other... from the context menu, choosing an application, and then clicking the Always Open With checkbox doesn't change the default application for all files with that extension, but rather only changes that specific file.

If you want to change the default application used to open all files with a specific extension, the steps are slightly different:

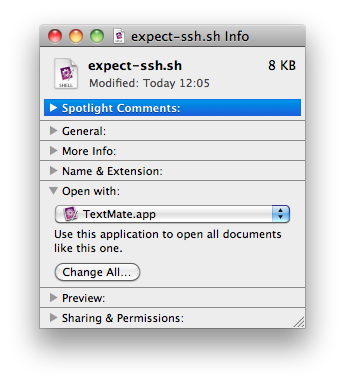
Select the file and choose File -> Get Info (or Cmd+i) and expand the Open With section:

Get Info

From here, select the application you want to use for opening those file types and then click Change All. This will update the OS X Launch Services Database, which is consulted when opening files. Now all files with that extension will be opened with the application you selected.

Choose Happiness and Growth

There are few things in life that are absolutely, one hundred percent, guaranteed. Death is one of those things. Take a moment to think about that. Every single one of us, no matter how smart, rich, or popular, every single one of us is going to die. The flesh and organic matter that is this body is guaranteed to one day cease to exist.

It's not just us either. Everything ends one day. Even this Earth will be gone, most likely consumed by the sun when it expands to a red giant billions of years from now. The entire universe, with all the planets, stars, and galaxies, will also be gone one day. And while it will probably happen a lot sooner, we can be certain that any memory of our existence will also gone when the universe goes.

The bottom line is this: You can be guaranteed that every single thing you see, think, do, or create, every single person you know or have heard of, every single place you’ve been or know about, will one day cease to exist.

So what does all this have to do with happiness? Well, if we can be assured that we’ll all die one day and that everything will eventually be gone, then it’s safe to assume that the only reason for existence is to experience life while it’s here.

So what’s life? Well, we know that death most often brings sadness and is associated with the ending of progression, so this would mean that life, being the polar opposite of death, should be associated with happiness and growth. I propose that choosing anything less than happiness and growth in our life is associating ourselves with death and thereby ignoring life.

This should give no one any reason to accept anything in life that constrains their own happiness or growth (whether mental, physical, or spiritual) or enables the constraint of others’ happiness or growth. To do either of these is to disregard, neglect, and eschew life itself.

Life is our chance. It’s our small window of opportunity. Our situations may vary and our circumstances may differ, but we all have the ability to make a conscious, day-to-day decision to strive for happiness over sadness; for growth over stagnation; for life over death.

Choose happiness. When something upsets you — the car in front of you cuts you off; you feel yourself getting agitated; someone is rude or unpleasant towards you; things just don’t seem to be going your way — make a conscious decision to let it go and choose happiness. Don't let your circumstances become an excuse not to be happy. You're alive right now. That's the only reason you need to be happy.

Choose growth. Do you feel as though you're a better version of yourself today than you were yesterday? If you don’t, then it's time to make a conscious decision to do something to improve yourself every single day. Stop watching so much TV. Stop oversleeping. Do something every day to improve your health (both mental and physical!). Small changes over a long period always equate to a greater overall change. As long as you're living, you should be growing. Stagnation is for death.

It’s your life! What will you do with it?

10 Ways to Nudge Yourself Into Action

I recently took action on a big decision. This “taking action” literally came down to pressing a button on my keyboard (I was sending an email). Pressing that one button turned out to be a lot more difficult, and much more interesting, than I had expected.

As time ticked on, I watched my subconscious surface with unseen doubts, alternative outcomes, and a bunch of stuff that I hadn’t anticipated getting in my way. I had literally planned and thought about this event for months and decided earlier in the week that it was time to take action.

It’s funny how we can psych ourselves up to do something, only to turn back with our tail between our legs the moment we’re face-to-face with actually having to do something about it. Taking action can be scary, and for good reason: Wielding the power to control or influence the future is a daunting task.

If you need to take action on something and you’ve made up your mind that you won’t back down without a fight, try some of these tips to help nudge yourself into action. I used all of them the night I sent that email.

  1. Get your blood moving. Get up and walk around. Go for a run. Workout. Fresh blood running through your veins gives you new energy and helps you see your thoughts, and the situation, from a new perspective.
  2. Move to a different location. Physically moving to a different location helps change the context and let's you see things from a different angle.
  3. Ask yourself, how bad is the alternative? If the decision is big enough to warrant as much attention as you've already given it, doing nothing will most likely do more harm than good.
  4. Does your happiness depend on it? If the thing you're having trouble taking action on has any chance of improving your happiness, then taking action is damn well worth the risk!
  5. Remind yourself why. What made you want to take action? Why are you doing this? Simply remembering what motivated you to take action in the first place can nudge you to take that next step.
  6. Time is limited, your opportunities are not. There will always be a greater opportunity out there. There will always be a better time. You can choose to do nothing now and let time run on, or you can choose to take action and move yourself forward, thereby placing yourself into a position of receiving those opportunities.
  7. Without action, nothing happens. It sounds obvious, but we often want and expect things to change without doing anything to make them happen. If you want air, you breathe. If you want to eat, you feed yourself. If you want to get somewhere in life, you need to do something about it.
  8. You will always make mistakes. And that's good! Mistakes make us better -- it's a basic function built into nature. The more mistakes you make, the more likely you are to grow and learn. Most of us don't make enough mistakes!
  9. Envision what comes next. What will your world be like after taking action? What things can you be absolutely certain of? The clearer your understanding of how the world will be after taking action, the easier it will be to nudge yourself into action.
  10. Realize how you'll feel if you don't take action. If you're feeling antsy now, how will you feel if you don't take action? Will those feelings continue to build up? You'll feel so much better after this "taking action" step is behind you.

What things have helped you nudge yourself into action?

Getting out of my Perfectionist State of Mind

I've been spending a lot of time working on the new website for my web hosting business, ActualWebSpace (formerly known as Akmai.net). It’s a project that’s been underway for a lot longer than I’d hoped for and my perfectionist mentality is mostly to blame.

Early on, I decided the new site would run on WordPress and while I’ve spent a good amount of time tweaking WordPress themes, I've never designed one from the ground up. I’m by no means a designer and, being somewhat of a perfectionist, it's rather difficult for me to accept my creations the way they are and just be happy. This often results in designs that never leave the drawing board or, even worse, entire sites that never leave my computer.

Realizing it would be a good opportunity to teach myself to ignore the screaming perfectionist in my head and learn a little about site design along the way, I borrowed ideas and CSS from the WordPress.org theme and began envisioning and planning the custom theme. Because this was a business site, I felt the need to design something custom; I didn't want to use someone else's work and I wasn’t ready to spend money to outsource the work. I figured it would take me a month to get the new site up, two at the most.

Its been almost a full year since I started working on the new site and the perfectionist has been winning so far. I've dragged my feet so many times that I lost count and I've spent way too much time with little adjustments that, in the end, probably won't make a difference.

The past few weeks, however, have been much different. I've been making a hard push to finally get it done and I've made great progress. Focusing on one page at a time and working on it until it was finished has really helped. I keep reminding myself that anything I don't like can be changed later, even after the site goes live. Improvements to the site will always be ongoing and that's expected by everybody.

Here are just a few tips that have helped me as a non-designer get out of my perfectionist state of mind and make real progress on my site. These may not work for you, but they worked great for me. I plan to review this list in the future when I’m working on other sites:

  • Decide what pages are an absolute must-have to launch the site. Whatever pages can be added later, add them later. Only work on the must-have pages until they’re done.
  • Get the color scheme, header, and footer (preferably in that order) done before working on the individual pages. It’s easier to work on individual pages when you can step back and see the finished page in its entirety.
  • Focus on one page (or task) at a time and work on nothing else until it’s finished. You’ve probably heard this before, but real progress is made when you stay focused and consistently chip away at something until it’s done.
  • If you get stuck, work on something else. I know this contradicts the previous tip, but if you’re really feeling stuck try working on another part of the site for awhile. Let working on something else be your release for the thing you’re stuck on. Just don’t get carried away and start jumping all over the place.
  • Don’t let ideas distract you. You will invariably think of stuff you think could be made better or have ideas you want to try that are unrelated to what you’re currently working on. Keep a list of stuff you want to change or try and simply add to the list the moment something comes up. Then get back to work. (This tip also applies to header/footer changes, which you will see a lot of while designing individual pages!) No matter how simple, add it to the list and tackle it later.
  • Remember that sometimes less is more. Don’t try to fill spaces simply for the sake of filling them or to mimic the design/layout/content of other sites. Figure out exactly what information you need to get across and leave out the rest.
  • Get inspiration and ideas from other sites. Look at other sites for design, implementation, content, and topography ideas, but don’t get hung up comparing your site to theirs; they are two different sites.
  • Recycle. Find sites with layout or design elements that you really like and grab the CSS. Analyze how other sites have made stuff work and try them on your own site (I cannot stress how useful the FireFox Firebug extension is for doing this!).
  • Learn from the best. Look at big-name sites and analyze how they laid things out. There are often entire teams dedicated to figuring out the best techniques and many sites are where they are now only after years of trial-and-error. Save yourself an enormous amount of time and money by studying these sites.
  • Stop when it’s both “good enough” and “usable”. Would it kill you to let others see the page right now? Could Grandma figure out how to use it? Then stop. It’s good enough and you can improve on it later!

Finally, I want to give Steve Krug's awesome book on web usability, Don't Make Me Think!, a quick plug. I finished reading it this week and I think it’s a must-read by anyone involved with web design. It’s such a small book and so full of gold nuggets that you have absolutely no excuse not to read it. I’ll be reviewing Don’t Make Me Think! soon, so be sure to subscribe to my blog if you’re interested in reading the review.

Preparing a Mac for Resale with OS X Leopard

When reselling a Mac, it's nice to give the new owner an experience similar to buying a new Mac. This means reinstalling a clean copy of OS X and, if you're super nice, installing the latest software updates and additional software. Finally, the Setup Assistant needs to be reset so that it runs when the new owner turns on the computer.

Note: The steps below were used to prepare a MacBook Pro running OS X Leopard for resale. Although the steps are similar for other versions of OS X, I have only tested them with Leopard. (Update: Matt mentioned in the comments that he successfully used these steps on OS X 10.6.)

Backup Your Data

If the Mac you're reselling is your own, you should do a full system backup before proceeding.

My favorite method for doing this is to use an external USB hard drive and Carbon Copy Cloner (free). Carbon Copy Cloner can be used to take a snapshot of your entire drive and make it bootable. This means you can actually boot from your backup drive, given you're booting from identical hardware. At the very least, you'll have an identical copy of everything on the computer.

You can also use Time Machine to backup your data. I don't use Time Machine, so I cannot recommend it.

The bottom line is, you want to backup anything important on the Mac you're reselling because the next steps will erase everything.

Reinstall Mac OS X Leopard

  1. Insert Mac OS X Leopard Install Disc
  2. Restart the computer
  3. Hold down the Option key while the computer is restarting. The system will then prompt you to select a startup disk. Choose the Mac OS X Leopard Install Disc.
  4. On the "Select a Destination" screen, click "Options" and choose "Erase and Install". This will ensure a clean installation of Mac OS X Leopard.
  5. Follow the remaining steps to install Mac OS X; they are all self explanatory.
  6. When the installation finishes, the Mac will reboot and you'll be presented with the Setup Assistant.

If you're not interested in installing the software updates or any additional software, press Command+Q to quit the Setup Assistant and choose Shutdown. The next time you turn on the machine, the Setup Assistant will launch again.

Install Software Updates & Additional Software

If you want to be super nice to the new owner of your Mac, you'll need to complete the Setup Assistant and create a temporary user. We will use that user to download and install the software updates as well as install any additional applications (Firefox, MS Office, etc.). Once we're done updating the system and installing software, we'll delete the temporary user and reset the Setup Assistant.

  1. Complete the Setup Assistant and create the first user account (we'll delete this user and reset the Setup Assistant later, so it doesn't matter what you use). Make note of the shortname for the user you create as we'll need that in the next section (e.g., user "Raam Dev" will probably have a shortname of "raamdev").
  2. At this point, you should be logged into the newly reinstalled system using the temporary account you created.
  3. Connect to the Internet (using a wired or wireless connection)
  4. Run Software Update (Apple Icon -> Software Update) and install any available updates. This may take awhile!
  5. After the system reboots, run Software Update again. There will most likely be more updates to install. Repeat this process until there are no more updates to install.
  6. Install any additional applications, being sure to install for "All Users" if prompted. Also, make sure the new applications are installed in /Applications/ and not ~/Applications/

Clean Up and Reset the Setup Assistant

Now that we've installed the latest updates and installed any additional software, we need to clean things up. First, we'll delete the temporary user we created and then we'll reset the Setup Assistant to ensure it launches the next time we boot up.

First, you'll need to start the Mac in Single User mode by restarting and holding down Command+S. This mode does not have a graphical user interface (GUI) and is entirely command-based.

Once you're in Single User mode, run the following commands and press Enter at the end of each line. (Note: The $ represents the command prompt; you don't actually type the $.)

By default, the hard drive is mounted as read-only in Single User mode. Before we continue, we need to make the disk writable:

[code lang="bash"]
$ mount -uw /
[/code]

Next, we clean up that temporary user we created. Replace USERNAME with the shortname of the user you created in the previous section.

[code lang="bash"]
$ rm -R /Library/Preferences/
$ rm -R /Users/USERNAME/
$ /bin/launchctl load /System/Library/LaunchDaemons/com.apple.DirectoryServices.plist &
$ dscl . -delete /Users/USERNAME
[/code]

And lastly, we need to reset the Setup Assistant so it runs the next time we start the Mac:

[code lang="bash"]
$ rm /var/db/.AppleSetupDone
[/code]

Now that everything is cleaned up and the Setup Assistant has been reset, we can shutdown the system and ship or deliver the Mac to its new owner!

[code lang="bash"]
$ shutdown -h now
[/code]

If you want to boot the Mac to make sure it looks the way it should when the user gets it (i.e., the intro video and Setup Assistant start), just make sure you press Command+Q and choose Shutdown.

Mt. Jackson & Mt. Webster

On Top of Mt. Jackson

This past Monday I hiked Mt. Jackson, checking off another 4k footer from the list of 48 in NH. The trailhead was located off RT302, right next to Crawford Notch in the heart of the White Mountain National Forest. At the base, the temperature was around 40 degrees Fahrenheit, so I expected much colder temps at the summit and prepared accordingly.

It was a steady climb up; there were only a few places where I didn't feel like I was climbing stairs. Since I was constantly moving, my body warmed up and I ended up storing most of the warm clothing in my bag during the hike. Most of the landscape was lush -- even tropical (it's hard to imagine for New England, but there are rain forests here!).

Somewhere around 3,500', I looked up and the tops of the trees were covered in something white. I realized it was ice! At the same time, I noticed the wind was blowing incredibly strong just 15' above me; the clouds, so close I felt like I could reach out and touch them, were whipping by as if on a racetrack. From that point onward, things just got colder.

When I reached the summit, everything was frozen. It was incredible. The wind was gusting so strongly that I struggled to maintain my balance. I took off one of my gloves to take pictures and within thirty seconds I couldn't feel my fingers! There were 360-degree views of the surrounding Presidentials -- absolutely stunning.

I decided to take the Mt. Webster loop back instead of going the same way I came. It was an extra 1.6 miles, but I was in no rush. But before I left the summit, I heard a bird whistling to me. I looked over and there he was, perched ten feet in front of me on a frozen pine branch. Realizing I was on part of the Appalachian Trail, I suspected he might be accustom to being fed by passing hikers. I opened a food bar and sure enough, he ate right out of my hand!

The hike from the summit of Mt. Jackson to the summit of Mt. Webster was mostly easy-going terrain. There were lots of slippery log walkways winding through swampy areas that were overgrown with green moss. It was also still cold (the trees were still under 15', and I was still exposed to the strong winds).

Overall, it was an incredible hike. The four and a half hours felt more like eight and the changing landscape, high winds, and friendly wildlife made the trip exhilarating. I didn't pass a single person on the entire hike, probably due to the fact that it was Monday. 🙂

Date of Hike
2009/11/16

Hiking Time
Total Time (including breaks): 4 hours
Book Time: 4-5 hours

Hiking Distance
Round Trip: 5.73 miles

Total Climb
2,232′

Runkeeper Stats

Developing my Personal Brand

This past weekend I read Colin Wright's free eBook on Personal Branding. While I had a general idea what personal branding was before I read the ebook, what I didn't have was a good answer to the ever important question, "Why?".

Here's what Colin says about why you need a personal brand:

Why Do You Need a Personal Brand?

There are many reasons you should want to develop a personal brand. Building a positive reputation (whatever that might mean in your field) can lead to increased word-of-mouth advertising for you and your services. When your reputation spreads and precedes you, it also makes interactions with potential clients that much easier, allowing you to spend less time convincing them to hire you, and more time negotiating the scope of services and payment (and actually working on the project).

Managing a personal brand helps you build a kind of brand equity, which will grant your name and products a certain star power. This associative celebrity can aid you in future projects you may wish to undertake, allow you to easily segue into alternate-but-related fields and will grant you expert status within your current field.

By recognizing and optimizing your personal brand, you will become part of and associated with specific ideas, movements, aesthetics, cultural attitudes and people. The more you refine your brand, the more targeted your message becomes and the more you will be doing the work you want to do, with the people you want to be working with, and at a price point that everyone can agree on.

And those are just the short-term benefits! In the long run, taking the time to filter out the rough and think through what kind of professional you want to be and how you want the rest of the world to see you can actually make you a much more skilled, fulfilled and happy person. It was Abe Lincoln who said, “I don’t think much of a man who is not wiser today than he was yesterday.” Don’t be looked down on by Abe: improve yourself today.

Colin's ebook is a must-read for anyone who works as a consultant or freelancer, who does business or communicates on the web, or who just plain cares about themselves. Everyone has a personal brand. However, you need to take charge of defining that brand; you need to take charge of owning it. Your personal brand is like your health: you are the only person who can maintain it.

To begin developing my personal brand I need to figure out where my personal brand stands now. However, figuring that out on my own would be a bit difficult: I’m bound to be biased. So to help me get started I’ve created an online form with three simple questions that I will personally pass around to friends and family:

  • When you hear or see the name "Raam Dev", what's the first thing that comes to mind?
  • Describe something you like about Raam
  • Describe something you don't like about Raam

If you have a minute to fill out the form (it’s only three questions!), I would greatly appreciate it:

Help Raam Improve Himself!

Anyone who knows me can help, even if you've never met me in person! In fact, I'm very interested in the current state of my online brand, so if you only know me online I'd really be grateful for your submission.

In a few weeks, or whenever I’ve collected enough answers, I will announce the results here on my blog. This will be my current personal brand; the starting point from which I will work to consciously improve myself and my personal brand.

Unix/Linux: Finding and Killing Processes by User

If you've ever run ps aux | grep user to list processes and hunt for process IDs, you'll be happy to know there is a simpler alternative. Both finding and killing processes owned by a particular user is made simple using the handy pgrep and pkill utilities.

Listing Processes with pgrep

Listing all the processes owned by the user raam can be done like this (the -l switch causes the output to include the process name):

[bash]
$ pgrep -l -u raam
9614 screen
9628 bash
9644 irssi
16165 bash
16297 rtorrent
19462 ssh
19515 bash
19526 ssh
20964 sshd
[/bash]

You can also filter the list of results by appending a full (or partial) process name to the command:

[bash]
$ pgrep -l -u raam bash
9628 bash
16165 bash
19515 bash
[/bash]

Killing Processes with pkill

The pkill command does basically the same thing as pgrep, except it kills the processes instead of listing them. This is useful if you have a user with several dead processes, or if you were deleting a user and you wanted to kill any running processes first.

Killing all the processes owned by the user raam looks like this:

[bash]
$ pkill -u raam
[/bash]

And once again, if you only wanted to kill all the bash processes owned by raam, you would append the process name to the command:

[bash]
$ pkill -u raam bash
[/bash]

As always, check the man pages for pgrep and pkill for more information and switch options.

Mac OS X: Resizing Oversized Windows to Fit the Screen

I recently switched from a 15" MacBook Pro (2007 model) to the latest 13" MacBook Pro (2009, unibody model). After transferring my iTunes library to the new laptop, I found that the size of the iTunes window exceeded the size of the screen (the 15” MBP had a 1440x900, while the 13” MBP has a slightly smaller 1280x800). This meant I was unable to grab the bottom right corner of the window to resize it:

iTunes too large to resize!

Unfortunately, the maximize button in iTunes only cycles through Previous Size and the Mini Player mode; at no point does it actually maximize the window to fit the screen!

Note: As Ondrej commented below, you might be able to fix this by simply holding down the Alt/Option key and pressing the zoom/maximize button (the green button).

I tried installing an application called RightZoom which changes the behavior of the maximize button in OS X by maximizing the window to fill the screen (as opposed to simply maximizing for “best fit”). However, that did nothing to change the behavior of iTunes.

After searching the web for solutions and finding nothing, I remembered a trick I had used in the past on Windows computers: Change the display resolution to something smaller, thereby forcing the operating system to resize windows to fit the new resolution. Then, after the OS resizes the windows, change the resolution back to the original. Of course this only works if the original resolution is not already set for the lowest one (it most likely isn't).

To my relief, this trick worked perfectly! When I switched to a smaller resolution, the iTunes window was resized to fit the smaller screen.

For your reference, here are the steps:

  1. Launch System Preferences -> Displays
  2. Select a smaller resolution
  3. iTunes (or any other application) will be resized to fit the smaller resolution
  4. Change the resolution back to the default
  5. Oversized window problems solved!

Create and Share Value

Do you add valueless content to the digital world? How much of what you say or write is only valuable to yourself? How much of it consists of you complaining or bragging about what you've done (or even worse, what you're currently doing)?

I know I'm guilty of it: Sometimes when I’m alone and my mind is idle, posting something, anything, to Twitter and knowing that someone somewhere will read it gives me a sense of connection. But that's being selfish. How much does spewing useless information into the world actually help me (or anyone)? It makes me “feel” a little better in the moment, but does it really do anything for anyone long-term?

The Internet makes it easy for us to keep sharing useless stuff that we think is important because we don't see anyone’s reaction to what we're offering. If you stood on the sidewalk and asked strangers to listen to how your day went, how many people would care? With the in-your-face feedback that you’d receive on the sidewalk, how long would it take you to realize that what you're offering is valueless and adds nothing useful to the lives of others?

On the Internet, you don’t see when someone grumbles at that self-centered, narcissistic paragraph of text you’ve written; you don’t see all the eyeballs that pass over and dismiss your carefully crafted jumble of words.

Being in a constant mode of providing value requires changing your mindset. Yesterday, for example, I went for a walk to clear my head. Towards the end of the walk, I decided to post something on Twitter to share the refreshing experience. At first, I wrote:

"Just finished a nice walk outside in the cold. It really cleared my head.”

Then I realized I could provide more value to others by rephrasing the message:

“Got a lot on your mind? Try taking a walk outside when it’s cold and focus on nothing but your breathing and the movement of your legs.”

Now which of those two posts would you rather read? Which provides more value to world?

Be someone who creates value, not noise. If you find something of value, rebroadcast it (but don't become a repeater just rebroadcasting someone else's voice; create your own voice). If you feel you rarely have anything of value to share, try changing your perspective. If you still have nothing, don't share information simply for the sake of sharing. Sharing is good, but sharing something that only adds to the noise is not good.

Before you publish something you’ve written for Twitter, Facebook, or a blog post, ask yourself if what you're writing would be of value to anyone. If not, don't pollute the digital world by adding to the noise.

Be someone who provides value:

  • Ask yourself how your observations, activities, and experiences could be useful to others.
  • Rephrase valuelessness to provide value through making suggestions or offering advice.
  • Try seeing things through someone else's perspective; would a stranger be interested?
  • Only create or share when you think it will provide value; don't create or share for the sake of creating or sharing.
  • Rebroadcast value, but don't become a rebroadcaster; build your own voice through personal observations.
  • Change your mindset to reflect someone who provides value.

It’s amazing how easily valuelessness can become valuable by simply changing the perspective and intention.

Redefining the Purpose of my Technology Blog

A little over nine months ago, I announced Solid State Raam, a technology blog dedicated to my explorations of the digital world. It was originally set up to give myself a place to write about technology and document my discoveries without feeling like I was alienating visitors on my personal blog. The new blog was, however, lacking a vision; it mostly existed “just in case” I wrote something that I felt was too long or complex for my personal blog. In short, the motivation for writing new content just wasn’t there.

In the past, I had spent enormous amounts of time searching for a “perfect” theme, so when I put up my technology blog I decided to use a default WordPress theme and be done with it, however, last month Cody McKibben of ThrillingHeroics.com released his awesome (and free!) custom WordPress theme. Solid State Raam was in terrible need of a facelift, so I installed Cody’s theme and spent a little time tweaking it. The new theme seemed to breathe some motivation into writing for the blog, but there was still something missing: a vision.

Incidentally, the installation of the new theme coincided with another event. After explaining the WHOIS system to my dad one evening, I realized that I have a passion for helping others understand the digital world. The WHOIS system is a rather boring subject, even for a geek like me, but I nevertheless found myself explaining it to my dad with great enthusiasm. When I thought back to the other times where I had explained technology to people, I realized that I’ve always been enthusiastic and excited about it, no matter how boring or simple the subject was to me.

With this new understanding of my passion for helping others understand technology, a more clearly defined vision for my technology blog has emerged: A place to not only document my discoveries but to also help others understand the world of technology with which I am so familiar.

The world is filled with evildoers looking to take advantage of those who know very little about technology: identities are stolen, wallets are emptied, and valueless electronic goods are willingly purchased as a result of pure ignorance. Many people are fully aware of their ignorance to technology and, as a result, using technology creates intense frustration. I have often wondered how much more enjoyable the web would be for people if they knew how they could find anything with Google, or if understanding the simple difference between a web browser and an operating system would help prevent them from becoming victims to identity theft.

If I can help alleviate fear, frustration, and ignorance towards technology by simply providing a resource for people to educate themselves, then I will be helping to make the world a better place.

Edit: After about a year of having my tech posts published separately from my personal site, I decided to move them back here and shut down SolidStateRaam.com. You can find tech posts in the Technology category.

The Calm Before the Storm

I’ve noticed a pattern with my blog posting frequency: Whenever my daily life is going through a period of change, or when my short-term vision (1-6 months) is suddenly unclear, I tend to retract from expressing anything whatsoever; I retreat into the safety of my own brain until my short-term future is a little more clear. During that time, my posting frequency dries up and I have trouble organizing enough thoughts to write a single post. I'm beginning to realize that an unclear short-term vision creates an instantaneous writers block for me.

Everyone’s daily life changes from time to time, but the “period of change” I’m referring to affects more than just my personal life and short-term goals. Many other things are simultaneously changing: new blogs, new business ventures, new exercise routines, and even new writing environments and bank accounts. Some of my short-term goals are being completed (skydiving, scuba diving) and energy is being refocused to remaining goals (speed-reading, learning the piano). At the same time, the goals of existing projects (such as this blog) are are being redefined. I feel as though I’m revving up for all these changes and there’s one giant switch that’s about to flip.

But don’t get me wrong. I’m not trying to say that I dislike change or that I wish my “plans” weren’t disrupted. Quite to the contrary, I enjoy life throwing me surprises and reminding me that any plan, no matter how perfect, is destined for change. Expecting a plan not to change is guaranteeing myself disappointment. The only things I try to expect are this very moment, the lessons the past has to teach me, and the unpredictable potential the future holds. I’m constantly attempting to harness the power of the moment to augment the future while simultaneously searching for balance in life.

The PADI Open Water Diver Course

The following is a semi-detailed account of the PADI Open Water Diver course I took last weekend. Anyone considering taking the course, or just curious about diving, may find it useful.

The Open Water Diver course offered by PADI is an entry-level course designed for people who are not familiar with diving. The course provides you with the basic knowledge of skills, equipment, and theory to safely dive to a depth of about 18 meters (60 ft).

Pre-class homework

After signing up for the course, I was given a packet containing the Open Water Diver Manual, the Recreational Dive Planner (RDP), a diver log book, and various other fliers and informational material. I was told I had to read all five chapters in the book and complete all five knowledge reviews before coming into class.

The book material was interesting and covered a wide range of topics, including scuba equipment and usage, the effects of changing air pressure on the human body, and even things like the ocean tides and types of waves. While the book covered more than I expected and left me feeling a bit overwhelmed by all the information, once I understood the concepts and actually got in the water to use the equipment, everything made perfect sense.

Class - Chapter Quizzes and Final Exam

The first four hours of the class consisted of our instructor, Beth, taking turns asking us to read our answers from the knowledge reviews. She then explained any answers we got wrong and made sure we understood the answers. We then took short 10-15 question quizzes on each chapter as we finished reviewing the knowledge reviews. Once again, Beth explained to us any answers we got wrong. The whole quiz process was very informal.

After reviewing and taking multiple-choice quizzes on all five chapters, we took a final exam (also multiple-choice). The final exam was 50 questions, 25% of which consisted of dive table problems.

The dive tables were probably the most difficult part of the coursework, but once you understand how to use them they’re really quite simple. A separate book that came with the RDP explained how to use the dive tables. (The dive tables basically let you figure out how long you can stay at a particular depth underwater and how much time you need to wait before a second or third dive. The longer you’re underwater, the more nitrogen makes its way into your blood. Eventually the nitrogen becomes dangerous to the human body. The dive tables help you avoid the danger by planning your dives within safe limits.)

Once the final exam was done, Beth had me find a BCD and a wetsuit that fit (BCD stands for Buoyancy Control Device; it’s usually a vest that holds the scuba tank and contains inflatable pockets to control your buoyancy in the water). She then had me put all the gear and two scuba tanks in my truck and gave me directions to the pool.

Pool time - Finally in the water!

When I arrived at the pool, Beth told me it was just me and her; the other student said she wasn’t feeling well (she also didn’t do so well on the final exam; she had trouble with the dive tables). After unloading the gear and changing into my bathing suit, I had to do an 8-lap swim in the pool without touching the sides or the bottom, followed by 10 minutes of treading water on the deep end. These tests are required as part of the course and are done to prove fitness and comfort level in the water. You’re allowed as much rest as you need in between the two tests.

Next came the fun part. I learned how to assemble the scuba gear: attaching the scuba tank to the BCD, attaching the first stage of the regulator to the tank, connecting the BCD inflator hose, and finally turning on the air and checking the Submersible Pressure Gauge (SPG). As required by the course, I had to assemble and disassemble the scuba gear a total of five times before the course was over.

The next four hours consisted of various activities of increasing difficulty. I learned how to flood and then clear my mask underwater; how to breathe using an alternate air source; how to make a Controlled Emergency Swimming Ascent (CESA); how to remove the gear under and above water; different methods of entering the water wearing scuba gear; and various other techniques and exercises.

By the end of the night, I was very comfortable with the scuba gear. The diving manual had given me the impression that the equipment was complicated, but once I had used it and seen the purpose of each piece, the equipment was really easy to understand and use.

Normally the pool work would have been spread out over two days, but because it was just me and the instructor, everything went really fast (four hours vs eleven hours!).

Swimming in Real Water

While the confined water dives (in the pool) are an important part of the course, I also need to complete a total of four open water dives to actually get my Open Water Diver certification. The open water dive locations are chosen by the instructor and can be done on a lake or in the ocean.

Unfortunately, I took this course late in the season and winter is fast approaching. This means I will most likely have to do my open water dives next spring. From what the instructor told me, I will basically be doing the same exercises I did in the pool. Each of the four dives must last a minimum of 20 minutes and will most likely be at a depth of 20-30ft.

Taking my First Breath Underwater

One of my 2009 resolutions was to become a certified scuba diver. At the time of writing my resolutions, I didn’t even know what “certified scuba diver” meant; I just knew that scuba diving was something I’ve always wanted to do.

A few months ago I realized it was getting late in the year and time was running out, so I visited Northeast Scuba, a local dive shop in Chelmsford, MA, and spoke to the guy behind the counter. He explained the Open Water Diver certification offered by PADI allows a diver to use scuba equipment down to 60 feet and that it’s a very popular entry to all other diving certifications offered by PADI, such as Rescue Diver, Deep Diver, Wreck Diver, and Advanced Open Water Diver.

After signing up for the course, I was required to complete homework before coming into the class. There were five chapters in the Open Water Diver manual, each with a knowledge review at the end. After reading the first chapter and completing the first knowledge review, I procrastinated until a day before the class was scheduled and spent eight hours straight (until three in the morning) reading the remaining chapters and completing all the knowledge reviews (not recommended!).

The Open Water Diver manual contained lots of interesting stuff: everything from scuba equipment, to dangers of pressure underwater, to ocean currents and wave types. It did a great job explaining topics that would’ve otherwise been difficult to understand.

The day before I was scheduled to take the class, I sprained my ankle bad enough that I had to reschedule the class. A few days before the rescheduled class, I got a call saying the instructor had an emergency and that the class had to be rescheduled again.

Finally, this past weekend the stars aligned and I took the class. The class took place in the back room of the dive shop and was very small: only myself and another student (an accountant in her mid to late 40s). The quizzes and final exam were easy, but time consuming.

After the classwork, I loaded up my rented scuba gear and two scuba tanks, went on a one hour lunch, and drove to the pool, which was located in a fitness center in Boxboro, MA, about 20 minutes away. When I arrived, I learned that the other student wasn’t coming (she didn’t feel well and had trouble with the dive tables on the final exam), so it was just me an the instructor.

My first breath underwater was pretty much what I had expected. What I had not expected, however, is what came next. After being under for longer than I could hold my breath, I literally felt as though I had entered a new world! When you're in scuba gear, everything happens in slow motion underwater. Once you obtain neutral buoyancy there is very little affect from gravity; you're basically weightless. It’s hard to explain how this affects the way you perceive your environment and I think it's something you have to experience first-hand to really appreciate.

I had so much fun going through all the different diving exercises and learning about all the scuba gear, including how to assemble and disassemble everything. I practiced things like flooding and clearing my mask underwater, various emergency ascents, finding neutral buoyancy, and various methods of entering the water (one big leap, going in backwards off a boat, entering from the shore).

With all my pool work done, I now just need to do four open water dives (in a lake or ocean) to become a certified Open Water Diver. Since it’s so late in the season, there’s a good chance I’ll have to wait until next spring to complete the four open water dives, but once I’ve got my certification, I’m definitely going to work towards other certifications (like the Advanced Open Water Diver and Rescue Diver).

I’ve long suspected that I would love diving and I can already feel myself itching to go back under. I know the confined dives aren't quite the same as the open water, but I expect the open water to be even more incredible.

Falling to Earth from 12,000ft

12,000ft above the Earth

One of my 2009 resolutions was to complete the Accelerated Free Fall (AFF) program which meant my first jump would've been solo. However, when I called Skydive New England to schedule the AFF jump, they told me the season was over and I'd have to wait until next spring. My girlfriend Jessica had already committed to jumping tandem and, although it was a little hard to accept the change in plans, I quickly got over it and decided to also jump tandem.

"For once you have tasted flight
you will walk the earth
with your eyes turned skyward,
for there you have been
and there you long to return."

- Leonardo da Vinci

It was absolutely incredible. We jumped at 12,000 ft. Everything happened so fast and it's still hard to believe it really happened. The staff at Skydive New England were awesome. Big Jim, the guy I jumped with, was really fun (he has completed over 6,000 jumps!) and the videographer (I forgot her name) was pretty good at getting me to make faces and talk.

I was surprised that I didn't feel more fear as I jumped out of the plane but I have a suspicion that jumping solo will be a little different. (With tandem, you're attached to an experienced skydiver who has had thousands of jumps and who pushes the two of you out of the plane. Going solo however, it's your own muscles that are pushing your body out of the plane.) I've already started saving for the entire AFF program (25 jumps) to get my A license next spring (that will allow me to jump solo anywhere for around $20!).

The photos are awesome (click the photo at the top to see the whole album).

Floating in a Bubble

The past few weeks have been quite unusual, to say the least. Things around me seem to be happening so fast that all I can do is sit back and watch in awe and wonder. It seems pretty amazing to me that just two months ago, given as many tries as I wanted, I wouldn't have been able to guess that my life would be where it is now.

I've always felt as though everything around me wasn't real, as if my entire life was just a big elaborate dream. (If you've ever had a dream that you knew was a dream, you know how I feel while awake.) I still feel that way, only now I feel like I'm having a dream inside a dream, where in that dream I'm floating in a bubble not sure where I'm going to float to next.

This feeling of the unknown is not something I'm usually comfortable with, but the more time I spent wondering what I should do about it, the more I realized I was missing out on the moment. I am very happy and grateful for where I am now and wasting the moment seems like a horrible thing to do. As I pondered these new events in my life, a little voice in my head began whispering to me, "just run with it and see where it takes you".

We're all living in bubbles. We might have an blurry idea of the direction the wind is blowing us, but we really have no clue how we're going to end up getting there. Each one of us lives a life that we cannot fully predict. We meet people we didn't know we'd meet; we do things we didn't think we'd do; we go places that we previously couldn't have imagined a reason for going. Our bubble floats and bounces around throughout life, eventually bumping into something that makes our physical existence no more. Pop!

But this doesn't mean we should give up all control and just blow wherever the wind takes us. We should be mindful of the present and humbled by the unpredictability of life. Our ambitions, dreams, and purpose should guide us along the way but not create roadblocks. Our life shouldn't be rigid and easily upset by unexpected events. Instead, we should allow our life to flow like water.

Embrace unexpected events in life the same way water embraces an obstacle.

Developing Intimate Familiarity

When I started taking piano lessons, my tutor was constantly stressing the importance of becoming intimately familiar with all 88 keys, the sound each one made, and the musical notation that corresponded to each key. I understood why all that was important, but I really had no idea how becoming intimately familiar felt or even looked like. That changed today.

My tutor has me practicing several different areas simultaneously. There are seven separate sections but they can roughly be split up into three areas: exercises on the piano, reading and recognizing notes on paper, and rhythm and ear training. The most difficult part for me has been joining these different areas. I can practice stuff on the piano and then stop and read notes on paper, but connecting the notes on the paper to the keys on the piano just doesn't seem to happen.

Then today, just as I was finishing a one hour practice session and writing down what I had practiced, I had an idea for how I could work on connecting the various areas as I practiced them: I would start using my little music notation notebook (a Moleskin) for keeping track of not only time but the actual notes that I practiced. Instead of just writing "Practiced the D Major scale: 20 min", I would actually write out the musical notes for the D Major scale that I played and then make a note of how much time I spent practicing them. Making a habit of writing the notes every time would mean automatically strengthening the connection between the notes and the keys that I'm playing.

When you watch a good musician play an instrument, you can tell the instrument has become an extension of him or herself. It has become as familiar and comfortable to them as their own hands and feet. Once that happens, there is no discomfort limiting their ability to create music; the music can just flow through them. Learning a new instrument (especially a first instrument) is basically like adding a new body part to yourself -- a third arm or leg. Becoming intimately familiar and comfortable with such a new body part takes a lot of concentrated practice.

I spent about twenty minutes writing notes and playing them at the same time and wow. Everything feels like it's starting to connect! It's almost like I finally figured out how to attach nerves to this new body part, instead of just brainlessly moving things around.