Escaping Filename or Directory Spaces for rsync

To rsync a file or directory that contains spaces, you must escape both the remote shell and the local shell. I tried doing one or the other and it never worked. Now I know that I need to do both!

So let's say I'm trying to rsync a remote directory with my local machine and the remote directory contains a space (oh so unfortunately common with Windows files). Here's what the command should look like:

rsync '[email protected]:/path/with spaces/' /local/path/

The single quotes are used to escape the space for my local shell and the forward-slash is used to escape the remote shell.

Installed DenyHosts to Help Prevent SSH Attacks

When the LogWatch report from yesterday (for web.akmai.net) arrived in my Inbox, it had over 20,000 failed SSH login attempts. Today I decided it was finally time to do something about all those attacks.

After looking around a bit, I found several different solutions. Some solutions utilized firewall rules and others monitored your /var/log/secure (or /var/log/auth.log) log files for multiple failed login attempts and then added those IPs/Hosts to the /etc/hosts.deny file.

I decided to go with the latter method and quickly found a nice tutorial for setting up DenyHosts (be sure to download the latest version (2.6 as of this writing) instead of the older version 2.0). Rather than reinvent the wheel, here is what the DenyHosts website says about itself:

What is DenyHosts?

DenyHosts is a Python script that analyzes the sshd server log messages to determine what hosts are attempting to hack into your system. It also determines what user accounts are being targeted. It keeps track of the frequency of attempts from each host.

Additionally, upon discovering a repeated attack host, the /etc/hosts.deny file is updated to prevent future break-in attempts from that host.

An email report can be sent to a system admin.

Since I was setting up DenyHosts on a RedHat-based machine (CentOS) and not a Debian-based machine, I needed to change this line:

update-rc.d denyhosts defaults

to this:

chkconfig denyhosts --add

Other than that, the installation steps were just as the tutorial described. I decided to enable the ADMIN_EMAIL option so that I would receive an email every time something was added to hosts.deny, but within minutes of starting DenyHosts I had a dozen attacks with a dozen emails on my BlackBerry. I had to disable ADMIN_EMAIL to stop the spamming!

To make sure DenyHosts was working properly I tried logging in with the wrong password three times. When I tried to connect again, here is what I received:

ssh [email protected]
ssh_exchange_identification: Connection closed by remote host

DenyHosts also has the ability to report to a central server the hosts that are trying to break in and you can also download a list of hosts that have been reported by others. I choose to opt out of doing this for now. The DenyHosts statistics page is pretty cool. Notice how the majority of the hosts come from China? Hmm.

UPDATE:
I quickly discovered that DenyHosts was adding my IP address to the hosts.deny file. When I watched /var/log/secure I discovered the problem:

Jun 13 20:18:46 web sshd[5959]: reverse mapping checking getaddrinfo for 75-147-49-211-newengland.hfc.comcastbusiness.net failed - POSSIBLE BREAKIN ATTEMPT!
Jun 13 20:18:46 web sshd[5959]: Accepted publickey for fooUser from ::ffff:75.147.49.211 port 57926 ssh2
Jun 13 20:18:48 web sshd[5994]: Did not receive identification string from ::ffff:75.147.49.211

I'm not entirely sure how to fix this, but for now I added my IP address to /usr/share/denyhosts/data/allowed-hosts (I had to create this file) which prevents DenyHosts from blocking my IP no matter what (see this FAQ for more info). Also, I had to restart DenyHosts (/etc/init.d/denyhosts restart) before the change to allowed-hosts took effect.

s3delmany.sh – Delete Many S3 Objects With One Command

Update: The Amazon S3 service API now allows for deleting multiple objects with one request (up to 1,000 objects per request). Please see the Amazon S3 Developer Guide for more information.

I've been doing some stuff at work using Amazon S3 to store files and during my testing I uploaded a ton of files that didn't need to be there. Unfortunately, the command line tool I'm using, s3cmd, does not allow me to delete multiple files at once. There is no way to do a wild-card delete. This means I would need to get the full path to each object and delete them one by one:

./s3cmd del s3://s3.ekarma.net/img/1205794432gosD.jpg
Object s3://s3.ekarma.net/img/1205794432gosD.jpg deleted
./s3cmd del s3://s3.ekarma.net/img/1205794432g34fjd.jpg
Object s3://s3.ekarma.net/img/1205794432g34fjd.jpg deleted

Yea, there's no way I'm doing that for over 200 objects. I mean come on, there are tools to automate this kind of stuff! So I created s3delmany.sh:

#!/bin/sh
# -------------------------
# s3delmany.sh
# Author: Raam Dev
#
# Accepts a list of S3 objects, strips everything
# except the column containing the objects,
# and runs the delete command on each object.
# -------------------------

# Redirect output to the screen
2>&1

# If not using s3cmd, change this to the delete command
DELCMD="./s3cmd del"

# If not using s3cmd, change $4 to match the column number
# that contains the full URL to the file.
# This basically strips the rest of the junk out so
# we end up with a list of S3 objects.
DLIST=`awk 'BEGIN { print "" } { print $4, "t"} END { print ""}'`

# Now that we have a list of objects,
# we can delete each one by running the delete command.
for i in "$DLIST"; do $DELCMD $i
done

Download
s3delmany.zip

Installation
1. Extract s3delmany.zip (you can put it wherever, but I put it in the same directory as s3cmd).
2. Edit it with a text editor and make sure DELCMD is set correctly. If you're not using s3cmd, change it to match the delete object command for that tool.
3. Make it executable: chmod 755 s3delmany.sh

Usage
If you're using s3cmd and you placed s3delmany.sh in the /s3cmd/ directory, you should be able to use the script without modifying it. The script works by taking a list of objects and running the delete command on each one.

To pass s3delmany.sh a list of objects, you can run a command like this:

./s3cmd ls s3://s3.ekarma.net/img/ | ./s3delmany.sh

This will delete all objects under /img/. Make sure you know the output of your s3cmd ls command before you pass it to s3delmany.sh! There is no prompt asking if you're sure you want to delete the list, so get it right the first time!

Hint: s3cmd doesn't allow you do use wild-cards, but when you run the ls command, you can specify the beginning of an object name and it will only return objects starting with that. For example, s3cmd ls s3://s3.ekarma.net/img/DSC_, will return only those objects that begin with DSC_.

Alternate Usage
If you have a text file containing a list of S3 objects that you want to delete, you can simply change print $4 to print $1 and then do something like this:

cat list.txt | ./s3delmany.sh

By the way, print $4 simply tells s3delmany.sh that the S3 objects are in the 4th column of the data passed to it. The ./s3cmd ls command outputs a list and the object names are in the 4th column. The awk command expects the columns to be separated by tabs (t).

If you have any questions or comments, please don't hesitate to use the comment form below!

Quick Wireless Security using SSH Tunneling

I'm a little paranoid when it comes to wireless security. Even if I'm on an encrypted wireless network, I won't access any of my bank accounts or login to any website that requires a password without securing my traffic with an additional layer of security using SSH tunneling.

SSH tunneling can also be used to circumvent network-based restrictions in the workplace or on a free public wifi hotspot, giving you the freedom to browse whatever websites you want. If implemented on an OS networking level, you can even use the tunnel for your email and other applications. However the focus of this post is on using SSH tunneling to secure your web traffic.

Here is a quick list of what you'll need:

  • Firefox or Internet Explorer (this technique also works with Opera and Safari, although I don't cover those here)
  • Putty (Windows); The terminal (Linux or OS X)
  • SwitchProxy Tool (nice-to-have Firefox Plugin)
  • Access to an *nix-based computer. This will probably be the most difficult to obtain and if you're not familiar with Linux or OS X I recommend you ask a friend if they wouldn't mind giving you an account on their Linux computer. You can try to find a free shell that allows port forwarding, but they are rare.

Setting up the SSH Tunnel

Windows

Since Windows doesn't have an SSH client built in, you will need to use the wonderful SSH client application called Putty. After you've downloaded and launched Putty, you should be presented with the main screen. Fill in the Host Name (or IP address) field with that of your Linux computer and be sure to select SSH from the Connection type.

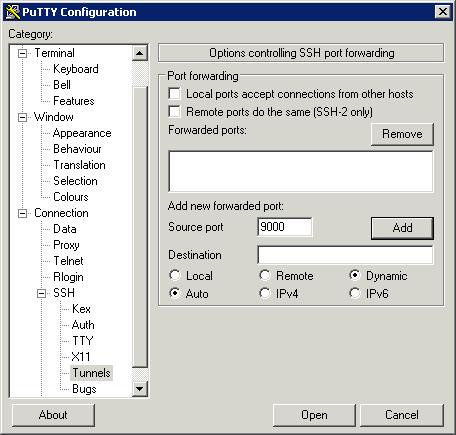
On the left column of options, select Connection -> SSH -> Tunnels. Enter 9000 in the Source port field, select Dynamic from the option at the bottom, and then click Add. Your screen should now look something like this:

Note: If you don't see the Dynamic option in Putty, make sure you have the latest version.

Now go ahead and click the Open button to connect to and login to your Linux computer. Once you have successfully logged in, the tunnel will be open and you can proceed to configure your web browser to use the tunnel.

Linux/OS X

Since you're using a *nix based system, your computer already has everything it needs to setup an SSH tunnel. Simply access the terminal (Applications -> Utilities -> Terminal.app on OS X) and connect to the remote Linux computer as follows:

ssh -l -D 9000

After logging into the remote computer, the dynamic SSH tunnel will be opened and we can continue to configuring the web browser.

Configuring the Web Browser to use the SSH Tunnel

Firefox with SwitchProxy Tool plugin (the method I use)

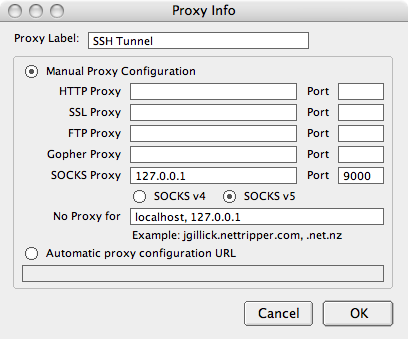
Download and install the SwitchProxy Tool plugin. After installing the plugin, open its configuration window (Tools -> Add-ons -> SwitchProxy Tool -> Preferences on OS X). This will open the basic configuration window for the plugin. Click Manage Proxies and then Add. Choose Standard for the proxy configuration type and click Next. Fill in the fields as shown below.

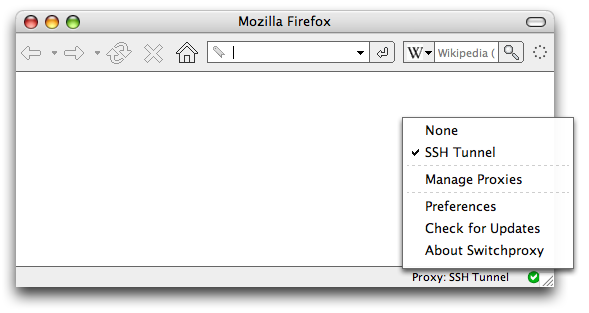
After saving the connection, you should be able to use the plugin to easily switch between browsing through the SSH tunnel and browsing without it. I have it configured to show in the Firefox Status Bar, as I find that to be the easiest method of toggling between the two:

Firefox without SwitchProxy Tool

Although SwitchProxy Tool to easily switch my proxy settings, I will also explain how to configure the browser without the plugin.

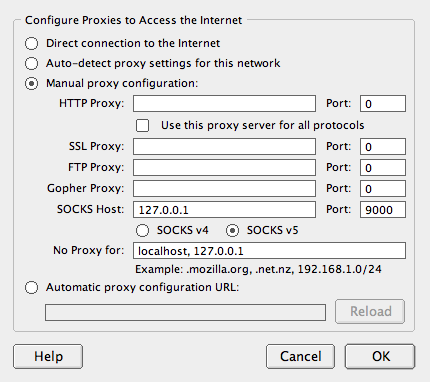
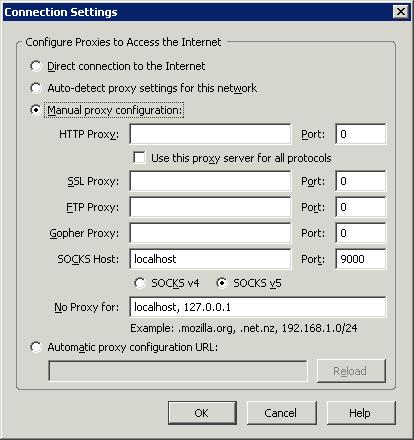
Open the Firefox Preferences (Firefox -> Preferences on OS X) and click the Advanced icon at the top. In the connection section, click the Settings... button. Choose Manual proxy configuration and fill in the SOCKS Host and Port fields as shown below.

Internet Explorer

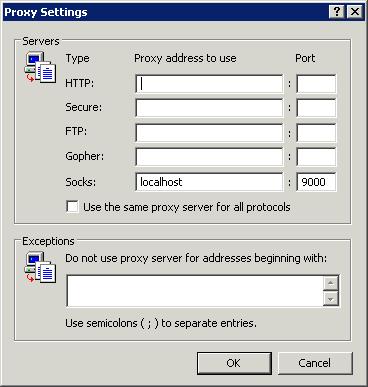
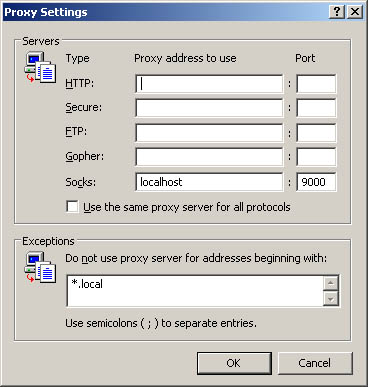
From the Internet Explorer menu, choose Tools -> Internet Options. Select the Connections tab and then click the LAN Settings button. Enable the Use proxy server for your LAN option and click Advanced.

In the Servers section, make sure all the fields are empty except for the Socks field. Type localhost in the Socks Proxy address field and 9000 in the Port field. Your screen should look something like this:

Click the OK button all the way back to your browser. You should now be browsing the Internet securely through the SSH tunnel! An easy way to confirm this is to disconnect from the Linux computer by closing Putty and checking if you can still browse the web. Since the browser has been configured to use the tunnel, you won't be able to browse the web if that tunnel is closed.

If you wish to revert back to browsing the web normally, simply uncheck the Use proxy server for your LAN option in LAN Settings.

Recursively Renaming Files – The One Liner

A couple of months ago I wrote about a solution to recursively rename multiple files on a Linux system. The problem with that solution was that the script needed to be saved as a file called rename and then chmod 755 to make it executable.

Today, while writing a script for my ASAP application, I found a much easier one line solution which uses commonly installed command line tools:

$ for i in `find . -name "*.php5"` ; do mv -v $i ${i/.php/.php5/}; done

This chain of commands searches for all files containing .php5 and renames them to .php. The most obvious limitation of this solution is that if a filename or directory contains .php5, it will also be renamed. So if, for some wacky reason, you had a directory called /my.php5.files/, that directory would be renamed to /my.php.files/. Similarly, a file named my.php5.example.php would be renamed to my.php.example.php.

For my application, this one liner worked fine as I simply added a warning to the top of my script. If anyone knows how I can easily modify that command to ignore all directories (I didn't see anything in the find command syntax that might help), I would greatly appreciate the information!

Moving a CVS 1.12 repository to CVS 1.11

Over the weekend I moved my entire CVS repository from my home server to a domain hosted on the dedicated web server for my web hosting company. From what I read online, it was as simple as copying all the files to the new location. This appeared to work, but when I tried to create a new project and share it to the repository using Eclipse, I received the following error:

CVS Error

Hmm, unrecognized keyword 'UseNewInfoFmtStrings'. I tried searching Google and although I didn't find very much in the way of a solution, there were hints to the error possibly relating to differences in CVS versions. So I checked my home server version: CVS 1.12.13. Then I checked the version of CVS on my web server: CVS 1.11.17. Ah ha!

My next thought was to upgrade CVS on my web server. But then I discovered my web server (CentOS 4) doesn't have the CVS 1.12 package available because only stable packages are supported. I decided it was best to keep the server stable and starting looking for a way to "downgrade" the 1.12 repository to make it compatible with 1.11.

My eventual solution was to backup /home/dev82/cvsroot/CVSROOT/history, which contains the history information for all the files in the repository, and then delete the /home/dev82/cvsroot/CVSROOT/ directory. After this, I simply ran the following command to recreate CVSROOT and make it compatible with CVS 1.11:

root@web# cvs -d /home/dev82/cvsroot/ init

With the fresh CVSROOT directory in place, I copied the history file back to /home/dev82/cvsroot/CVSROOT/, overwriting the existing one that the cvs init command created.

My biggest worry with doing this was possibly losing history information or somehow being unable to restore files, etc. However, I was able to successfully, create, commit, and restore files from the history. I also had no errors creating new projects and sharing them with the CVS repository.

If anyone knows of a better solution, or has any information on what potential problems following this procedure might have, please leave a comment and let me know!

IMPORTANT UPDATE: I discovered any new files I committed to my repository were being saved to the ./Attic directory. The ./Attic directory is used by CVS for files that have been deleted. If someone checks out a version of the code where that file existed, CVS will pull the file out of the Attic and allow it to be checked out. The funny thing was that my newly committed file still checked out normally even though it only existed in the Attic on the server.

Eventually, I concluded the trouble of moving a 1.12 repository to a server running CVS 1.11 wasn't worth the trouble. I checked out the latest versions of all my projects, deleted the CVS meta-data from them (Eclipse allows you to do this automatically when you disconnect a project from a CVS repository), and then created a new clean repository and checked all the projects back in. My history information is gone, but if I ever discover I really need an old version of a file, I still have a copy of the original repository on my home server.

Making iTerm and naim play nicely

I've started using iTerm as my terminal client on Mac OS X. Previously, I was using the Terminal.app which comes with OS X, but that has its limitations. It also doesn't look as pretty as iTerm does when I'm using naim, the console based messaging client I use to talk on IRC, GoogleTalk, and AIM.

Out of the box, iTerm works really well and there wasn't very much I customized to make it look the way I wanted. I didn't see an option in Terminal to disable bold fonts, however iTerm has that option and it makes naim look much nicer:

Of course, I can't forget to mention one of the best features of iTerm: tabs! Yes, I can have five or six terminal windows open, and they will only take up the space of one window. Detaching a tab is as simple as dragging it away from the main window. OK, back to the point of this post.

When I started using a G4 Mac several months ago, I was using Terminal to access naim. After a lot of digging around on the web, I finally discovered how to map the keys in Terminal so they work as expected to control naim (changing screens, scrolling through the buddies list, etc). I documented my discoveries on the NaimWiki. However, to my disappointment and frustration, iTerm's default key bindings did not work with naim out of the box. I figured it would be as simple as following the steps I followed for Terminal, but that wasn't the case.

There were two problems I needed to solve: Fix the backspace key and the home, end, page up, and page down keys. The backspace key was Yfixed with the help of this blog post. I simply modified the 'delete' key mapping for the iTerm Keyboard Profile I was using and changed the hex code being sent from 7f to 0x08.

I then needed to add new entries for the other keys to work properly. For each of these keys, add a new mapping, select the key, choose 'Send escape sequence' for the action and enter the appropriate sequence:

[1~ (home)
[4~ (end)
[5~ (page up)
[6~ (page down)

That's it! You should now be able to change connections (IRC, AIM, etc) by holding down fn and pressing delete. To scroll through your buddies, or through channels on IRC, simply hold fn and press home or end. To page up and down through the conversation window, use fn and page up or page down.

You can find my addition of this information to the NaimWiki here. If you have your own tips for using iTerm, please let me know!

Recovering from power outages with a Linux Mac Mini

My Debian GNU/Linux server Pluto, which is located in my apartment in Cambridge, is running on a Mac Mini (PowerPC). Over the past few days, I've had several power outages. When the power comes back on, my Windows computer turns back on and, if I need to, I can remotely connect to it from the office. Pluto however, does not automatically turn back on. I need to physically turn it on when I get home from work. This is not acceptable!

On a PC, there is a BIOS option called PWRON After PWR-Fail. This simply turns the computer back on if the power goes out while it is running. Great, but the Mac Mini doesn't have a standard BIOS; it has OpenFirmware! I did lots of Googling and came up with solutions specific to Mac OS X, but that doesn't help me since I'm running Linux. I even discovered the command line utility pmset which can be used to modify power management settings from within OS X (and a nifty option called autorestart which causes the Mac to automatically restart after power failure). I thought maybe I could find the pmset utility for Linux and install that, but that turned up nothing as well.

Eventually, I found the answer in this forum post on an Ubuntu forum. It's amazing how the Ubuntu operating system has created such a huge wealth of information for the Linux community. This huge pool of questions and answers has made finding solutions to common (or not so common) Linux issues much easier over the past few years.

As root, execute the following command:

echo 'server_mode=1' > /proc/pmu/options

You can confirm the changes have been made by running:

cat /proc/pmu/options

If server_mode=1, then you're all set. You can try unplugging the power from your Mac Mini, waiting a few minutes, and plugging it back in. The Mini should turn on as soon as you plug in the power.

Kill Inactive and Idle Linux Users

Every once in awhile the SSH connection to my Linux server will die and I'll be left with a dead user. Here's how I discover the inactive session using the w command:

 15:26:26 up 13 days, 23:47,  2 users,  load average: 0.00, 0.00, 0.00
USER     TTY      FROM              LOGIN@   IDLE   JCPU   PCPU WHAT
raam     pts/0    wfc-main.wfcorp. Mon10    2days  0.04s  0.04s -bash
raam     pts/1    pool-151-199-29- 15:26    0.00s  0.02s  0.01s w

You can easily tell there's an idle user by glancing at the IDLE column; the user in the first row has been idle for 2 days. There are many ways of killing idle users, but here I'll show you a few of my favorites. The bottom line is, you need to kill the parent process created by the idle user when he logged in. There are a number of ways of doing that.

Here is how I discover the parent process using the pstree -p command:

        ├─screen(29380)───bash(29381)───naim(29384)
        ├─scsi_eh_0(903)
        ├─sshd(1997)─┬─sshd(32093)─┬─sshd(32095)
        │            │             └─sshd(32097)───bash(32098)─┬─mutt(32229)
        │            │                                         └─screen(32266)
        │            └─sshd(1390)─┬─sshd(1392)
        │                         └─sshd(1394)───bash(1395)───pstree(1484)
        ├─syslogd(1937)
        └─usb-storage(904)

We need to find the parent PID for the dead user and issue the sudo kill -1 command. We use the -1 option because it's a cleaner way of killing processes; some programs, such as mutt, will end cleanly if you kill them with -1. I can see by looking at the tree where I'm running the pstree command, so I just follow that down the tree until I find a common process (branch) shared by both users; this happens to be sshd(1997).

You can see there are two branches at the point -- one for my current session and one for the idle session (I know this because I'm the only user logged into this Linux server and because I know I should only have one active session). So I simply kill the sshd(32093) process and the idle user disappears.

Of course, if you're on a system with multiple users, or you're logged into the box with multiple connections, using the above method and searching through a huge tree of processes trying to figure out which is which will not be fun. Here's another way of doing it: Looking at the output from the w command above, we can see that the idle users' TTY is pts/0 so now all we need is the PID for the parent process. We can find that by running who -all | grep raam:

raam     + pts/0        May 10 10:45   .         18076 (wfc-main.wfcorp.net)
raam     + pts/1        May 11 15:26   .         1390 (pool-151-199-29-190.bos.east.verizon.net)

Here we can see that 18076 is the PID for the parent process of pts/0, so once we issue kill -1 18076 that idle session will be gone!

Erasing a Disk Using Linux

Here is a really quick way to erase a disk in Linux. Maybe "erase" is the wrong word -- the command actually fills the entire disk with 0's thereby overwriting any existing data. Assuming the disk you want to erase is /dev/hda, here's what you would run:

dd if=/dev/zero of=/dev/hda bs=1M

Technically, this is a better option than simply "deleting" the data or removing the partitions, as those options make it easier to recover data. So, if the FBI is about to raid your little lab and you only have time to run one command, thats what it should be. 🙂

Linux Power on Windows Machines

The other day I needed to update a bunch of links inside several files for a website, which was hosted on a Windows 2000 server (ugh!). I had no idea which files needed to be updated, and there were well over 60 files. You may recall I had to do the very same thing a week earlier, however that website was hosted on a Linux machine.

Then I realized I had installed Cygwin on the Windows 2000 server awhile back, but never got around to using it! I copied and pasted the search and replace command I had used on the Linux machine and pasted it in the Cygwin console, changing the directory to the one I needed to search. Ten seconds later, all the files were updated!

After this event, I have a new found respect for Cygwin.

Recursively Renaming Multiple Files

I needed to rename a bunch of files for a customer at work the other day -- more than 60 files. The files were on a Linux system, so I knew there was an easy way of doing it. A few days ago I used perl to search and replace a piece of text in a several files , so I decided to find a way to do it with perl.

I found the following script on this site:

[perl]
#!/usr/local/bin/perl
#
# Usage: rename perlexpr [files]

($regexp = shift @ARGV) || die "Usage: rename perlexpr [filenames]n";

if (!@ARGV) {
@ARGV = ;
chomp(@ARGV);
}

foreach $_ (@ARGV) {
$old_name = $_;
eval $regexp;
die $@ if $@;
rename($old_name, $_) unless $old_name eq $_;
}

exit(0);
[/perl]

After saving the script to a file called rename (and chmod 755'ing it) I was able to run the following command to change the file extension on all .JPG files from uppercase to lowercase .jpg. To search for all files underneath a particular directory, I used the find command and piped it's output to the rename script:

find /home/customername/content/images/ | rename 's/JPG$/jpg/'

A few seconds later and all the files were renamed! This script is incredibly versatile, as you can pass it any regular expression! A few quirks I found were that you cannot reference the script; you must use it from the directory you stored it in (find / | ~/rename 's/JPG$/jpg/' won't work). This is because the script uses itself (on line 17). This also means if you save the script as something other than rename, you must also modify line 17 of the script.

Installing Apache 1.3 on Debian Etch

I few days ago I setup a new Linux box to use for testing my web development work. The production environment for the site is hosted on a Linux machine, so I wanted to test it in a Linux environment, not a Windows environment (which is where I currently do my development work). So, I decided to setup a Linux box with Samba, map a network drive, and simply work on my site files directly from the Linux server. This way I can just save my changed file, press refresh in my browser, and see the changes. I'll explain more about my actual staging setup in a future post.

I did not find very much, if any, information about how to easily setup Apache 1.3 on a Debian 4.0 (Etch) system. Why do I want Apache 1.3 instead of Apache 2? Because I'd like to replicate the production environment as closely as possible. My web host uses Apache 1.3.37, PHP 4.4.3, and MySQL 4.1.21.

I documented the steps I took to get everything setup here on my Wiki. This is the first time I've used the Wiki to store information that I would normally post here in my blog, and I'm still trying to figure out how I will decide what information goes on the Wiki and what goes on the blog.

The quick answer to getting Apache 1.3 installed on an Etch system is to edit /etc/apt/sources and change etch to sarge. Then run apt-get update and apt-get install apache. You can make sure you’re going to install Apache 1.3.X beforehand by running the following command: apt-cache showpkg apache and checking which version it displays. It should show something like this:

Package: apache
Versions:
1.3.34-4.1(/var/lib/apt/lists/debian.lcs.mit.edu_debian_dists_etch_main_binary-i386_Packages) (/var/lib/dpkg/status)

Easily Replace all Occurrences of a String in Multiple Files Using Linux

This came in handy when I needed to change the IP address used in several links on a customer's site. I simply specified the path to all the web files, and ran a command similar to the one below.

find /path/to/directory -name "*.txt" | xargs perl -pi -e 's/stringtoreplace/replacementstring/g'

Note that you can change *.txt to just * to search inside all files. Also keep in mind the replacement command will be completed recursively (files nested inside directories will also be searched).

Update your Linux PCs to Support the new DST

For most Linux systems, checking for support of the new DST is as easy as running the following command:

zdump -v /etc/localtime | grep 2007

If you see two lines that say Sun Mar 11 and two lines that say Sun Nov 4 then your Linux system is already ready for the new DST.

If your system says it can't find the zdump command, try /usr/sbin/zdump instead. If your system doesn't list those two days, read this article for more information. I was rather surprised that all four of my Linux servers already had support for the new DST, since I don't usually update them.

Changing the default group for a Linux user

I have a couple of bash and PHP scripts I created to checkout a local copy of a specific project, rsync the checked out copy to a staging server, and then remove the checked out files. When I commit something to CVS from Eclipse, it uses the extssh method of connecting to CVS and logs into SSH using the username raam. I discovered that when I create a new file in Eclipse, commit it to CVS, and then run my staging scripts, the staging scripts are unable to checkout and rsync the new file. Why? Because the new file belongs to the raam group, instead of the cvs group.

To solve this problem, I needed to change the default group used when the user raam creates a new file. You can see current group info for yourself using the id command:

raam@mercury:~$ id
uid=1000(raam) gid=1000(raam) groups=1001(cvs),20(dialout),24(cdrom),25(floppy),29(audio), 33(www-data),44(video),46(plugdev),1000(raam)

As you can see from gid=1000(raam), the default group is currently set to raam. This information is stored in the /etc/passwd file:

raam@mercury:~$ cat /etc/passwd | grep raam
raam:x:1000:1000:Raam Dev,,,:/home/raam:/bin/bash

The fourth field holds the default gid. When I ran the id command earlier, I noticed the gid for the cvs group is 1001, so after changing the fourth field for my account in the /etc/passwd file (root access required), I can run the id command again and confirm my default group has changed:

raam@mercury:~$ id
uid=1000(raam) gid=1001(cvs) groups=1001(cvs),20(dialout),24(cdrom),25(floppy),29(audio), 33(www-data),44(video),46(plugdev),1000(raam)

This fixed my problem with the staging scripts, because now every new file committed to CVS automatically has the cvs group and the www-data account which runs those scripts has access to files in the cvs group.

In retrospect, this was probably the wrong (or long) solution to my problem. I should have just added the www-data account to the raam group, so my PHP scripts had access to files I committed to CVS.

Either way, I learned something new! Thanks to tldp.org for this page on File Security, which explains everything I learned.

HOW-TO: Easily Secure any Wireless Connection with SSH

For a long time I had been running a Squid proxy on my Linux server, opening an SSH tunnel to the server from my wireless laptop with the -L3128:127.0.0.1:3128 SSH option to create the local tunnel, and then configuring my browser to use the 127.0.0.1:3128 HTTP proxy. This method worked well for a long time, however it had its disadvantages -- namely the extra configuration involved.

Probably the most difficult was the setup and configuration of the Squid proxy (getting the access rights configured correctly in squid.conf), but equally as challenging was explaining the whole process to someone else -- impossible if they were not familiar with Linux.

Recently, my Squid server stopped working and I wasn't able to use the tunneling method mentioned above to secure my wireless connection while I was at Panera Bread (currently the largest provider of free WiFi in the USA). For this reason, I didn't feel safe logging into my WordPress administration interface to work on a blog entry. So while I was searching for Squid configuration instructions, I came across a much easier way of securing my wireless connection. How simple? This simple: ssh -D 9000 [email protected].

Yes, really that simple. Nothing needed to be configured on the server (besides having the SSH server running, which most Linux installations already have by default). I then opened my browser and configured it to use a SOCKS v5 proxy to localhost using port 9000 and bingo, all web traffic was now encrypted over the SSH connection! I confirmed this by running the netstat command on my Linux server and found several new connections to websites I was browsing on my wireless laptop.

If you're running Windows, and don't have access to the wonderful Linux command line utilities such as SSH, you can download Putty. The latest version, v.59, has support for the -D SSH option. After you download and install Putty, enter the connection details to your SSH server (or find a service that provides a free shell account and allows port forwarding/proxying and use that), then click on Connection -> Tunnels in the options on the left. What you need to do is add a dynamic port. You do this by filling out the Port field and choosing Dynamic. Leave everything else blank and click Add. The screen should look like this right before you click Add:

Once you're done, you can save your connection information and then connect. Once you have logged into your shell account, you will need to configure your web browser to use the tunnel instead of a direct connection. I have included directions for configuring Firefox and Internet Explorer (IE isn't as straight forward as you'd expect, go figure).

In Firefox, simply choose Tools -> Options -> Advanced -> Network Settings. Choose "Manual proxy configuration:" and in the SOCKS Host field enter "localhost". For the port, enter "9000". I choose SOCKS v5 from the options below the SOCKS Host field, but I'm not sure if that matters. Here is what your screen should look like:

For Internet Explorer, it took me a bit of trial and error to get it working properly. Here is what you do. Tools -> Internet Options -> Connections -> LAN Settings. Choose "Use a proxy server for your LAN" and click Advanced. Erase everything in all fields, except the "Socks" and corresponding "port" field. Enter "localhost" in Socks field and "9000" in the port. Here is what the screen should look like:

Click OK all the way out to your browser, press refresh and you should be loading the web page through your secured tunnel!

This is the easiest method of securing a wireless connection I have come across. Using only WEP or WPA encryption is a joke. If someone is interested in your wireless traffic enough to be monitoring it, you can be certain they know how, and will, break your WEP encryption. At home, I use WEP encryption in addition to this method of tunneling, so effectively I have two layers of encryption protecting my traffic. And if I'm accessing a website through HTTPS, that adds yet a third layer of encryption.

Although you can also use this SOCKS connection to encrypt your E-Mail (at least in Mozilla Thunderbird), you can also use the SSH -L option to encrypt specific connections for which you have no local control over. However, I will leave that for the next HOWTO.