There is a great plugin for Eclipse called SQL Explorer, which "is a thin SQL client that allows you to query and browse any JDBC compliant database". I have a local LAMP (or in this case, MAMP) environment setup on my Mac for development purposes. Up until now I have been using phpMyAdmin through an external web browser to view/edit the MySQL database (Eclipse's built-in web browser sucks -- I cannot even copy/paste from it!). Since I do everything else from within Eclipse, moving outside the Eclipse window just to view tables/data in the database really interrupts my work-flow (not to mention the distractions that come with using a web browser 😉 ).
SQL Explorer is really nice, once you get it working. I assumed it would be as simple as downloading the plugin and creating the connection to my local MySQL database -- but that didn't work. You can download and manually install the plugin, but choose to use the built-in Eclipse Install and Update functionality to download and install the plugin. Here is how it's done:
Download and Install Eclipse SQL Explorer Plugin
- From within Eclipse, choose
'Help -> Software Updates -> Find and Install'from the menus - Choose the
'Search for new features to install'option and click Next - Click
'New Remote Site', enter'SQL Explorer'in the Name field and'http://eclipsesql.sourceforge.net/'in the URL field and then click OK - You should now see
'SQL Explorer'in the list of'Sites to include in search' - Uncheck everything except
'SQL Explorer'and click Finish - A new screen should open which allows you to select
'SQL Explorer'. After selecting it, click Next
The SQL Explorer plugin should now be installed and available as a new perspective. You can start using it by selecting it in the Open Perspective list (Window -> Open Perspective -> Other...). Once you have opened the SQL Explorer, you will need to add a new connection. In the Connections tab, click the 'New Connection Profile' icon or right click anywhere inside the empty list and choose it. This will open the 'Create New Connection Profile' window.
This is where there is no documentation explaining what is really needed to connect to a MySQL database. You would think it would be as simple as selecting the MySQL Driver from the list, entering your database connection information and saving the connection. But upon doing this, I received the following error:
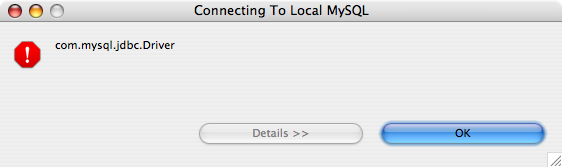
I don't know about you, but I have definitely seen more informative error messages than com.mysql.jdbc.Driver. After a little research, I discovered that we actually need to install the MySQL JDBC driver before using SQL Explorer to connect to a MySQL database. I didn't see this information anywhere in the SQL Explorer documentation or on the website. The fact that the Create New Connection window shows me a huge list of database drivers to choose from is very misleading!
Before we add the new driver, we need to download the MySQL JDBC Connector. You will want to copy the mysql-connector-java-5.0.8-bin.jar file somewhere permanent, since the new driver we create will look for for this file whenever we connect to a MySQL database.
Download Connector and Create MySQL JDBC Driver
- Download the MySQL JDBC Connector, extract and save the
mysql-connector-java-5.0.8-bin.jarfile some place permanent (I stored it in my/Applications/Eclipse/directory) - Open the
'Create New Connection Profile'window in SQL Explorer, click the New Driver button - On the
'Create New Driver'screen fill in the Name field with something like'MySQL JDBC Driver' - In the Example URL field fill in the following:
jdbc:mysql://[<:3306>]/ - Click the Extra Class Path button
- Click Add and then select the
mysql-connector-java-5.0.8-bin.jarfile you downloaded - Click the List Drivers button. This should automatically fill in the Driver Class Name field at the bottom with
'com.mysql.jdbc.Driver'
At this point, you should have a window that looks like this:
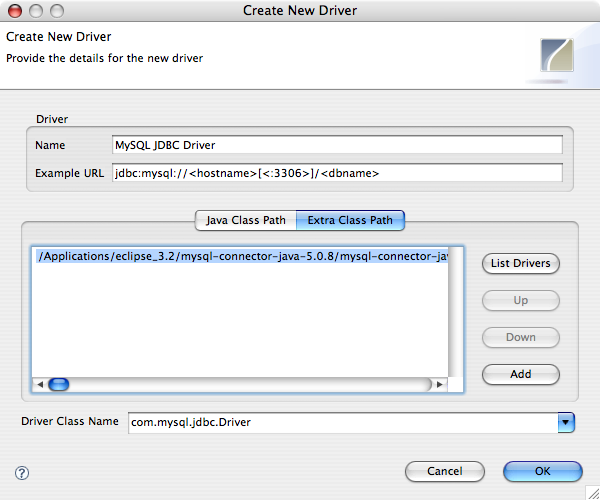
Click the OK button. This will bring you back to the 'Create New Connection Profile' window. Now you should be able to select your new 'MySQL JDBC Driver' from the list of drivers, fill in the URL field with something like 'jdbc:mysql://localhost:3306/test_database', and enter your MySQL Username and Password details (if you're using MAMP, the defaults are root/root). Click OK and then double click on the new connection in the Connections list. Assuming your MySQL database is running and the connection details are correct, you should see the Database Structure tab populate and allow you to view the contents of your database.
For those who might want to know exactly what versions of software I am using, here is the list:
Mac OS X 10.4.10 on a MacBook Pro
Eclipse 3.2.2
SQL Explorer plugin 3.0.0.2006
MySQL JDBC Connector 5.0.8
I've only started to explore the possibilities of what can be done with SQL Explorer, but I can already tell it will make my development process much smoother. I was surprised that there wasn't more readily available documentation explaining how to do what I have explained here, but hopefully someone will find this mini-tutorial useful.
Thanks for writing this and posting it on the sql explorer forums – very useful!
You’re welcome! 🙂
Thanks for the info Raam! An addition:
In order to connect using MAMP Pro, deselected “Allow local access only” in the MySQL Tab and restart the servers.
Thanks Nicolas!
Thank you a lot! I used this how-to with windows, its the same.
On the SQL Explorer Page i searched in vain for such a simple thing, a newbe doesn’t know 🙂
You’re welcome Franc! I’m glad you found my little tutorial helpful!
Great tutorial! Thanks. Works the same in OS X and Windows, like Franc Walter mentioned.
You can also edit the MySQL Driver that comes with Eclipse SQL Explorer instead of creating a new driver.
Preferences > SQL Explorer > JDBC Drivers > Edit MySQL Driver > Add Extra Class Path > List Drivers > OK
Awesome! Thanks for the note about using the MySQL Driver that comes with SQL Explorer, Justin.
I found the tutorial very helpful. Thanks a lot!
You’re welcome josephdietrich! Glad I could help!
Thanks Ramm. I’m new to eclipse and was having a hard time understanding the driver setup. Your article was a great help.
You’re welcome, Mark! Glad I could help! 🙂
Thanks very much for this, I’m amazed there isn’t any adequate documentation
You’re welcome, John!
Very helpful even after a couple of years. Great simple write up.
Thanks MK_Dev! 🙂
Great stuff, Raam. Succint and helpful!
Thanks, Ivy! Glad I could help. 🙂
gr8 …it was really helpfull ..thanx
Glad I could help, Prateek! 🙂
This was extremely helpful for a mac user like me!
Glad I could help, Sandi! 🙂
amazing … !!!
Glad you found this useful, Dayler. 🙂
Great post, really usefull! Thanks
You’re welcome! I’m glad you found this helpful. 🙂
Hello ,
your post was very helpful , I am getting some error when i try to connect the database .
Cannot connect to mydatabase/anonymous . Check your URL
Access denied for user “@’localhost’ to database ‘mydatabase’
Hi Manideep,
It sounds like you’re using the wrong authentication credentials. I suggest double-checking the credentials and trying again.