Safari 4 Beta

The new Safari 4 Beta web browser seems just as fast as the reviews are saying (42x faster than IE7; 3.5x faster than Firefox) and some of the new features are pretty cool: cover flow for bookmarks, CSS animation (now part of WebKit), and even 3D animation using the new HTML5 canvas element. I'm eagerly awaiting a Mac release of the Google Chrome browser to compare with Safari 4. (In the meantime there's always CrossOver Chromium, a Mac & Linux port of Google Chrome.)

Installing rTorrent on OS X Leopard (10.5) using Fink

I've been using Transmission as a BitTorrent client on my MacBook Pro for a while now, but after setting up rTorrent on my Linux server earlier today and seeing how awesome it was, I just had to install it on my laptop as well. I absolutely love text-based applications!

The easiest way to install rTorrent is by using Fink or MacPorts. (Both of these tools allow you to download software that has been ported from Unix/Linux to Mac OS X.) I'll use Fink since I'm a fan of Debian Linux and Fink uses the Debian dpkg and apt-get package management tools.

Apparently there is no Fink binary available yet for OS X Leopard (10.5), so it must be compiled from source. These directions (which also contain instructions for setting up rTorrent on earlier versions of OS X) helped explain the overall process presented here. Since you'll need to compile from source, you will need to have Xcode installed (a set of development tools from Apple).

The basic steps for setting up Fink are as follows:

  1. Download the latest Fink source
  2. Open up a terminal (Applications -> Utilities -> Terminal.app) and run the following commands
  3. $ cd /path/to/download/directory
  4. $ tar xvzf fink-x.xx.x.tar.gz
  5. $ cd fink-x.xx.x
  6. $ ./bootstrap
  7. You will now be presented with several questions. Answer using the defaults (press Enter) for everything except the question about whether you want to enable the unstable tree; you must answer Yes to this question (see here if you accidentally missed this step).
  8. When the script finishes, run /sw/bin/pathsetup.sh
  9. For good measure, run apt-get update

Great! Now that Fink is installed, installing rTorrent is really easy:

$ fink install rtorrent

You might be notified that a bunch of extra packages need to be installed (there were 46 needed on my system!) so just choose Yes. After the packages have been downloaded and compiled (this might take a while) rTorrent should be on your system and ready to use.

Getting Started with rTorrent

rTorrent

You can launch rTorrent by simply running rtorrent in a Terminal, but before you get started you should look over the man page (man rtorrent) and then set up a configuration file (~/.rtorrent.rc). There are only four lines in my configuration file (check the man page to see what these do):

port_range = 26000-26999
directory = ~/downloads/torrents/
session = ~/downloads/torrents/sessions/
encryption = allow_incoming,try_outgoing,enable_retry

If you're interested in a lot more options, you might want to grab a copy of the sample .rtorrent.rc config file (why this wasn't included in the package, I don't know) and place it in your home directory.

The rTorrent User Guide has information about all the stuff on the screen as well as various commands to navigate the interface.

Using the wonderful screen utility, rTorrent becomes even more powerful on remote systems. I leave rTorrent running on my server and whenever I remotely SSH into the box I can then reattach the screen session that rTorrent is running inside of and instantly have access to it!

Instantly Preview Files in OS X using Quick Look

I discovered this feature as I discover many new things in OS X: entirely by accident. While I had a file on my desktop selected, my wrist accidentally hit the space bar on the keyboard. Instantly a quick preview window popped up giving me a preview of the image:

Mac OS X Quick Look

The feature, known as Quick Look, is one of the more than 300 new features in OS X Leopard (10.5). Quick Look also works on text files, documents, PDF files, and even HTML and PowerPoint. This method of previewing files is so much easier than opening them in their native application! (It's more than a preview though, since you can also scroll through the pages for multi-page documents.) Closing the preview window is as easy as pressing Esc, or you can simply select another file with the preview open and it will preview the newly selected file.

HOWTO: Remove Google Software Update on Mac OS X

A few days ago I wrote about how evil Google secretly installed software update on my computer. Well, even worse than that, when I choose to continue with the update it gives me this message:

Updates Unsuccessful

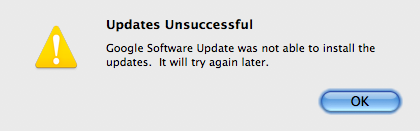
So every other day for the past two weeks I have been prompted to update the Google Talk plugin, and every single time I choose OK this same error message pops up. I had planned to leave the software update installed, but since it's not working and it's really starting to bug me, I'm removing it.

According to some discussion on Google Groups, the Google Software Update can only be removed by uninstalling any plugins associated with it (Google Earth, Google Talk, etc). Well that's not fair. I never installed any plugins to begin with! Time to do it the hacky way.

Hidden away on a page labeled "What is Google Software Update?", Google provides the single command you need to run to uninstall Google Software Update from your entire system:

sudo /Library/Google/GoogleSoftwareUpdate/GoogleSoftwareUpdate.bundle/Contents/Resources/GoogleSoftwareUpdateAgent.app/Contents/Resources/install.py --uninstall

NOTE: Make sure the --uninstall portion of the command actually has two dash characters. It's possible your browser replaced the two dashes with a single dash character.

If you have something like the Google Gears plugin installed in your browser, you should either uninstall the Gears plugin or use it with caution. The Google Software Update is meant to help keep your Gears plugin (and other plugins) updated with any new security patches. Of course, if the Software Update isn't working, then it's really nothing more than an annoying nag screen.

UPDATE 2016-01-27: this comment has several links that may contain more up-to-date information.

UPDATE 2016-02-25: It appears this is the most recent command that seems to work:

sudo ~/Library/Google/GoogleSoftwareUpdate/GoogleSoftwareUpdate.bundle/Contents/Resources/ksinstall --nuke

Removing the Update Engine from your Home Directory

Several commenters mentioned the update engine was installed in their home directory. If the update engine was installed on a per-user basis (as opposed to system-wide), then use this command instead:

~/Library/Google/GoogleSoftwareUpdate/GoogleSoftwareUpdate.bundle/Contents/Resources/GoogleSoftwareUpdateAgent.app/Contents/Resources/install.py --uninstall

NOTE: Make sure the --uninstall portion of the command actually has two dash characters. It's possible your browser replaced the two dashes with a single dash character.

Update: A commenter mentioned that if the install.py file is not found, you can try running the following command instead:

/Library/Google/GoogleSoftwareUpdate/GoogleSoftwareUpdate.bundle/Contents/Resources/GoogleSoftwareUpdateAgent.app/Contents/Resources/ksinstall --uninstall

Preventing Google Earth from Reinstalling the Update Engine

A commenter provided this solution for preventing Google Earth from reinstalling the update engine:

Google Earth reinstalls the software updater when it’s launched. To prevent this I created an empty file at ~/Library/Google/GoogleSoftwareUpdate, then transferred ownership to root and made it read-only for normal users:

touch ~/Library/Google/GoogleSoftwareUpdate
sudo chown root ~/Library/Google/GoogleSoftwareUpdate
sudo chmod 644 ~/Library/Google/GoogleSoftwareUpdate

Update: As one commenter mentioned, Google now has a page relevant to this discussion.

Update: It appears that at least some of Google's software now gives you the option for disabling the installation of the automatic update engine during the setup process. See this blog post for an explanation.

It appears that now you can plug this into your terminal to disable Google Software Updater from checking for updates:

defaults write com.google.Keystone.Agent checkInterval 0

Google Update Uninstaller Tool

Viktor Petersson from Wireload notified me of a tool they put together to make uninstalling the Google Update engine really simple. If you don't feel comfortable with the command line, download the Google Update Uninstaller.

HOWTO: Show the Full Path in Finder's Title

An annoying feature of the OS X Finder is that it doesn't show the full path of the folder you're currently browsing -- it only shows the name of the folder in the title. I like seeing the entire path of the folder because I do a lot of stuff from the command line, so as you can imagine I was thrilled to discover an easy fix to this problem.

Simply open the terminal (Applications -> Utilities -> Terminal.app) and run the following command:

defaults write com.apple.finder _FXShowPosixPathInTitle -bool YES

You'll then need to restart Finder by either rebooting or running the killall Finder command. Now Finder will show the full path in the title!

Path in Finder's Title

If for some reason you want to revert back to seeing only the folder name (I can't imagine why you would), simply repeat the process and change YES to NO at the end of the command.

HOWTO: Disable OS X Window Drop Shadow for Screenshots

One of the awesome features of OS X is the built-in screenshot mode. It allows you to easily select areas of the screen to capture (press Cmd+Shift+4 to activate screenshot mode), or select an entire window to capture (while in screenshot mode, press the spacebar to switch to window-capture mode).

I frequently post screenshots on this blog and I hated that the window screenshots included the drop shadow added by OS X around the window. This meant the width of the resulting screenshot was actually 50px bigger all the way around.

Luckily, there is a way to disable the drop shadow when taking screenshots. Simply open the terminal (Applications -> Utilities -> Terminal.app) and run the following command:

defaults write com.apple.screencapture disable-shadow -bool true

Now logout (or reboot) and when you login again your screenshots won't include the drop shadow! For more helpful shortcuts and commands for screenshots in OS X, check out Taking Screenshots in Mac OS X.

Evil Google Secretly Installs Software Update

I was shocked to see this Google Software Update window on my Mac this morning asking me to install an update to the Google Talk Plugin:

Google Software Update

First of all, I had never seen this update window in my life and I never approved the installation of any such Software Update Engine! Secondly, what Google Talk Plugin is it talking about? As far as I can remember, I never installed a GTalk plugin. I use Adium for chatting on GTalk and I never had to install a plugin to use Google Talk! Maybe the update engine is trying to update the GTalk plugin that came with Adium?

There are some other people who are also quite annoyed by this secret update engine installation. Apparently the update engine is fully open-source, but there is no uninstall program. To uninstall it, you must unregister applications that are using it and wait a day for it to automatically uninstall itself. How ugly.

Mounting HFS+ with Write Access in Debian

When I decided to reformat and install my Mac Mini with the latest testing version of Debian (lenny, at the time of this writing) I discovered that I couldn't mount my HFS+ OS X backup drive with write access:

erin:/# mount -t hfsplus /dev/sda /osx-backup
[ 630.769804] hfs: write access to a journaled filesystem is not supported, use the force option at your own risk, mounting read-only.

This warning puzzled me because I was able to mount fine before the reinstall and, since the external drive is to be used as the bootable backup for my MBP, anything with "at your own risk" was unacceptable.

I had already erased my previous Linux installation so I had no way of checking what might have previously given me write access to the HFS+ drive. A quick apt-cache search hfs revealed a bunch of packages related to the HFS filesystem. I installed the two that looked relevant to what I was trying to do:

hfsplus - Tools to access HFS+ formatted volumes
hfsutils - Tools for reading and writing Macintosh volumes

No dice. I still couldn't get write access without that warning. I tried loading the hfsplus module and then adding it to /etc/modules to see if that would make a difference. As I expected, it didn't. I was almost ready to give up but there was another HFS package in the list that, even though it seemed unrelated to what was trying to do, seemed worth a shot:

hfsprogs - mkfs and fsck for HFS and HFS+ file systems

It worked! I have no idea how or why (and I'm not interested enough to figure it out), but after installing the hfsprogs package I was able to mount my HFS+ partition with write access.

Update:

As Massimiliano and Matthias have confirmed in the comments below, the following solution seems to work with Ubuntu 8.04:

From Linux, after installing the tools suggested before, you must run:
mount -o force /dev/sdx /mnt/blabla

Otherwise, in my fstab, I have an entry like this:
UUID=489276e8-7f9b-3ae6-8c73-69b99ccaab9c /media/Leopard hfsplus defaults,force 0 0


Creating a Bootable OS X Backup on Linux: Impossible?

I've had plans for a while now to set up a backup system using a Debian Linux server and rsync to back up my MacBook Pro laptop. At first glance, it seemed like it would be pretty straight forward. I've been able to make a bootable copy of my entire MBP using nothing but rsync (thanks to some very helpful directions by Mike Bombich, the creator of the popular, and free, Carbon Copy Cloner software). And by bootable copy I mean I could literally plug in the USB drive and boot my MBP from the drive (hold down the Alt/Option key while booting). Restoring a backup is as simple as running the rsync command again, but in the reverse direction. I know this solution works because I used it when I upgraded to a 320GB hard drive.

To start, I needed to create a big enough partition on the external USB drive using Disk Utility (formatted with Mac OS Extended (Journaled)). I then made a bootable copy of my MBP with one rsync command:

sudo rsync -aNHAXx --protect-args --fileflags --force-change
--rsync-path="/usr/local/bin/rsync" / /Volumes/OSXBackup

But my dream backup system was more unattended. I wanted something that would periodically (a couple times a day) run that rsync command over SSH (in the background) and magically keep an up-to-date bootable copy of my MBP on a remote server.

I love Linux and I jump at any opportunity to use it for something new, especially in a heterogeneous network environment. So when I decided to set up a backup server, I naturally wanted to make use my existing Debian Linux machine (which just so happens to be running on an older G4 Mac Mini).

So, after making a bootable copy of my MBP using the local method mentioned above, I plugged the drive into my Linux machine, created a mount point (/osx-backup), and added an entry to /etc/fstab to make sure it was mounted on boot (note the filesystem type is hfsplus):

/dev/sda /osx-backup hfsplus rw,user,auto 0 0

All that's left to do now is to run the same rsync command as earlier but this time specifying the remote path in the destination ([email protected]:/osx-backup/). This causes rsync to tunnel through SSH and run the sync. Unfortunately, this is where things started to fall apart.

OS X uses certain file metadata which must be copied for the backup to be complete (again, we're talking about a true bootable copy that looks no different than the original). Several of the flags used in the rsync command above are required to maintain this metadata and unfortunately Linux doesn't support all the necessary system calls to set this data. In particular, here are the necessary flags that don't work when rsyncing an OS X partition to Linux:

-X (rsync: rsync_xal_set: lsetxattr() failed: Operation not supported (95))
-A (recv_acl_access: value out of range: 8000)
--fileflags (on remote machine: --fileflags: unknown option)
--force-change (on remote machine: --force-change: unknown option)
-N (on remote machine: -svlHogDtNpXrxe.iL: unknown option)

According to the man page for rsync on my MBP, the -N flag is used to preserve create times (crtimes) and the --fileflags option requires chflags system call. When I compiled the newer rsync 3.0.3 on my MBP, I had to apply two patches to the source that were relevant to preserving Mac OS X metadata:

patch -p1 <patches/fileflags.diff
patch -p1 <patches/crtimes.diff

I thought that maybe if I downloaded the source to my Linux server, applied those same patches, and then recompiled rsync, that it would be able to use those options. Unfortunately, those patches require system-level function calls (such as chflags) that simply don't exist in Linux (the patched source wouldn't even compile).

So I tried removing all unsupported flags even though I knew lots of OS X metadata would be lost. After the sync finished, I tried booting from the backup drive to see if everything worked. It booted into OS X, but when I logged into my account lots of configuration was gone and several things didn't work. My Dock and Desktop were both reset and accessing my Documents directory gave me a "permission denied" error. Obviously that metadata is necessary for a viable bootable backup.

So, where to from here? Well, I obviously cannot use Linux to create a bootable backup of my OS X machine using rsync. I read of other possibilities (like mounting my Linux drive as an NFS share on the Mac and then using rsync on the Mac to sync to the NFS share) but they seemed like a lot more work than I was looking for. I liked the rsync solution because it could easily be tunneled over SSH (secure) and it was simple (one command). I can still use the rsync solution, but the backup server will need to be OS X. I'll be setting that up soon, so look for another post with those details.

Accessing the VMWare Fusion BIOS

As noted in the Known Issues section of the VMWare Fusion Release Notes, the VMWare Fusion BIOS goes by way too fast to give you a chance to access it. The only way you can access it is by modifying the .vmx configuration file for the VM:

The VMware Fusion BIOS posts too quickly to access.

Most users will not need to access the BIOS, but advanced users might want to do so, to change the boot order, set a boot password, or enable a second floppy drive. To work around this problem, use a text editor to add the following line to the configuration (.vmx) file of the virtual machine:

bios.forceSetupOnce = "TRUE"

The next time you boot up the virtual machine, it will automatically boot into the BIOS. This configuration option then reverts to FALSE. You must set the option to TRUE each time you want to boot the virtual machine into the BIOS.

Having trouble finding the .vmx file?

You cannot edit the .vmx file by opening it with Finder. You need to use the Terminal to edit the file. Here's how you do that:

Launch Terminal (Applications -> Utilities -> Terminal.app) and navigate to the folder (or directory) where your Virtual Machines are stored. To do this, you use the "cd" command. For example, my Virtual Machines are stored in Documents -> Virtual Machines, so I type the following to change into that directory: cd Documents/Virtual Machines/ and then press Enter.

Now you need to change into the directory that matches the name of your Virtual Machine. For example, let's say it's called "Windows XP" -- you would type cd Windows XP/. (Note that you have to "escape" spaces in the folder name by preceding them with a backslash.)

Once you're there, you can use the "ls" command (that's a lowercase L) to list the contents of that folder. You should see the .vmx file you're looking for. Now to edit that file in TextEdit, simply run the following command: open -e *.vmx.

That's it! Now you can edit the file as described above to enable the BIOS.

Backup-Bouncer

I haven't tried it yet, but Backup-Bouncer looks like a very useful tool for verifying backup methods (it doesn't actually verify backups, but rather the accuracy of a backup method's ability to copy OS X metadata). The latest version of rsync (v3.0.3) passes Backup-Bouncer with flying colors when tested with this command: sudo rsync -aNHAXx –protect-args –fileflags –force-change /Volumes/Src/* /Volumes/Dst/test

Accidentally Using an Old Version of rsync

Last night I discovered I had been using an old version of rsync that did not use SSH by default! Something happened during my upgrade to Leopard that switched the default rsync from /usr/bin/rsync (v2.6.9) to an old version that must have been installed by fink in /sw/bin/rsync (v2.5.5)! I discovered the problem after a simple rsync command failed and I ran the command again with the -vv flags (to get a more verbose output). Sure enough, it was running with RSH and not SSH! Even the man page said RSH was the default! (On the upside, the suddenly broken PHP script I had written to help with deploying web projects, and which utilizes rsync over SSH, is not really broken after all.)

HOWTO: Create an ISO Image from a CD in Mac OS X

Insert the CD you want to create an ISO image from into your CDROM/DVD drive and then launch Disk Utility (Applications -> Utilities -> Disk Utility). Select the CD underneath the drive listed on the left and then click New Image in the tool bar at the top.

Disk Utility

On the Save As dialog, enter a name for your ISO image and choose the location where you want to save the file. Change the Image Format from compressed to DVD/CD master (compressed will save the file as a DMG image). In the example below, I use example as the filename.

Disk Utility Save As Dialog

Disk Utility will create the disk image with the .cdr extension, even though the image itself is identical to a .iso image1.

Disk Utility Creating Disk Image

When Disk Utility is finished, you can browse to the file with Finder and rename the file from example.cdr to example.iso.

Rename CDR to ISO

The ISO image can then be distributed and burned on any system (I tested this by burning the resulting ISO on a Windows XP machine using the free DeepBurner application).

Not a true ISO image?

I have read that the resulting ISO image is not a "true" ISO-9660 filesystem and that you can use the following command to convert DMG images (leave the Image Format as compressed to create a DMG image in Disk Utility) into *real* ISO images using the following command:

[sourcecode language="bash"]
hdiutil makehybrid -o example example.dmg
[/sourcecode]

This will convert example.dmg into example.iso. However, after burning the resulting ISO image on a Windows machine the CD was not bootable. Using the renaming method I described above, the CD was bootable and Windows was able to see the contents of the CD without any problems.

I looked over the man page for hdiutil and even tried some of the examples to convert a DMG to a *true* ISO file:

[sourcecode language="bash"]
hdiutil makehybrid -o example.iso example.dmg -iso -joliet
[/sourcecode]

But after burning the resulting ISO to a CD, I discovered the CD was again not bootable. Maybe I'm missing something and someone can enlighten me. Until then, I will continue creating a .cdr image and renaming it to .iso.

Could this be the future of touchpads?

Future MacBook Pro Touchpad?

A multi-touch color screen touchpad using the same touchscreen as the iPhone? It could replace the OS X dock and provide a whole new method of interacting with your computer! Fingerprint security device, electronic signature pad, an electronic sketch pad for better photo editing accuracy... the possibilities are endless!

iCal Missing AM/PM Option? Change to 24-hour Mode!

Am I crazy or is there no way to make iCal show AM/PM when editing a calendar entry?

iCal Missing AM/PM Option

The AM/PM option IS there, because if I use the arrow key to move over to next field, there's a hidden AM/PM field which I can change. However, unless I know what it's already set to, I have no way of knowing what I'm changing it to. Very annoying.

My fix for this is to simply use 24-hour mode, which I already use on my main system clock anyway. (By the way, if you have trouble converting 24-hour time to 12-hour time, you might want to check out my post on Learning to Interpret Military Time.) Unfortunately, enabling the "Use a 24-hour clock" option in the Date & Time settings does not enable 24-hour clock mode in iCal. To do this, you must modify the International settings (!?).

System Preferences -> International -> Formats -> Times -> Customize

Changing time format

From here, you can select and delete the AM/PM option from the white field and then click the little arrow on the hour field to change it's format to 24-hour (this screen is very non-intuitive for something made by Apple). I made the changes to Short, Medium, Long, and Full time formats and then clicked OK and WHAM! iCal showed 24-hour time and made it possible to easily change the time on an entry.

iCal 24-hour format

Unable to connect using Sprint U727 on Leopard – FIXED

After so many hours trying to fix the damn U727 USB Sprint card, I finally have it working again. It was working fine up until about a week ago when it mysteriously stopped working. I was getting all kinds of messages, including "Unable to connect" and several seemingly useless messages in /var/log/ppp.log: "Connect script failed", "LCP: timeout sending Config-Requests", "CCLExit: -6021 (No carrier.)", and "CCLExit: -6019 (Modem error, modem not responding.)".

I finally came across this post that included a list of steps which billio discovered fixed the problem for him. I am re-posting his steps here (I hope he doesn't mind):

1. Remove the Novatel USB device.

2. Download the latest driver package for Mac OS X from Sprint. It says it is for Tiger (10.4) but it seems to work.

3. Delete (sudo rm -rf) all the Novatel files from /System/Library/Extentions. Reboot.

4. Run the mpkg installer for the Sprint drivers.

5. Reboot.

6. Open Network Preferences; plug in the Novatel device; click “+” and add “Novatel CDMA” device.

7. Click “Advanced” button. Change vendor to Novatel and Model to CDMA.

8. Click “Connect” and it works.

And I couldn't believe it, but that actually worked! (I'm writing this post using the Sprint card right now.) You can find the Sprint drivers here (select MAC OS from the drop down and download the Sprint SmartView software).