Personalizing the WordPress Comment Reply Link

The default WordPress Comment Reply link, which shows up when threaded comments are enabled, is not very personalized. Every comment gets the same plain link that says "Reply":

Comment Reply Link without Comment Author Name

Every now and then I will get someone who accidentally presses one of those reply links thinking they're leaving a new top-level reply for the post.

That might seem like a silly mistake, but it helped me to realize that if the comment reply link included the name of the person you're replying to, it would be more difficult to make that mistake.

We should do anything we can to remove ambiguity. Besides, personalized comment reply links are just plain cool.

It took me a bit of digging around but I finally came up with a solution. Add the following code to the bottom of your theme's functions.php file:

/*
 * Change the comment reply link to use 'Reply to <Author First Name>'
 */
function add_comment_author_to_reply_link($link, $args, $comment){

    $comment = get_comment( $comment );

    // If no comment author is blank, use 'Anonymous'
    if ( empty($comment->comment_author) ) {
        if (!empty($comment->user_id)){
            $user=get_userdata($comment->user_id);
            $author=$user->user_login;
        } else {
            $author = __('Anonymous');
        }
    } else {
        $author = $comment->comment_author;
    }

    // If the user provided more than a first name, use only first name
    if(strpos($author, ' ')){
        $author = substr($author, 0, strpos($author, ' '));
    }

    // Replace Reply Link with "Reply to <Author First Name>"
    $reply_link_text = $args['reply_text'];
    $link = str_replace($reply_link_text, 'Reply to ' . $author, $link);

    return $link;
}
add_filter('comment_reply_link', 'add_comment_author_to_reply_link', 10, 3);

This code also takes into account the fact that some people might use more than a first name when they leave a comment. Having their whole name in the reply link would just look weird, so the code only uses the first name.

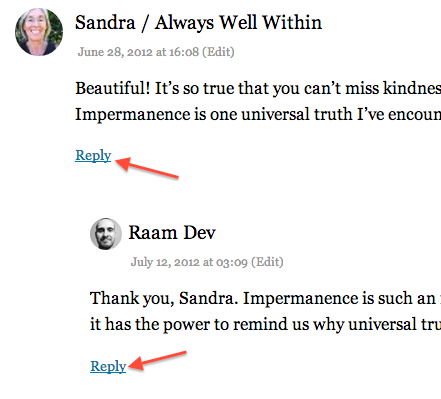
Here's what the comment reply links look like with the above code implemented:

Comment Reply Link with Comment Author Name

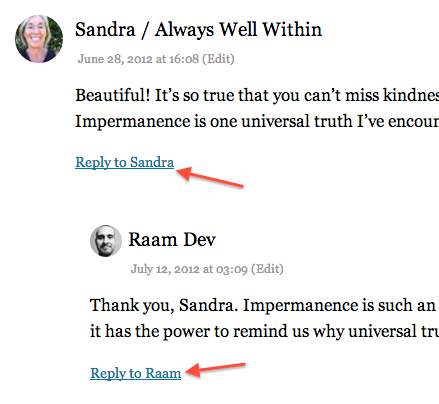
And that's it! You can see this code in action on my site in the comments section. (Check out this post for a ton of threaded comments.)

Supporting Translations

A commenter pointed out that you can modify the code as follows to support translations:

If you're like me and using WordPress language files to translate the site change this line:
`$link = str_replace($reply_link_text, 'Reply to ' . $author, $link);`
to
`$link = str_replace($reply_link_text, __( 'Reply', 'nameofyourtheme' ).' '. $author, $link);`

the `nameofyourtheme` string has to match the textdomain in your language file, in my case Im using the `twentytwelve` theme so I'll just type:

`$link = str_replace($reply_link_text, __( 'Reply', 'twentytwelve' ).' '. $author, $link);`

Please note that the `.' '.` is added to get a space between the your `"Reply"` string and `$author` variable.

Personalizing the Cancel Reply link

If you'd like to also personalize the 'Click here to cancel your reply' link to instead say "Cancel Reply to [author]", you can use the following code:

/*
 * Change the comment reply cancel link to use 'Cancel Reply to 
 */
function add_comment_author_to_cancel_reply_link($formatted_link, $link, $text){

    $comment = get_comment( $comment );

    // If no comment author is blank, use 'Anonymous'
    if ( empty($comment->comment_author) ) {
        if (!empty($comment->user_id)){
            $user=get_userdata($comment->user_id);
            $author=$user->user_login;
        } else {
            $author = __('Anonymous');
        }
    } else {
        $author = $comment->comment_author;
    }

    // If the user provided more than a first name, use only first name
    if(strpos($author, ' ')){
        $author = substr($author, 0, strpos($author, ' '));
    }

    // Replace "Cancel Reply" with "Cancel Reply to "
    $formatted_link = str_ireplace($text, 'Cancel Reply to ' . $author, $formatted_link);

    return $formatted_link;
}
add_filter('cancel_comment_reply_link', 'add_comment_author_to_cancel_reply_link', 10, 3);

Including Custom Post Type in Default WordPress RSS Feed

To control what post types show up in the default WordPress RSS feed, you can add a function to your themes functions.php file (if one doesn't exist, create it in your theme folder) to control what is returned when the RSS feed is requested.

function myfeed_request($qv) {
	// If a request for the RSS feed is made, but the request
	// isn't specifically for a Custom Post Type feed
	if (isset($qv['feed']) && !isset($qv['post_type'])) {
		// Return a feed with posts of post type 'post'
		$qv['post_type'] = array('post');
	}

	return $qv;
}
add_filter('request', 'myfeed_request');

If we wanted to modify this so that the default feed includes 'post' and a entries from Custom Post Type 'thoughts', we can modify the function as follows:

function myfeed_request($qv) {
	// If a request for the RSS feed is made, but the request
	// isn't specifically for a Custom Post Type feed
	if (isset($qv['feed']) && !isset($qv['post_type'])) {
		// Return a feed with posts of post type 'post' and 'thoughts'
		$qv['post_type'] = array('post', 'thoughts');
	}

	return $qv;
}
add_filter('request', 'myfeed_request');

PHP Session Permission Denied Errors with Sub-Domains and IE7 or IE8

I encountered a strange problem with IE7 and IE8 where if I visited `example.com` first and then visited `sub-domain.example.com`, Apache would return Permission Denied errors errors when trying to access the PHP session files for `sub-domain.example.com`.

After some investigation, it appears this is a problem with the way IE7 and IE8 request session data from Apache, or possibly because IE7 and IE8 have a non-standard way of announcing the domain they're requesting session data for.

Here's my scenario:

I'm running Apache 1.3 with two domains, each has their own account with their own users:

    Domain: mycompany.com
    Session path: /tmp/
    Webserver user: mycompanycom

    Domain: support.mycompany.com
    Session path: /tmp/
    Webserver user: nobody

Here is what happens during a normal visit with Firefox/Safari/Chrome:

  1. I visit `mycompany.com` and session file is created in /tmp/ owned by the user mycompanycom
  2. I then visit `support.mycompany.com`, and second session file is created in /tmp/ owned by user nobody
  3. Apache doesn't get confused and the correct session files are returned

However, here's what happens during a visit with IE7 and IE8:

  1. I visit `mycompany.com` and a session file is created in /tmp/ owned by the user mycompanycom
  2. I then visit `support.mycompany.com` and, instead of creating second session file in /tmp/ owned by the user nobody as you would expect (and as happens when using Firefox/Safari/Chrome), Apache tries to return the session file for mycompany.com.
  3. The session file for `mycompany.com` is owned by the user mycompanycom, so the web server, running as user nobody cannot access it. Permission is denied.

I searched Google for a solution and came across this question on StackOverflow. Several users suggested creating a separate directory in /tmp/ to separate the stored session data for `support.mycompany.com` from the session data for `mycompany.com` and then telling PHP to store all session data for `support.mycompany.com` in the new directory. This worked perfectly!

Here's what I did. First, create the new session directory (Note: Make sure the new directory resides inside /tmp/!):

    mkdir /tmp/support.mycompany.com
    chown nobody:nobody /tmp/support.mycompany.com

I then added the following to an .htaccess file in the root web directory for `support.mycompany.com`:

    php_value session.save_path '/tmp/support.mycompany.com'

And finally, I removed all existing session data in /tmp/ to ensure the new session path would get used immediately:

    rm -f /tmp/sess_*

And that's it! Now IE7 and IE8 work properly because when visiting `support.mycompany.com`, IE7 and IE8 do not accidentally find session data for `mycompany.com` and try to use it.

I'm fairly certain this problem has to do with how IE7 and IE8 request session data from Apache. They probably first request session data for `mycompany.com` and THEN request session data for `support.mycompany.com`, even though the latter was the only doman entered in the address bar.

Switching to suPHP; What a Mess!

When one of my users reported problems deleting files he had uploaded using a PHP script, I quickly discovered all the files being uploaded were owned by the user running the web server: nobody. This meant only the root user could delete those files.

Apache suEXEC is commonly used to resolve this problem. It allows Apache to run as the user who owns the domain being accessed. This way, files created by PHP would be owned by the user owning the site instead of the default nobody user.

However, Apache suEXEC only works if you're using CGI as the PHP handler. The PHP5 handler on my server was set to use CGI, but I have PHP4 configured as the default PHP version and it was configured to use DSO. When I tried changing PHP4 to use CGI as the handler, most of the domains on my server displayed this:

Warning: Unexpected character in input: '' (ASCII=15) state=1 in /usr/local/cpanel/cgi-sys/php4 on line 772
Warning: Unexpected character in input: ' in /usr/local/cpanel/cgi-sys/php4 on line 772
Parse error: syntax error, unexpected T_STRING in /usr/local/cpanel/cgi-sys/php4 on line 772

OK, that looks like a problem with cPanel. I don't have time to debug cPanel's problems.

suPHP, like suEXEC, is used to run Apache as the user who owns the domain. I decided to try recompiling Apache and PHP with suPHP enabled to see if that would fix the problem.

File Ownership Hell

suPHP worked, except now the sites using PHP sessions were trying to access stored session data in /tmp/ that was owned by the user nobody! So I deleted all the session data and that allowed the PHP sites to create new session data with file ownership of the user owning the domain.

But then I tried accessing my WordPress admin page and started getting permission denied errors in /wp-content/cache/. Same problem: the cache files that had been created before I enabled suPHP were owned by the user nobody and now the user who owns my domain couldn't access them. A quick chown -R raamdev:raamdev /wp-content/cache/ fixed that problem.

Yeah, I could simply chown -R [user]:[user] /home/[user] for each of the users on the server, but there's something about running a recursive command on files I've never seen, and know nothing about, that makes me uncomfortable.

More suPHP Limitations

I was beginning to worry that this was going to be more difficult than simply enabling suPHP and I wondered how many other sites I'm hosting could have similar problems. I tried accessing one of the high priority sites I'm hosting and discovered it was broken and displaying an "Internal Server Error".

After a little research, I discovered that you cannot use php_value directives in .htaccess files with suPHP. The .htaccess file included with (created by?) Joomla! contained this at the bottom:

#Fix Register Globals
php_flag register_globals off

I already knew register_globals was turned off in the global PHP configuration, so I simply commented out that line and the site started working again.

Conclusion

It was at this point that I concluded it was too risky to just blindly enable suPHP while hosting over 50 domains, many of which I am not at all familiar with what's being used or hosted. I will need to take the time to carefully crawl through all the sites making sure their .htaccess files don't contain anything that might disrupt suPHP and then confirm all the sites are still working properly.

Lesson learned: Setup suPHP before you're hosting 50+ domains.

Multiple Query Problems with mysql_query()

I was writing some code earlier today that involved writing data to two separate MySQL tables. The second INSERT statement needed to contain the automatically generated ID (auto_increment) of the first INSERT statement, so I wanted all the queries to run one after another.

Thinking it made the most sense to just build one long query and execute it all at once, I wrote code similar to the following:

// Build a query with multiple INSERT statements
$q = "INSERT INTO sessions VALUES(NULL, '$name', '$desc', '$stime');";
$q .= "INSERT INTO events VALUES(LAST_INSERT_ID(), '$event', '$e_desc');";

// Execute query
mysql_query($q, $conn) or die(mysql_error());

Upon running the code I received this error:

You have an error in your SQL syntax; check the manual that corresponds to your MySQL server version for the right syntax to use near '; INSERT INTO events VALUES(LAST_INSERT_ID(), '24', 'my event1', 'button')' at line 1

So, as I normally do when this kind of problem arises, I echoed the query that was being executed and, hoping to get more information on the error, I ran it directly from phpMyAdmin. Here is the SQL I ran:

INSERT INTO sessions
	VALUES(NULL, 'Raam', 'example', '2008-04-24 21:59:08');
INSERT INTO events
	VALUES(LAST_INSERT_ID(), '24', 'my event1', 'button');

phpMyAdmin says:

Your SQL query has been executed successfully

OK, so my SQL is fine.

I then looked up the mysql_query() function on php.net and found this little tidbit of info:

mysql_query() sends an unique query (multiple queries are not supported) to the currently active database on the server that's associated with the specified link_identifier .

Ah, so multiple queries are not supported with the mysql_query() function. That's most likely a security feature, but quite annoying none the less. The bottom line is, you cannot run multiple queries with mysql_query().

PHP5 has the mysqli_multi_query() function, which does allow you to run multiple queries (I know, I know, I should be coding for PHP5 by now).

Adding CC Recipients With PEAR Mail

I use the PEAR Mail package quite often in projects that require sending email -- either user-generated or system-level notification emails. I recently wrote something at work that required CCing the user a copy of the email. My first thought was that simply adding CC headers with the users' email address would suffice, but that just isn't the case.

Since mail headers can be modified to state anything you want, PEAR Mail doesn't actually use them to to figure out where to send the email (adding the CC header works fine and the users' email address even shows up in the CC field, but they never receive the email).

A comment by Armin Frey that I found on the PEAR bug page for this problem explains what's going on and offers a solution:

[2007-07-06 15:22 UTC] arminf (Armin Frey)

It seems that the Recipients decides where to send the e-mail and the
headers decide how to display it.

The simple solution is that you add all the addresses to $recipients.

Here is the code I used:

$to = '[email protected]';
$cc = '[email protected]';
$recipients = $to.", ".$cc;
$headers['From']    = '[email protected]';
$headers['To']      = $to;
$headers['Subject'] = 'Test message';
$headers['Cc']	    = '[email protected]';
$headers['Reply-To'] = '[email protected]';

$send = $mail->send($recipients, $headers, $body);

The solution works perfectly. Now the email addresses show up in the correct fields and all the recipients receive the email. Unfortunately, this method does not work for BCCing users. I wonder if BCCing is even possible with PEAR Mail or if I'll need to find something else. To Blind CC (aka, BCC) an address, simply add the address to the $recipients, but not to any of the $headers (thanks Jason!).

Amazon S3 HMAC Signatures without PEAR or PHP5

The Amazon S3 proposal for uploading via POST describes how to assemble a policy document that can be used to create a time-sensitive signature. The obvious advantage to this method is that you don't have to worry about someone stealing your secret AWS key or uploading random files without your permission.

Here is the example policy document from the proposal:

{ "expiration": "2007-12-01T12:00:00.000Z",
  "conditions": [
    {"acl": "public-read" },
    {"bucket": "johnsmith" },
    ["starts-with", "$key", "user/eric/"],
    ["content-length-range", 2048, 20971520]
  ]
}

This Policy document is Base64 encoded and the Signature is the HMAC of the Base64 encoding.

The application I am developing at work requires this signed policy method of uploading files to S3, however I needed to do it with PHP4 and preferably without any extra PEAR packages. This posed somewhat of a challenge, as all the tutorials I found on the web explained how to sign the policy using the PEAR Crypt_HMAC package or some feature of PHP5.

I eventually figured it out, and I'm here to show you how. The two functions used were found on the web (I don't remember exactly where) and worked perfectly for my situation.

(Note: I had a lot of trouble saving the contents of the following code in WordPress due to some Apache mod_security settings configured on my server.)

/*
 * Calculate HMAC-SHA1 according to RFC2104
 * See http://www.faqs.org/rfcs/rfc2104.html
 */
function hmacsha1($key,$data) {
    $blocksize=64;
    $hashfunc='sha1';
    if (strlen($key)>$blocksize)
        $key=pack('H*', $hashfunc($key));
    $key=str_pad($key,$blocksize,chr(0x00));
    $ipad=str_repeat(chr(0x36),$blocksize);
    $opad=str_repeat(chr(0x5c),$blocksize);
    $hmac = pack(
                'H*',$hashfunc(
                    ($key^$opad).pack(
                        'H*',$hashfunc(
                            ($key^$ipad).$data
                        )
                    )
                )
            );
    return bin2hex($hmac);
}

/*
 * Used to encode a field for Amazon Auth
 * (taken from the Amazon S3 PHP example library)
 */
function hex2b64($str)
{
    $raw = '';
    for ($i=0; $i < strlen($str); $i+=2)
    {
        $raw .= chr(hexdec(substr($str, $i, 2)));
    }
    return base64_encode($raw);
}

/* Create the Amazon S3 Policy that needs to be signed */
$policy = '{ "expiration": "2007-12-01T12:00:00.000Z",
  "conditions": [
    {"acl": "public-read" },
    {"bucket": "johnsmith" },
    ["starts-with", "$key", "user/eric/"],
    ["content-length-range", 2048, 20971520]
  ]';

/*
 * Base64 encode the Policy Document and then
 * create HMAC SHA-1 signature of the base64 encoded policy
 * using the secret key. Finally, encode it for Amazon Authentication.
 */
$base64_policy = base64_encode($policy);
$signature = hex2b64(hmacsha1($secretkey, $base64_policy));

That's it! This method doesn't require PHP5 and doesn't require any additional PEAR packages.

ERROR 406: Not Acceptable

The other day I was writing a script for work and discovered it wasn't behaving as expected. The web browser didn't give me any helpful information so I decided to use wget to see what the actual error was:

eris:~ raam$ wget --spider -v mysite.com
Connecting to mysite.com|69.16.69.151|:80... connected.
HTTP request sent, awaiting response... 406 Not Acceptable
16:19:28 ERROR 406: Not Acceptable.

Ah ha! ERROR 406: Not Acceptable. After doing some Googling I discovered the problem is related to an optional (though commonly installed) Apache module called mod_security. This module basically acts as a firewall for Apache to help prevent website attacks, specifically attacks through POST submissions.

To disable mod_security, you can place the following line in an .htaccess file on the root of your site:

SecFilterEngine off

I then confirmed that disabling mod_security actually fixed the problem:

eris:~ raam$ wget --spider -v mysite.com
Connecting to mysite.com|69.16.69.151|:80... connected.
HTTP request sent, awaiting response... 200 OK

So as you can see, the quick solution to fixing the Error 406 problem is to disable mod_security altogether using a .htaccess file. However, this leaves me wondering how much security I'm giving up by disabling mod_security.

I was in a hurry when this happened so I didn't spend much time investigating what exactly my script was doing that may have caused mod_security to freak out. Sometimes other applications cause the Error 406 problem, such as WordPress or Mambo, and you really don't have choice except to wait for a fix to be released. Since my own software caused the problem, figuring out why should be easy. I'll post my results when I determine what was.

slGrid: Edit Mode without Add or Delete

I've been customizing slGrid for an application I'm developing at work. One of the things I needed to do was to enable the MODE_EDIT but at the same time prevent additions or deletions.

To prevent deletions, there is an option in /classes/gridclass.php called $editmode_delete, which you can simply set to false to prevent deletions and remove the 'Delete' column. However, this creates another problem: While editing a row, the 'Delete' button and the 'Cancel' button share the same column:

So by disabling deletions, we're giving up our 'Cancel' button. This means the only way to get out of edit mode after clicking the 'Edit' button, is to refresh the page. OK, so thats not the end of the world. Lets continue.

Our next problem is insertions -- we need to prevent users from adding new rows. I saw the $editmode_add option in /classes/gridclass.php, and assumed it would be as simple as changing it to false. But to my surprise, that only removed the 'Add' button, leaving the entire (empty) insertion row at the top of the table:

Well that doesn't make any sense. If there is an option to disable insertions, why leave the unused empty row? After lots of digging I finally found the block of code that needs to be commented/removed to prevent the empty row from loading:

gridclass.php:

						if ($this->mode == MODE_EDIT)
			{
				$insert_row = array();
				$row_index = -1;

				foreach ($this->columns as $column)
					$insert_row[$column->name] = "";

				$this->CreateRow($insert_row, $row_index, $visible_row_index, $table_main);
				$row_index++;
			}

After commenting out that block of code, I finally have what I want; slGrid in Edit Mode without the ability to Add or Delete:

I'm going to be working with slGrid a lot now and I'll be tweaking/customizing it quite a bit. I will be sure to share everything I learn here on my blog for others who may wish to use it.

Comment History with Get Recent Comments Plugin

My Dad and I have been going back and forth quite a bit in the comments on a recent post I wrote about Consumption. This filled up the Recent Comments list on the sidebar rather quickly and I wasn't able to see other recent comments. I realized a comment history or archive page, similar to my post archive page, would be very useful.

After looking around a bit, I found a really nice plugin by Krischan Jodies called Get Recent Comments. It has a ton of features and lots of configuration options. It has been updated as recently as last month and even supports the new widgets feature of WordPress 2.3 (it also works with older versions of WordPress as far back as 1.5).

By default, the instructions included with the plugin explain how to add recent comments to your sidebar. They don't, however, mention anything about creating a comment history page. In the instructions there is a snippet of PHP code which you are supposed to use in the sidebar.php file of your WordPress template. I thought great, I simply need to create a new page in WordPress and add that snippet of code to the page using the runPHP plugin to execute the PHP on that page. This worked, partially. At the top of my comment history was this error:

Parse error: syntax error, unexpected $end in /home/raamdev/public_html/blog/wp-content/plugins/runPHP/runPHP.php(410) : eval()’d code on line 1

I thought perhaps it was because my runPHP plugin was outdated, so I upgraded it to the latest version (currently v3.2.1). I still received the error, so I decided to play around with the snippet of PHP code provided by the Get Recent Comments plugin. I was able to modify it slightly to get rid of the error as well as output some additional text. Here is the snippet of code I use to create my new Comment History page:

<?php
if (function_exists('get_recent_comments')) {
   echo "(Showing 500 most recent comments.)";
   echo "<li><ul>".  get_recent_comments() ."</ul></li>";
}
?>

In the plugin options, I configured the plugin to group recent comments by post. This created a very readable Comment History page. After adding the ID of the new page to the exclude list in my header.php file to prevent the page from showing in the header (wp_list_pages('exclude=704&title_li=' )), I added a 'View comment history' link to the bottom of the Recent Comments list on the sidebar.

The Get Recent Comments plugin is really powerful and I'm a bit surprised that the plugin doesn't include basic instructions about how to create a comment history page. If you receive a decent amount of feedback from your visitors (in the form of comments), this is a great way to see all that feedback on a single page. If you have Trackback's and Pings enabled, this plugin can even show those.

Using wget to run a PHP script

wget is usually used to download a file or web page via HTTP, so by default running the wget http://www.example.com/myscript.php would simply create a local file called myscript.php and it would contain the contents of the script output. But I don't want that -- I want to execute the script and optionally redirect its output somewhere else (to a log file or into an email for reporting purposes). So here is how it's done:

$ wget -O - -q http://www.example.com/myscript.php >> log.txt

According to the wget man page, the "-O -" option is used to prevent wget from saving the file locally and instead simply outputs the result of the request. Also, wget normally produces it's own output (a progress bar showing the status of the download and some other verbose information) but we don't care about that stuff so we turn it off with the "-q" option. Lastly, the ">> log.txt" redirects the output of the script to a local file called log.txt. This could also be a pipe command to send the output as an email.

There is an incredible amount of power behind wget and there are a lot of cool things you can use it for besides calling PHP scripts from the command line. Check out this LifeHacker article for a bunch of cool uses.

phpBB photo-captcha image loading issues

A friend was having trouble with the photo-captcha mod he installed in phpBB. The photo-captcha mod basically presents users with a group of images and asks them to choose all images that fit a certain category (i.e., choose all cars). After installing the mod however (and fixing a couple of silly mistakes), only half of the images would show up. And it wasn't the same images not showing up, it was entirely random.

As is usually the case with debugging, I looked for a working example with which I could compare the non-working one. When I found a working photo-captcha mod, I noticed the images loaded more slowly and consistently than on the non-working example. It was as if the non-working example was on crack, while the working example was practicing yoga.

I compared HTTP headers, checked cache settings, and everything else I could think of, but nothing looked out of the ordinary. So I decided to try something. Why not force the mod to pause between loading each image?

So I opened /forum/includes/usercp_confirm.php and modified it:

$image = $sub;
@imagegammacorrect($image, 1.0, (0.5 + mt_rand(0,1200)*0.001));

header('Content-Type: image/jpg');
header('Cache-control: no-cache, no-store');
@imagepng($image);
// -------- EDIT BY RAAM --------
sleep(1);
// -------- END EDIT ---------
exit;

And it worked! The code paused for 1 second between loading each image and all the images loaded properly. I have no idea what caused this problem but if you know please leave a comment! And if you're having this same issue, at least now you have a solution. 🙂

NoteSake.com beat me to the punchline

For the past two years or so, I've been slowly working on a website called SaveNotes.com. However, while reading LifeHacker I came across a site called NoteSake.com. Apparently, they beat me to the punchline.

Their site looks great and has very similar features as what I had planned for SaveNotes.com. There are a couple of things I planned on doing differently, such as the ability to quickly create a note without logging in or authenticating yourself, but there were a lot of things I hadn't even thought of, such as the ability to export notes as a PDF or share notes with other NoteSake users.

I tried creating an account on NoteSake.com to try out the features, however I'm still waiting for the email that contains the confirmation URL (which is another reason I disliked the idea of requiring an account).

Perhaps I will continue to develop SaveNotes.com simply because it would be a tool I would find very useful. Besides, NoteSake.com doesn't really have any competition. Yet. 🙂

ImgListGenerator

Introduction

I've been doing a lot of eBay auctions lately and one of the most time consuming parts was creating the HTML for all the images in my auction description. I could reuse a lot the HTML, simply changing the directory and image names, but it was still a lot of repetitive work. This week I had 25 items to list and the repetitive work really got to me, so I stopped and spent 30 minutes putting together a script that would help me.

Usage

To simplify things, I decided not to support the ability to choose the directory with the images for which you want to generate HTML. Instead, you simply upload the index.php file to the directory that contains your images, visit that directory with your web browser, and the HTML is generated. Since your web browser reads HTML, the images will be displayed just as they would in your eBay auction. Simply right click on the page, choose View Source, copy the nicely formatted HTML and paste it into your eBay description.

You can view this script in action by browsing some of my images here.

Details

Here's a sample output from this script:

<p align="center"><img src="http://www.ekarma.net/demo/pics/sample/DSC_0001.jpg"></p>
<p align="center"><img src="http://www.ekarma.net/demo/pics/sample/DSC_0003.jpg"></p>
<p align="center"><img src="http://www.ekarma.net/demo/pics/sample/DSC_0004.JPG"></p>
<p align="center"><img src="http://www.ekarma.net/demo/pics/sample/DSC_0010.JPG"></p>

The code I had to write for this script was rather simple. The real meat of the work is done by a very nice function called preg_find() by Paul Gregg. His code is too much to show here, but I'll show you the code I wrote for this little script:

// Find all .jpg or .JPG files in the current directory using preg_find()
$files = preg_find('/.jpg|.JPG/', '.', PREG_FIND_SORTBASENAME);

// Store the path to the current directory
// (PHP_SELF includes index.php, so we use substr to remove that)
$link_dir = substr($_SERVER['PHP_SELF'], 0, -9);

// Loop through each of the files and generate the HTML
foreach($files as $file){
$my_file = substr($file, 2, strlen($file));
echo "<p align="center"><img src="http://" /></p>\n"; 
}

That's it! Of course it would be much nicer if you could upload this script to the root directory and either enter or choose a path with images, then click generate. However, this script does exactly what I need, so I don't plan to make any changes to it.

Download

This script can be downloaded here: index.php.zip (4KB)

Removing unwanted commas in a CSV file with PHP

During the past week, I've been working on a small PHP application that a friend paid me to write, called SearchCSV2MySQL. He is exporting data from a specific program and saving the data in Excel as *.csv. Here is what a sample of the data looks like:

130072690978,Jan-31 09:09,4.95,$,1,Vintage McMurdo SILVER Television Pre-Amplifier
220073351918,Jan-25 19:48,"1,031.00",$,2,"PITNEY BOWES, TABLETOP INSERTING MAILING SYSTEM"

As you might have guessed, you're looking at eBay auction information. The fields in the exported data are item, date, price, currency, bid count, and description. Importing large amounts of CSV data into a MySQL database is one thing (and I'll write a follow up post detailing how the application works), but I also needed to remove unwanted fields before importing the data into MySQL.

To do this, I break up each line using $fields = explode(",", $lines[$y]);, where $y is the current line we're processing. This takes the data between the commas and puts it into the $fields array. However if you look at the sample exported data carefully, you may realize that we won't get the results we're expecting. The commas found between the double quotes, in the price and description fields, will be processed as field separators! This would cause $fields[2] (the price field) for the second line to contain "1" instead of "1,031.00".

So how did I resolve this? After looking over the syntax for strpos(), substr(), and substr_replace() a million times, I finally came up with this solution:

/*
* ***************** Remove all commas from the price field ******************
*/
/* Isolate the second field (price field) by finding the position
* of the comma right before the price field (second comma)
*/
$first_comma_pos = strpos($lines[$y], ",");
$second_comma_pos = strpos($lines[$y], ",", $first_comma_pos + 1);

/* Check if the price field contains double quotes,
* which would mean the price has a comma in it and we need to remove it
*/
if(substr($lines[$y], $second_comma_pos + 1, 1) == """){
/* Find the positions of the opening and closing double quotes around the price */
$price_quotes_pos_start = strpos($lines[$y], """);
$price_quotes_pos_end = strpos($lines[$y], """, $price_quotes_pos_start + 1);

/* Find all occurences of a comma after the opening double quote, but before the closing quote,
* around the price field and remove them from this line.
*/
$price_comma_pos = strpos($lines[$y], ",", $price_quotes_pos_start);
while($price_comma_pos < $price_quotes_pos_end){
$lines[$y] = substr_replace($lines[$y], "", $price_comma_pos, 1);
$price_comma_pos = strpos($lines[$y], ",", $price_quotes_pos_start);

/* Update the position of $price_quotes_pos_end,
* since it has changed after we removed a comma!
*/
$price_quotes_pos_end = strpos($lines[$y], """, $price_quotes_pos_start + 1);
}
}

/*
* ***************** Remove all commas from the description field ******************
*/
/* Find the position of the comma right before the description field (fourth comma) */
$first_comma_pos = strpos($lines[$y], ",");
$second_comma_pos = strpos($lines[$y], ",", $first_comma_pos + 1);
$third_comma_pos = strpos($lines[$y], ",", $second_comma_pos + 1);
$fourth_comma_pos = strpos($lines[$y], ",", $third_comma_pos + 1);
$fifth_comma_pos = strpos($lines[$y], ",", $fourth_comma_pos + 1);

/* Check if the description field contains double quotes,
* which would mean the description has a comma in it and we need to remove it
*/
if(substr($lines[$y], $fifth_comma_pos + 1, 1) == """){
/* Find the positions of the opening and closing double quotes around the description */
$desc_quotes_pos_start = strpos($lines[$y], """, $fifth_comma_pos);
$desc_quotes_pos_end = strpos($lines[$y], """, $desc_quotes_pos_start + 1);

/* Find all occurences of a comma after the opening double quote, but before the closing quote,
* around the description field and remove them from this line.
* Since this is the last field, we dont need to worry about finding any
* commas after the closing quote, and therefore don't need to update $desc_quotes_pos_end.
*/
while($desc_comma_pos = strpos($lines[$y], ",", $desc_quotes_pos_start)){
$lines[$y] = substr_replace($lines[$y], "", $desc_comma_pos, 1);
}
}

I realize that there are a couple of limitations to this code, such as not removing both commas if the price contains a larger number (i.e., "1,042,240.00"). It also doesn't look in the description field for commas. UPDATE: I've updated the code to remove all commas from both the price and description fields.

This code is simply a proof-of-concept to show how I solved a problem. If you know of a better way to go about this, please let me know! Hopefully posting this snippet will save someone the time I spent figuring it out.

Show me the errors!

It took me forever to figure out why the hell including a specific class file in one of my PHP scripts was causing the script to output nothing -- besides a blank white page. I finally figured out that PHP must be hiding errors and as soon as I added the following line to the top of my script, the error was obvious (a single character error, no doubt):


ini_set('display_errors', '1');

I was testing on a webhost I had never used before, so I wrongly assumed it was a problem with my code causing the blank output.

Verizon's Ultimate Call Forwarding service allows you to remotely enable/disable call forwarding, as well as change the number to which calls will be forwarded. When you call the automated system to activate call forwarding, there are several other options you can select, such as "Forward after no answer" and "Forward when busy". Those features are extras, for which you need to pay an additional monthly fee. The only feature enabled on account I was configuring is the basic call forwarding, which explicitly forwards all calls. Why then, am I able to select, configure, and enable the other features?

"To enable Forward after no answer, press 1"
"1"
"Please enter the number you wish to forward your calls to"
"617-959-xxxx"
"Please hold while we process your request..."
"Forward after no answer has been enabled."

No it hasn't! The damn automated system says its been enabled, when in fact configuring and enabling this feature does absolutely nothing! So much for an intelligent system. It should tell me I don't have that feature enabled, not allow me to configure and enable it.