The Other Side of Discomfort

I spent this past weekend learning a new language. Not a spoken language, but a programming language called Python. It was incredibly rewarding and it’s hard to believe that I almost paid someone to take that opportunity away.

A few weeks ago I came across a traveling programmer who had written some software to show a map of his travels on an embedded Google Map. He included a drop-down that allowed the selection of different maps, each map representing a different period of travel in his life. 

After being thoroughly impressed—and perhaps a little bit jealous—by his extensive travels and the simplicity by which he displayed all this data, I began to envision how I could do something similar on my own website.

His software was fairly straightforward: It looked at the contents of several Google Earth KML files, parsed the map data inside them, and then displayed that data on an embeddable Google Map.

Straightforward? Perhaps. But I didn’t even know what KML files were, let alone how to use Google Earth. The last time I played around with Google Earth was years ago. I had no idea how to create maps with it.

But I wasn’t going to let that stop me. 

I foresee myself traveling for years to come and I’ve been looking for a good way to track and display my travels for awhile now. I’m currently using the TravelMap plugin on my map page, but it has limited features and doesn’t scale for my nomadic lifestyle. This Google Earth solution seemed elegant, practical, and scalable.

So I downloaded Google Earth and learned how to create lines and points. I watched tutorial videos on YouTube and read documentation. I exported one of the test maps to a KML file and opened it in a text editor to learn about its format. 

I discovered that KML files were simply XML files (very similar to HTML). The locations of the points that I added in Google Earth were identified using its GPS coordinates; the lines that I drew between two points were represented by a series of coordinates: start-coordinates, end-coordinates, start-coordinates, end-coordinates, and so on.

With my newly acquired knowledge I set out building several Google Earth maps, each representing all my travels for the past two years, starting with my trip to India in 2010 and ending with my present location in Australia in 2012. 

It was around this point where I began to think about what the process of updating my current location with this system would look like on a day-to-day or week-to-week basis. 

I realized it would require opening Google Earth on my computer, editing the map with my new travels and adding new points and new lines, then exporting the file to KML and uploading it to the web server.

That seemed like a lot of work, especially when I was already recording my travels to some degree using geotagging on social networks like Twitter and Foursquare. 

I’m very suspicious of repetitive things when it comes to my time. (It all started when I calculated how much of my life each year was being spent simply looking at various notifications on my computer: 15 hours! I no longer use notifications for anything.) If I’m already recording my location online, why should I spend time recording it again in Google Earth?

How could I automatically update the Google Earth KML file with my latest location without spending any additional time?

After a bit of research, I discovered that Foursquare provides a KML feed for all my check-in data. So, I just needed to create a program that would automate copying the data from one KML file to the other and then updating the path line to show that I traveled from the old check-in to the new check-in.

With my limited knowledge of programming languages, I knew that Python was the best language for this job. The problem was, I knew practically nothing about Python. I was a PHP programmer and I knew that solving this problem with PHP would be both messy and time-consuming.

At this point I’d already spent a lot of time learning about KML files and creating maps in Google Earth. The thought of learning a whole new programming language just to get a travel map on my site was pushing the limits of what I expected to invest in this project in terms of time.

Wouldn’t it be easier to just hire someone else to do this final part? 

Never before had I hired someone to write a program for me, but for the first time I found myself taking the thought seriously. Was I getting lazy? Was this laziness the result of being able to afford to hire someone?

I posted the job on Elance with a maximum budget of $250— that’s what this program was worth to me. Within a few hours I began receiving bids, but with each bid I felt myself more and more disinterested with this idea.

Why was I paying someone to take away my opportunity to learn and grow? 

That’s when I realized something important: It wasn’t that I was being lazy. It’s that I wanted to pay someone to take away the discomfort of learning and growing. 

That one realization changed my whole thinking and instead of succumbing to the discomfort of learning something new, I decided to push into the discomfort and find out what’s on the other side. 

On Friday night I found a free Python tutorial online and began learning. I started with the very basics and ignored what I already knew about programming. I completed every exercise, from the very basic to the more advanced.

At first it was repetitive and boring, but as the hours passed I found myself muttering over and over, “that’s interesting”, every time I learned a new concept or understood how something worked.

This learning and exploration became so fun that I spent nearly the entire weekend indoors, peeling myself away from the computer only to eat, fulfill my running commitment, and watch the sunset.

By Sunday morning I began exploring beyond the Python tutorial and started searching the Internet for examples of using Python to handle XML files. There were very few examples specific to KML files and I couldn’t find anything that did what I wanted, but I continued experimenting.

By that evening I had finished a 248-line program in Python that did exactly what I wanted. It’s certainly not the prettiest code but the sense of empowerment and elation that I experienced upon finishing it was worth far more than $250.

The lesson? When it comes to spending time or spending money, always spend the time if you’ll learn something that will save you both money and time in the long-run. 

And more importantly, when it comes to learning new things, don’t pay someone to take away the discomfort for you: lean into that discomfort. 

On the other side of that discomfort exists a world where you live with more knowledge and understanding than the present version of yourself. It may be hard to imagine that world right now, but push through the discomfort and you’ll get there.

I haven’t finished integrating the new travel map into my site, but here’s a working sneak peak of the Journey Map.

Blogging from the Command-Line

I'm a command-line person. If you can show me a command-line version of something I already do in a windowed environment, I'll get stuff done faster. I often look for command-line solutions to tasks that become repetitive and feel as though time could be saved by doing them on the console.

A recent example of this is the posting of asides on my blog. Asides are often very short (one or two sentences at most -- they appear on my blog without a title) and navigating the WordPress Administration interface in a web browser simply to post one or two sentences became very time consuming and distracting. Since I'm constantly editing files and code on the console using my favorite editor (vi), being able to quickly create and post an aside from the same environment would be awesome.

Before writing a tool that allowed me to post to my WordPress blog, I searched Google to see if someone else had already written something. Sure enough, I found blogpost, a script written in Python by Stuart Rackham:

blogpost is a WordPress command-line weblog client. It creates and updates weblog entries directly from AsciiDoc (or HTML) source documents. You can also delete and list weblog entries from the command-line.

It uses XML-RPC to post to WordPress blogs and also supports automatically uploading media files (images, videos, audio, documents) that are referenced within the AsciiDoc (or HTML) post file. Check the blogpost man page for full details.

Remember, my main goal here is to make posting short asides easier. I'm perfectly happy using the WordPress web interface to write longer posts. In fact, I prefer the web interface for longer posts because I get things like automatic spell checking (through OS X) and automatic draft saving (through WordPress).

After installing blogpost and modifying the configuration file to include my WordPress login details, I created a file called post.txt using the vi editor and, after saving the file and closing vi, I published the aside using blogpost:

$ blogpost.py --title="My Test Aside Post" -U --doctype='html' create post.txt
creating published post 'My Test Aside Post'...
id: 2758
url: https://raamdev.com/2009/01/24/my-test-aside-post

$ blogpost.py cat --categories="Asides, Blog Entries, General" post.txt
assigning categories: Asides,Blog Entries,General

Note that I only need really basic formatting (i.e., HTML for links), so I use the --doctype='html' option. This allows me to type raw HTML in vi when I'm editing the post file, just as I do now in WordPress (I don't use the Visual Editor).

While the options and flexibility provided by blogpost are great, the process of publishing an aside needed to be more automated to solve my problem. Creating a new file in vi, typing all those options, running two separate commands, and then deleting the file every time I wanted to post a few sentences on my blog didn't make a whole lot of sense. So I whipped together this little shell script to help automate the steps above:

#!/bin/sh
##
## aside.sh - automates publishing asides using blogpost.py
##

# Open a temporary file in the vi editor
vi aside.$$

# Display new aside before publishing
echo "New Aside:"
cat aside.$$
echo

# Prompt for an aside title
echo "Enter a title for this Aside:"
read TITLE
echo "OK!"
echo

# Using the temp file saved above, post the Aside
blogpost.py --title="$TITLE" -U --doctype='html' create aside.$$
blogpost.py cat --categories="Blog Entries, Asides" aside.$$

# Remove the temporary file
rm aside.$$

Now posting an aside to my blog is as simple as running ./aside.sh, typing the aside in vi, saving and quitting (:wq), and then typing a title. The rest of the work, including cleanup, is taken care of by the script!

Stuart did an excellent job with blogpost and if you have a blog and use the console (and why shouldn't you?!) I recommend you check it out. The blogpost README is a great place to start, as it includes prerequisites and installation information.

Being Greedy With Bash

Last night at my C/Unix class the professor quickly glossed over an interesting shell scripting technique that allows you to strip stuff off the beginning or end of a variable. I forgot about it until I saw the technique used again while editing a shell script at work today.

I didn't know what the technique was called but I remembered the professor saying something about "greedy clobbering" and, since I cannot search Google for special characters, I Googled "Bash greedy" and luckily found 10 Steps to Beautiful Shell Scripts, which just so happened to contain the technique I was looking for (#5).

There are basically four versions of this technique:

${var#pattern}
Search var from left-to-right and return everything after the first occurrence of pattern

${var##pattern}
Search var from left-to-right and return everything after the last occurrence of pattern (be greedy)

${var%pattern}
Search var from right-to-left and return everything after the first occurrence of pattern

${var%%pattern}
Search var from right-to-left and return everything after the last occurrence of pattern (be greedy)

Here's how it works. Let's say you have a variable that contains the path to a file:

FILE=/home/raam/bin/myscript.sh

Now let's say you wanted to extract the myscript.sh part from that variable. You could do some funky stuff with awk but there is a much easier solution built into Bash:

SCRIPTNAME=${FILE##*/}

Now $SCRIPTNAME will contain myscript.sh!

The ##*/ tells the shell to search left-to-right for everything before and including the slash (*/), be greedy while doing it so that all the slashes will be found (##), and then return whatever is left over (in this case, myscript.sh is the only thing remaining after the last slash).

AFAIK, this is a Bash-specific feature, but I'm not entirely certain and I wasn't sure where I could look to find out. It's amazing how four characters can do so much work so easily. The more I learn about what I can do with Bash, the more I wonder how I ever lived without all this knowledge!

I subconsciously converted a problem into a shell script

I have been writing a lot of shell scripts lately as part of the C/Unix class that I'm taking at Harvard Extension. My familiarity with how the Unix shell and the underlying system works has grown exponentially. When I came across a problem earlier today, I subconsciously turned the problem into a shell script without even thinking about it!

The problem: "How can I check to make sure my program is running every 30 minutes and restart it if it's not?"

Answer:

# If myscript isn't running, restart it
ONLINE=`ps aux | grep -c myscript`
# 2 because grep myscript also finds 'grep myscript'
if [ $ONLINE -ne "2" ]; then
        $MYSCRIPT_PATH/restart_service.sh
fi

I'm sure there are many better ways to solve this problem, but the fact that I instantly translated the problem into shell scripting code (and that it worked as expected on my first try) astonished me. I can see how good programmers who write in a particular language, and know the in's and out's the like the back of their hand can turn problems into code seamlessly (or know exactly where to look to find answers if they're unsure).

It's really amazing how easily you can solve simple problems when you have a deeper understanding of how the system works.

That's all. I just wanted to share my excitement. 🙂

Fun uses of code

The International Obfuscated C Code Contest has some cool demonstrations of what the C programming language is capable of including a tiny web server (even though it was voted Best Abuse of the Guidelines), a BASIC interpreter, and some fun uses of code. Another site, 99 Bottles of Beer, holds a collection of the song "99 Bottles of Beer" written in 1,233 different programming languages, including some historic ones like Focal-8, plain crazy ones like Procmail and sed, and more current languages like Java and Python.

My C Program Crashed the Terminal :(

As part of my homework assignment (due tonight!), I have to write two versions of the standard library function strncpy(), one using array's and one using pointers.

The strncpy() function basically takes two arguments, *src and *dest, and copies n number of bytes from *src to *dest.

#include 

// Function declarations
char *mystrncpy(char *dest, const char *src, size_t n);

main()
{
    char a[] = "this is a string";
    char b[50];

    mystrncpy(b, a, 400); // here is the problem
    printf("%sn", b);

    return 0;
}

// My attempt to replicate the strncpy() function with pointers
char *mystrncpy(char *dest, const char *src, size_t n)
{
    int i = 0;
    while (i <= n) {
        *dest = *src;
        src++;
        dest++;
        i++;
    }
}

While testing this pointer version of the function, I passed a much larger size (400) to the function than had been allocated for the destination variable (b[50]).

eris:hw3 raam$ gcc problem8.c -o problem8
eris:hw3 raam$ ./problem8
this is a string
Segmentation fault

Segmentation Fault

There is no better way to tell me my function needs more work than to stick a big "Application quit unexpectedly" message in my face! (And thankfully, my entire iTerm app did not crash.)

I wrote a post a few weeks ago about how eerily close C variables are to the machine, and the way this program crashed further confirms that point. I can't imagine the kinds of nasty things I will be able to do once I learn more advanced C functions. 😀

C Variables: Eerily Close to the Machine

In C programming, things as simple as variable assignment are not quite as simple as using an assignment operator---they sometimes require entire functions. For example, this code will not even compile:

#include        
#include        

int main()
{
        char    a[10], b[10];

        a = "hello";
        b = "world!";

        printf("%s %s", a, b);

        return 0;
}
$ cc test.c
test.c: In function ‘main’:
test.c:8: error: incompatible types in assignment
test.c:9: error: incompatible types in assignment

In C all strings are arrays. To create a string variable, you must create an array. The variable "a" is actually a pointer to the memory location of the character array, not the contents of the array itself! That's why I got the "incompatible types in assignment" error when I tried compiling the above code---I was trying to copy a string directly into a memory address!

The reason things are this way in C is for speed and simplicity. Sure, other languages automatically do the work of putting your five-character string into a variable and automatically allocate the necessary space in memory, but by doing that they spend a little more time behind the scenes---time and speed that may be precious to a systems-level programmer (who might be writing a program for, say, a tiny embedded device).

To copy a string into an array (i.e., assign a string to a variable), you can use the strcpy() function. This function does the work of taking each character in your string and putting it into the correct place in the given array:

#include        
#include        

int main()
{
        char    a[10], b[10];

        strcpy(a, "hello");
        strcpy(b, "world!");

        printf("%s %s", a, b);

        return 0;
}
$ cc test.c
$ ./a.out
hello world!

C was written in a time when assembly language was the norm. The problem with assembly language was that it was very tied to the hardware you were working on. Porting your work to other hardware, even if the changes in the hardware were only minor, required an entire rewrite of your code! Operating systems were also written in assembly at the time so creating a single operating system that worked on many different architectures was nearly impossible (unless you had an unlimited amount of time and money to have programmers constantly rewriting the operating system for every new hardware architecture that was released).

So the C programming language was created as a language one level higher than assembly. It was designed to maintain all the power and flexibility of assembly, while making it very easy to port to multiple architectures. This was made possible by using a compiler. The compiler simply took the C code and converted it into the necessary machine language for a specific architecture. If you wanted to port all your C code to a new architecture, all you needed to do was write a new compiler---not rewrite all your programs!

C lets you do stupid things not because it's stupid, but because flexibility and closeness to the physical hardware is necessary for writing operating systems. (As the programmer, it's your job to make sure what you're doing is possible with the hardware you're working on.) Where as other high-level languages will automatically take your string and stick it in the correct place in memory, C does only what you tell it to do. This makes it extremely fast, which is very important when you're writing an operating system.

The basic example of how a string cannot be assigned directly to the character variable because the variable is actually a pointer to a memory address, helped me realize why C is still used for systems-level programming and why it continues to be in use more than 35 years after its invention. I have flipped through many C books but never quite gotten this explanation of how C works. Understanding things at this level really helps me put the language in perspective.

Escaping Filename or Directory Spaces for rsync

To rsync a file or directory that contains spaces, you must escape both the remote shell and the local shell. I tried doing one or the other and it never worked. Now I know that I need to do both!

So let's say I'm trying to rsync a remote directory with my local machine and the remote directory contains a space (oh so unfortunately common with Windows files). Here's what the command should look like:

rsync '[email protected]:/path/with spaces/' /local/path/

The single quotes are used to escape the space for my local shell and the forward-slash is used to escape the remote shell.

Coding Furiously

I've been working day and night for the past few days on an already-late project for work. The fact that the project requires a computing language that was very unfamiliar to me just a few short weeks ago certainly adds to the brain drain. But, it's a language I've been wishing I had a reason to learn for years now so I'm definitely not complaining!

Fixing Boot-Time Dialog Display Issues

Dialog is a really useful utility for creating professional looking dialog boxes and menus within a shell script. I'm working on a boot-time script that allows the user to make system-level changes before the system has fully booted.

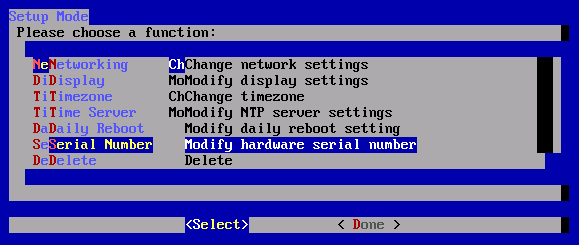
When testing my script from the command line, the dialog menu looked fine. However, whenever I set the script to start during boot (update-rc.d myscript.sh defaults, on Debian-based systems) here is what the menu looked like:

dialog display issues

UGH! It was barely usable. At first, I thought this would be an endlessly difficult problem to solve given my limited in-depth knowledge of Linux (I'm getting there!), but then I realized the main difference between the script running during boot and the script running after I had logged in was that my environment variables had not been loaded.

From the command line, I ran the env command to display all my current environment variables:

debian_vm:~# env
TERM=xterm-color
SHELL=/bin/bash
SSH_CLIENT=172.16.168.1 61315 22
SSH_TTY=/dev/pts/0
USER=root
MAIL=/var/mail/root
PATH=/usr/local/sbin:/usr/local/bin:/usr/sbin:/usr/bin:/sbin:/bin:/usr/bin/X11
PWD=/root
LANG=en_US.UTF-8
PS1=h:w$
SHLVL=1
HOME=/root
LANGUAGE=en_US:en_GB:en
LOGNAME=root
SSH_CONNECTION=172.16.168.1 61315 172.16.168.132 22
_=/usr/bin/env

The three variables that caught my eye were TERM, SHELL, and LANG. After a little trial and error, I discovered setting the LANG variable fixed the display issues with dialog! I added the following near the top of my script:

export LANG=en_US.UTF-8

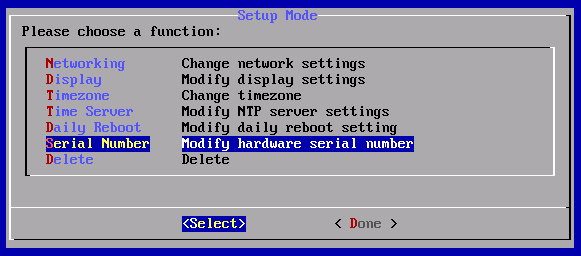
Now when my script loads during boot, everything looks correct:

dialog display issues fixed

Multiple Query Problems with mysql_query()

I was writing some code earlier today that involved writing data to two separate MySQL tables. The second INSERT statement needed to contain the automatically generated ID (auto_increment) of the first INSERT statement, so I wanted all the queries to run one after another.

Thinking it made the most sense to just build one long query and execute it all at once, I wrote code similar to the following:

// Build a query with multiple INSERT statements
$q = "INSERT INTO sessions VALUES(NULL, '$name', '$desc', '$stime');";
$q .= "INSERT INTO events VALUES(LAST_INSERT_ID(), '$event', '$e_desc');";

// Execute query
mysql_query($q, $conn) or die(mysql_error());

Upon running the code I received this error:

You have an error in your SQL syntax; check the manual that corresponds to your MySQL server version for the right syntax to use near '; INSERT INTO events VALUES(LAST_INSERT_ID(), '24', 'my event1', 'button')' at line 1

So, as I normally do when this kind of problem arises, I echoed the query that was being executed and, hoping to get more information on the error, I ran it directly from phpMyAdmin. Here is the SQL I ran:

INSERT INTO sessions
	VALUES(NULL, 'Raam', 'example', '2008-04-24 21:59:08');
INSERT INTO events
	VALUES(LAST_INSERT_ID(), '24', 'my event1', 'button');

phpMyAdmin says:

Your SQL query has been executed successfully

OK, so my SQL is fine.

I then looked up the mysql_query() function on php.net and found this little tidbit of info:

mysql_query() sends an unique query (multiple queries are not supported) to the currently active database on the server that's associated with the specified link_identifier .

Ah, so multiple queries are not supported with the mysql_query() function. That's most likely a security feature, but quite annoying none the less. The bottom line is, you cannot run multiple queries with mysql_query().

PHP5 has the mysqli_multi_query() function, which does allow you to run multiple queries (I know, I know, I should be coding for PHP5 by now).

Adding CC Recipients With PEAR Mail

I use the PEAR Mail package quite often in projects that require sending email -- either user-generated or system-level notification emails. I recently wrote something at work that required CCing the user a copy of the email. My first thought was that simply adding CC headers with the users' email address would suffice, but that just isn't the case.

Since mail headers can be modified to state anything you want, PEAR Mail doesn't actually use them to to figure out where to send the email (adding the CC header works fine and the users' email address even shows up in the CC field, but they never receive the email).

A comment by Armin Frey that I found on the PEAR bug page for this problem explains what's going on and offers a solution:

[2007-07-06 15:22 UTC] arminf (Armin Frey)

It seems that the Recipients decides where to send the e-mail and the
headers decide how to display it.

The simple solution is that you add all the addresses to $recipients.

Here is the code I used:

$to = '[email protected]';
$cc = '[email protected]';
$recipients = $to.", ".$cc;
$headers['From']    = '[email protected]';
$headers['To']      = $to;
$headers['Subject'] = 'Test message';
$headers['Cc']	    = '[email protected]';
$headers['Reply-To'] = '[email protected]';

$send = $mail->send($recipients, $headers, $body);

The solution works perfectly. Now the email addresses show up in the correct fields and all the recipients receive the email. Unfortunately, this method does not work for BCCing users. I wonder if BCCing is even possible with PEAR Mail or if I'll need to find something else. To Blind CC (aka, BCC) an address, simply add the address to the $recipients, but not to any of the $headers (thanks Jason!).

Dabbling in Java Web Programming

A bunch of new projects at work are requiring that I become familiar with Java programming, web programming and GWT in particular. My co-worker gave me this tutorial to try out, as the principles are similar to what we're using in the new projects.

So after setting up my environment (that's another post), I followed the tutorial and then began modifying the example code to see how I could change it. (The first thing that surprised me was that Java doesn't automatically sort stuff -- you need to do that separately (that's where SortedMap came in handy)):

package com.sonatype.maven.web;

import java.io.IOException;
import java.io.PrintWriter;
import java.util.Enumeration;
import java.util.Iterator;
import java.util.NoSuchElementException;
import java.util.SortedMap;
import java.util.TreeMap;

import javax.servlet.ServletException;
import javax.servlet.http.HttpServlet;
import javax.servlet.http.HttpServletRequest;
import javax.servlet.http.HttpServletResponse;

public class SimpleServlet extends HttpServlet {
	public void doGet(HttpServletRequest request, HttpServletResponse response)
			throws ServletException, IOException, NoSuchElementException {

		PrintWriter out = response.getWriter();
		out.println("SimpleServlet Executed");
		out.println("Character Encoding is " + response.getCharacterEncoding());
		out.println("ContentType is " + response.getContentType());

		out.println("nHere is a list of all query string vars:n");

		Enumeration e = request.getParameterNames();
		SortedMap sm = new TreeMap();

		while (e.hasMoreElements()) {
			String name = (String) e.nextElement();
			String value = request.getParameter(name);
			sm.put(name, value);
		}

		for (Iterator i = sm.entrySet().iterator(); i.hasNext();) {
			out.println(i.next());
		}

		out.println("nHere are the vars combined into a sentence:n");

		for (Iterator i = sm.values().iterator(); i.hasNext();) {
			out.print(i.next() + " ");
		}
		out.flush();
		out.close();
	}
}

So basically, after starting the Jetty Servlet container I was able to visit a URL like this:

http://localhost:8080/simple-webapp/simple?var1=Hello&var2=world&var3=of&var4=java!

And got an output like this:

SimpleServlet Executed
Character Encoding is ISO-8859-1
ContentType is null

Here is a list of all query string vars:
var1=Hello
var2=world
var3=of
var4=java!

Here are the vars combined into a sentence:

Hello world of java!

Java is cool stuff and I'm going to be diving into it a lot over the next few months. I'm reading an O'Reilly book called Head First Java which uses an innovative new method of teaching:

The latest research in cognitive science, neurobiology, and educational psychology shows that learning at the deeper levels takes a lot more than text on a page. Actively combining words and pictures not only helps in understanding the subject, but in remembering it. According to some studies, an engaging, entertaining, image-rich, conversational approach actually teaches the subject better. Head First Java puts these theories into practice with a vengeance. Chock full of mind stretching exercises, memorable analogies, and stories, humor and attitude that aren't just pasted-on distractions but that are used to drive home key points and make ideas come alive, the Head First approach is as effective as it is unique.

The method is definitely new to me, but it makes a lot of sense. I've started committing an hour each day to reading the book and doing examples/puzzles.