
Here is what my MacBook Pro desktop typically looks like while I'm working. All these programs running and I have 24% free memory and 60% free CPU. 🙂

There are 44 posts tagged Mac OS X (this is page 2 of 3).
Here is what my MacBook Pro desktop typically looks like while I'm working. All these programs running and I have 24% free memory and 60% free CPU. 🙂
First of all, I love MAMP (Apache, MySQL, and PHP for Mac). I use it on a regular basis for web development and it has been extremely useful since I started working on a Mac platform about a year ago. After upgrading to Mac OS X 10.5 (Leopard), I discovered MAMP would sometimes have problems starting and stopping. The MAMP widget and control panel would both say that Apache and MySQL are running, when in fact they were not.
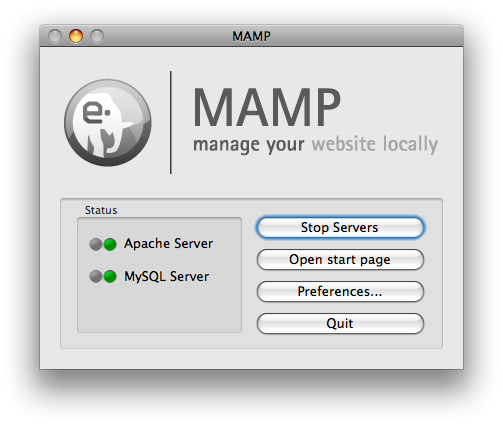
When attempting to stop the services, MAMP would show the progress meter for a few seconds and then do nothing (the lights stayed green). This was quite annoying to say the least.
Apparently this is a known bug. But don't fear, there is a solution! Click the Preferences button on the MAMP control panel, then click OK. MAMP will do some reinitializing and then all is well again. You're also able to start/stop MAMP from the widget.
The latest version available is 1.7.1 and it was released on 08-13-2007, almost a full year ago! I suppose that's what you can expect from a free version of their main product, MAMP Pro ($60), but slow bug fixes to their free version certainly wouldn't make me feel good paying money for MAMP Pro.
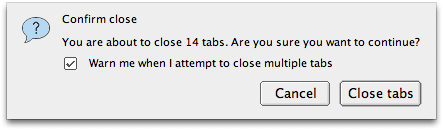
When I started using the beta version of Firefox 3, I quickly discovered a bug (which remains in RC1): Even though I had enabled the "Warn me when closing multiple tabs" option (Preferences -> Tabs), Firefox did not give me any warning when I accidentally pressed Cmd+Q. It would just quit without a prompting me, even if I had 15 tabs open!
In Firefox 2, enabling "Warn me when closing multiple tabs" option would cause this prompt to appear whenever I pressed Cmd+Q:
I searched Bugzilla@Mozilla for an open bug regarding this problem and quickly found Bug 422040 - Quit Firefox 3 beta 4 does not give "closing multiple tabs" warning. I commented about my own experience regarding this bug and further confirmed its existence in Firefox 3 RC1.
Finally, Paul O'Shannessy explained in comment #24 how the warn on close functionality works in Firefox 3:
Do you have the start up behavior to restore tabs & windows from last time?
If so, when you quit (cmd-Q) the dialog regarding save session will not show
and Firefox will quit. Session will be restored upon starting Firefox.This used to bug me until I thought about it more. Perhaps a dialog confirming
that you intended to quit is in store for this case, but that would be a
different bug. On the plus side, if you hit cmd-Q by accident your session
should restore.
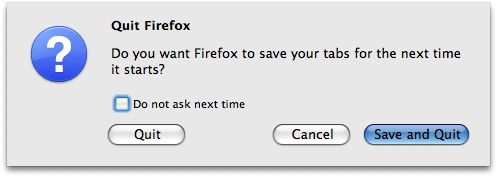
So basically, if you want to be warned when closing multiple tabs in Firefox 3, you need to make sure your "When Firefox starts" option (Preferences -> Main) is set to "Show my home page" and not "Show my windows and tabs from last time". Setting it to the latter prevents the warning dialog when using Cmd+Q (however, you will get the warning if you try to close Firefox by pressing the X icon with your mouse).
To further confuse things, the warning dialog that comes up has a "Save and Quit" button. This button saves and restores your tabs the next time Firefox starts, which overrides your "When Firefox starts" setting of "Show my home page".
Talk about inconsistent behavior. Even though this bug seems to be limited to Mac OS X, I really hope it gets fixed in the final release. But if it doesn't get fixed, I'm glad it's at least possible to get the warning dialog when pressing Cmd+Q and that you can choose to "Save and Quit", even if it means making silly changes to the "When Firefox starts" option.
One of the commenters mentioned the following workaround. I tested it with Firefox 3.5.7 on OS X 10.6.2 and it works perfectly:
After upgrading to Leopard, I noticed something different while typing a message in Adium:
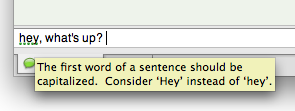
The tooltip was rather humorous and it caught me by surprise. I never realized grammar checking wasn't there until I upgraded to Leopard. I opened TextEdit and confirmed that it also has a grammar check option. Cool!
Leopard includes a ton of new features but I haven't even bothered to look over the list of 300 new features on Apple's website until now. Included in the list is the global grammar checking (assuming the app makes use of it):
Grammar Check
Let your grammar set a shining example. A built-in English language grammar checker helps ensure that you don’t make errors in grammar.
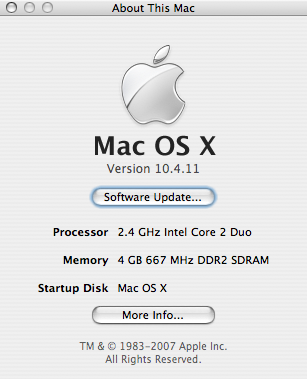
Well I finally did it. I upgraded to the latest and greatest version of Mac OS X: Leopard (10.5).
But why?
A little over six months ago I wrote about not fixing what isn't broken, including the previous version of OS X: Tiger (10.4).
There were a combination of events that drove me to write that post, including hearing numerous stories about how Leopard was causing problems for people upgrading. Also around the same time I was hearing about how so many people (including myself) were refusing to upgrade to the latest version of Microsoft's OS: Vista. But I now realize that every upgrade comes with its bumps and you won't be hearing stories from people who didn't have any problems upgrading (negativity is something to complain about, positivity is taken for granted).
So what drove me to upgrade to Leopard? Well a customer at work was having problems with an application I created and he was using the latest version of OS X (Leopard). I was running Tiger, so I wasn't able to replicate his problem and confirm the bug. This is unacceptable and if Apple is shipping new computers with Leopard, then my software should work with the latest version.
Impressive Upgrade Process
After using RsyncX to create a bootable backup of my entire Tiger installation (183 GB!), I started the upgrade process for Leopard. This was the first upgrade of an OS X system I had ever done and the first thing that impressed me was the 30+ minute "Verifying installation disc" step. I say it impressed me because it made me feel confident that the software was going to verify the entire installation disk before continuing with the upgrade process. I can't remember how many times I've installed/upgraded a Windows system only to discover the CD was corrupted and the resulting installation was flaky.
No Hiccups
The entire upgrade must have taken about an hour and a half, but I wasn't timing it so I could be wrong. With the exception of BOINC, OS X started up without any hiccups. The first thing that came up was the Software Update dialog with a whole slew of things to upgrade the system to 10.5.3. I let it do its thing, including a reboot when it was finished.
After the reboot, I started all the applications I use on a daily basis to confirm they worked properly: Eclipse (v3.3.2), Firefox (3.0 RC1), FileZilla (v3.0.5.2, though now I can upgrade to the latest version), iTunes (v7.6), Adium (v1.2.5), iTerm (v0.9.5), QuickSilver (vB51), Thunderbird (v2.0.0.14), and VMWare Fusion (v1.1.2).
Feeling a Little Sluggish
Right off the bat, the system felt a lot more sluggish than it did with Tiger. With 4GB of RAM in my system, I knew it shouldn't be slow. I was beginning to worry that I made a mistake by upgrading until I remembered something I read about Spotlight Indexing. I clicked on the Spotlight icon in the top left and sure enough it was in the middle of indexing my entire drive. I don't use Spotlight (I always know where everything is on my computer) and after a quick visit to macosxhints.com I had a solution to disable it completely:
Turning off and disabling Spotlight (helps prevent the slowness associated with indexing)1:
1) Stop and disable the spotlight application itself:
cd /System/Library/LaunchAgents

launchctl unload com.apple.Spotlight.plist

sudo launchctl unload -w com.apple.Spotlight.plist
(Ignore the error message from the last command. That command tries to stop the application for every user, including root. Since root isn't running the app, you get that error.)
2) Stop and disable the background server:
cd /System/Library/LaunchDaemons

sudo launchctl unload -w com.apple.metadata.mds.plist
3) Remove the .Spotlight-V100 directories
sudo find / -iname '.Spotlight-V100' -type d -maxdepth 3 -print0 | xargs -0 -t -n1 sudo rm -rf
Wow, that sped things up a lot! Being the user-friendly operating system that OS X has become known to be, I'm a bit surprised they don't at least notify the user that indexing is running and that the system might be a bit slow until its done.
Conclusion
I'm running Leopard and so far I'm really liking all the new features. There are so many slight things that, when put together, make the upgrade well worth any hiccups that might come as a result. I will be posting about these new features over the next few weeks as I discover their usefulness (or lack thereof).
If you're thinking of upgrading but haven't yet taken the plunge, I encourage you to do so. The sheer number of tips on macosxhints.com and LifeHacker which require Leopard should be enough to annoy you into upgrading.
Case sensitivity in Mac OS X does not exist.
The OS X command line is probably the most commonly used feature of my MacBook Pro. I love the fact that almost all the Linux commands I'm used to using on a Linux box work the same way in OS X. So, as you can imagine, I was shocked when I couldn't rename a simple directory:
eris:~ raam$ mv Downloads/ downloads/

mv: cannot move `Downloads' to a subdirectory of itself, `downloads/Downloads'
That command should allow me to rename 'Downloads' to 'downloads', but apparently OS X thinks 'Downloads' and 'downloads' are the same thing! That's absurd! In the Unix world, case matters!
So how did I eventually rename it?
eris:~ raam$ mv Downloads/ downloads2/

eris:~ raam$ mv downloads2/ downloads/
That's just ridiculous.
I installed the Fluxbox window manager on my MacBook Pro a while back and decided to start it up to make sure I had access to a "real" command line. Sure enough, the command worked as expected within Fluxbox. Maybe I'll start using Fluxbox a lot more often.
Check out this snippet from an article on InformIT:
Mac OS X, like the classic Mac OS before it, is not case sensitive; it doesn't care whether you said File1.txt or file1.txt. Only one of them can exist in a folder at the same time, and there's no ambiguity for either computers or humans in telling which file you meant. Even Unix commands like ls will work if you give them filenames to operate on that don't match the capitalization of the actual files (try it: ls /library).
That's really quite disappointing. I have suddenly lost so much respect for the OS X command line. Being derived from BSD in the Unix world, you would think Apple would keep something as fundamental as case sensitivity in OS X.
I wrote a post last year about replacing Command+Tab with Witch, an application switcher replacement for Mac OS X. When I moved to my new apartment early in January, my Linux server was without Internet access for a few weeks so I was forced to use a graphical IM client (as opposed to a console-based client).
David was using Adium at the time, so I decided to give it a try. It's definitely a nice messaging application -- nice enough that I haven't felt compelled to get my console client setup again (but I'm sure I will at some point; the command line rules!). Now, on to the point of this post.
After pressing Command+Tab to switch from an IM conversation to another application, here is what I saw when I pressed Command+Tab to return to the IM window:
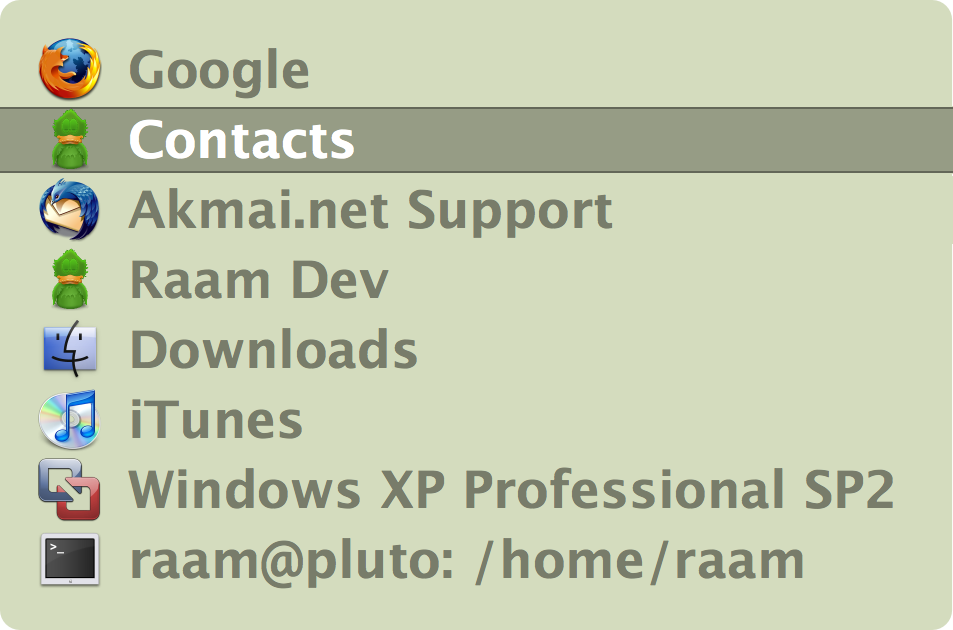
As you can see, Witch doesn't select my Adium IM conversation window ("Raam Dev" in this example) but oddly selects the Adium Contacts window, even though I was never looking at that window. This meant every time I switched from a conversation window to an application, I had to press Command+Tab+Tab+Tab just to get back to the previous window! Not only that, but normally I was trying to switch back to the IM window just to get rid of the distracting "new message notification" in the dock and being unable to do this quickly was really frustrating.
As extremely annoying as it was, it always bugged me at a time when I was too busy to figure out how to fix it. And by the time I was not busy I had forgotten about it. This pattern continued for THREE MONTHS (yes, I'm a very patient person)!
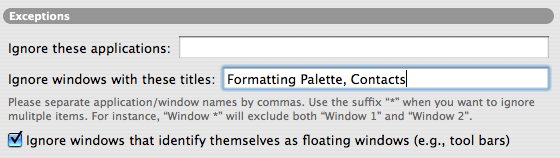
Today I decided I'd had enough. I took a peek at the Witch preferences (System Preferences -> Witch) and discovered that I could simply tell Witch to ignore the Contacts window! Doh!
Now when I press Command+Tab after switching to another application, the IM conversation window is the first item selected.
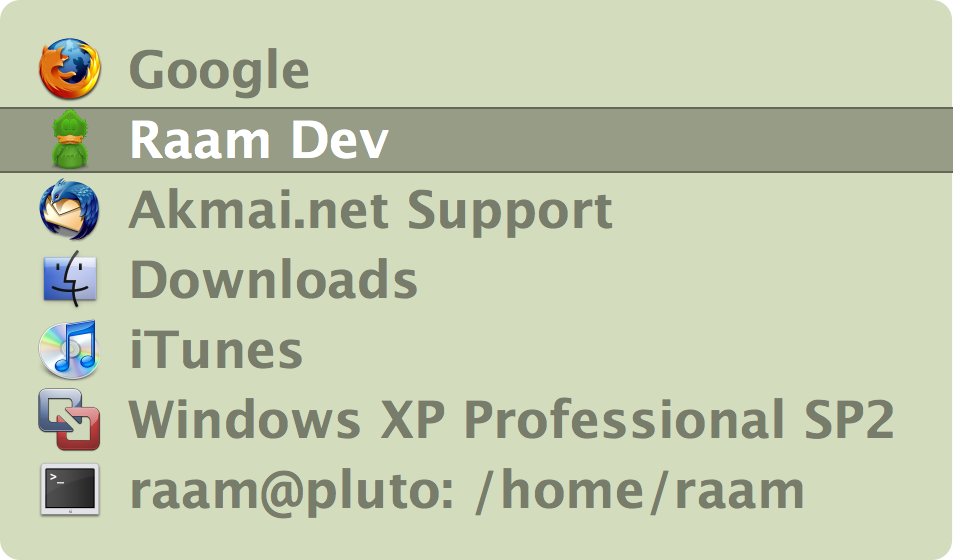
Woohoo! Sanity!
I'm a little paranoid when it comes to wireless security. Even if I'm on an encrypted wireless network, I won't access any of my bank accounts or login to any website that requires a password without securing my traffic with an additional layer of security using SSH tunneling.
SSH tunneling can also be used to circumvent network-based restrictions in the workplace or on a free public wifi hotspot, giving you the freedom to browse whatever websites you want. If implemented on an OS networking level, you can even use the tunnel for your email and other applications. However the focus of this post is on using SSH tunneling to secure your web traffic.
Here is a quick list of what you'll need:
Setting up the SSH Tunnel
Windows
Since Windows doesn't have an SSH client built in, you will need to use the wonderful SSH client application called Putty. After you've downloaded and launched Putty, you should be presented with the main screen. Fill in the Host Name (or IP address) field with that of your Linux computer and be sure to select SSH from the Connection type.
On the left column of options, select Connection -> SSH -> Tunnels. Enter 9000 in the Source port field, select Dynamic from the option at the bottom, and then click Add. Your screen should now look something like this:
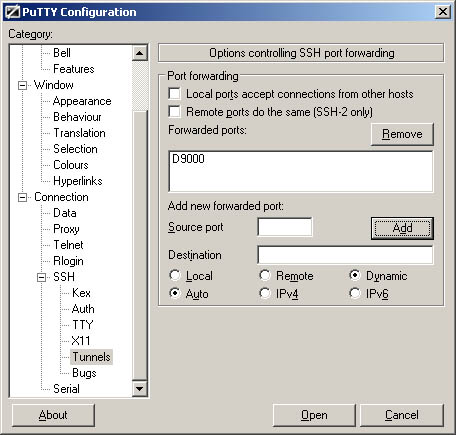
Note: If you don't see the Dynamic option in Putty, make sure you have the latest version.
Now go ahead and click the Open button to connect to and login to your Linux computer. Once you have successfully logged in, the tunnel will be open and you can proceed to configure your web browser to use the tunnel.
Linux/OS X
Since you're using a *nix based system, your computer already has everything it needs to setup an SSH tunnel. Simply access the terminal (Applications -> Utilities -> Terminal.app on OS X) and connect to the remote Linux computer as follows:
ssh -l-D 9000
After logging into the remote computer, the dynamic SSH tunnel will be opened and we can continue to configuring the web browser.
Configuring the Web Browser to use the SSH Tunnel
Firefox with SwitchProxy Tool plugin (the method I use)
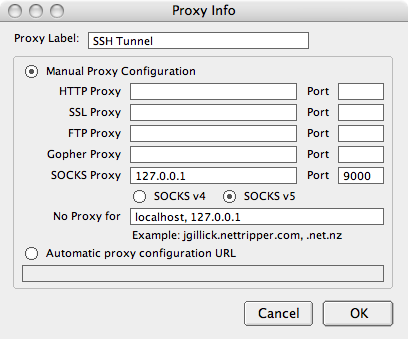
Download and install the SwitchProxy Tool plugin. After installing the plugin, open its configuration window (Tools -> Add-ons -> SwitchProxy Tool -> Preferences on OS X). This will open the basic configuration window for the plugin. Click Manage Proxies and then Add. Choose Standard for the proxy configuration type and click Next. Fill in the fields as shown below.
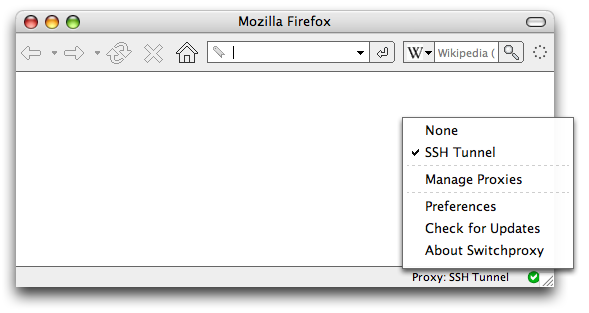
After saving the connection, you should be able to use the plugin to easily switch between browsing through the SSH tunnel and browsing without it. I have it configured to show in the Firefox Status Bar, as I find that to be the easiest method of toggling between the two:
Firefox without SwitchProxy Tool
Although SwitchProxy Tool to easily switch my proxy settings, I will also explain how to configure the browser without the plugin.
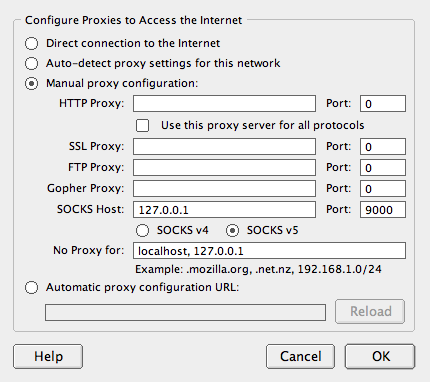
Open the Firefox Preferences (Firefox -> Preferences on OS X) and click the Advanced icon at the top. In the connection section, click the Settings... button. Choose Manual proxy configuration and fill in the SOCKS Host and Port fields as shown below.
Internet Explorer
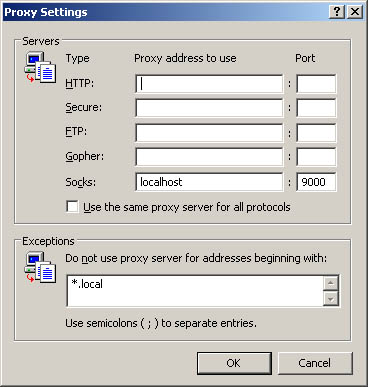
From the Internet Explorer menu, choose Tools -> Internet Options. Select the Connections tab and then click the LAN Settings button. Enable the Use proxy server for your LAN option and click Advanced.
In the Servers section, make sure all the fields are empty except for the Socks field. Type localhost in the Socks Proxy address field and 9000 in the Port field. Your screen should look something like this:
Click the OK button all the way back to your browser. You should now be browsing the Internet securely through the SSH tunnel! An easy way to confirm this is to disconnect from the Linux computer by closing Putty and checking if you can still browse the web. Since the browser has been configured to use the tunnel, you won't be able to browse the web if that tunnel is closed.
If you wish to revert back to browsing the web normally, simply uncheck the Use proxy server for your LAN option in LAN Settings.

Several months ago, when I moved to another apartment in the same house, I decided to see if I could use a wireless card and replace my broadband connection altogether (I was getting tired of transferring service and being without Internet for several days). What follows are a few things I learned along the way.
I chose the Sprint EX720 card for a couple of reasons but mainly because it fit in the ExpressCard slot of my new MacBook Pro. Earlier that same year, I tried the Sony Ericsson GC89 GRPS card from T-Mobile and that just plain sucked. The download speeds with the GC89 were horrible and I had all kinds of problems getting the card to work on an older G4 PowerBook (I didn't have my MacBook Pro at that time).
I had read a couple of raving reviews about the EX720 and lots of good stuff about the EV-DO network so I thought the experiment was worth a shot. Since Sprint gave me a 30-day risk-free guarantee, I would only be out the $35 setup fee. The extra features that came with the EX720 were really great, too:
"Sprint offers an external antenna, a carrying case and Broadband Card Adapter (Express to PCMCIA) that are each sold separately as an accessory for this device."

Before installing the card on my MacBook, I did some research and read somewhere that said I needed the "WWAN Support Update 1.0". However, when I tried installing it I got a message that said "This version is not supported". Apparently, my MacBook already had everything I needed because simply inserting the card worked. Almost.
In order to activate the card, a Windows machine is required. Luckily, I had VMWare Fusion installed and I was able to use Windows XP to activate the card. Sometimes the store will do this for you; my boss recently picked one of these up and it came activated.
Speaking of work, David setup my boss's the EV-DO card on one of the Windows machines in the office and shared its wireless connection with the entire office network (using Windows ICS). We're going to be without Internet for a few days while we move to the new office and this wireless card will allow us to continue working. I was absolutely amazed at how well it works. Everyone in the office is able to surf with almost no noticeable difference in speed. Even downloads are fast (I'm talking 1Mbps+ fast!).
Here are the results of some speed tests I ran with the EX720:
100% antenna (inside a coffee shop, away from window):
Download Speed: 1004 kbps (125.5 KB/sec transfer rate)
Upload Speed: 555 kbps (69.4 KB/sec transfer rate)25% antenna (in my basement):
Download Speed: 542 kbps (67.8 KB/sec transfer rate)
Upload Speed: 163 kbps (20.4 KB/sec transfer rate)
As you can see, these are very acceptable speeds for a wireless card that you can bring everywhere (on the train, into any coffee shop, inside office buildings, even in the bathroom or on the sidewalk). The tiny card even has a jack to attach an external antenna in case you happen to be somewhere that needs more reception (maybe an underground bunker).

The main goal of this experiment was to see if I could replace Comcast broadband at home. The card worked great and was definitely a lot better than T-Mobile's card. I've used my Blackberry as a modem to get online and the speed of this wireless card blew the EDGE network away. However there are lots of limitations to replacing my entire wired broadband connection at home.
If I replace my home broadband connection with a wireless card I cannot tunnel into any of the machines at home (assuming I take my wireless card with me when I leave the house). It's also hard to justify the $65 a month (after taxes), especially if I decide to also pay for a landline Internet connection (Comcast or Speakeasy for around $55).
In the end, I returned the EX720 card to Sprint (they honored their risk-free guarantee). I've grown accustom to having a wired broadband connection at home but if I traveled more this card would definitely be the second most important thing next to my laptop.
I couldn't pass up the awesome deal at NewEgg for 4GB of RAM for only $110 after $40 mail-in rebate! Apple charges $700 for the same upgrade!! The GeIL 4GB Dual Channel Kit received great customer reviews on NewEgg so I felt confident purchasing it. Installing it myself was a breeze. Apple provides directions for upgrading your memory on their website and if you need something more visual, there are videos on YouTube showing how its done.
My MacBook Pro runs a lot better now with the extra memory. I usually have Windows XP running inside VMWare so the memory was really being eaten up quick. Also, having the newer Santa Rosa MacBook Pro is great because the full 4GB is utilized, instead of only 3GB.
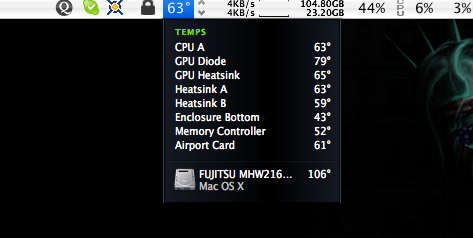
I'm always afraid to use my laptop when it's cold. I always fear that condensation will develop inside the laptop and short circuit something. It hasn't happened yet.
According to Apple, the MacBook Pro has the following specs:
Operating temperature: 50° to 95° F (10° to 35° C)
Storage temperature: -13° to 113° F (-24° to 45° C)
Relative humidity: 0% to 90% noncondensing
I wonder what the storage temperature range is for a hibernating MacBook Pro, since I always leave it sleeping.
I have long been an advocate of not immediately upgrading software. Most people upgrade simply because they're expected to or because they assume that newer stuff must be mean better stuff -- it doesn't. This "newer is better" mentality is the driving force behind our economy and advertisers are juicing every bit of attention from the younger generations, molding them into the perfect consumer. Many times consumers are presented with no other choice than to accept what is being sold. For example, if they purchase a new computer it's going to come pre-installed with the "latest and greatest" -- that is, latest and greatest piece of junk.
Software is a tool, designed to help you get something done. If the software already does the its job as expected, why change it? There are clearly differences between changes that effect usability and those which are meant to increase stability (the stone wheel, when first invented, worked as a wheel, however improvements increased its practicality and usefulness). The problem is that software companies need to make money -- if they created perfect software that gets the job done and never needed to be upgraded, where would their profits come from? The driving force known as greed creates competition between software companies, who then rush to get their latest and greatest software out before their competitors. The end result? Buggy, rushed software which adds as little "help-you-get-stuff-done" functionality as possible.
I mean really, how necessary are the added features of Windows Vista and Apple OS X Leopard? When Windows 2000 was upgraded to Windows XP, I recognized lots of extra unnecessary junk in XP. Windows 2000 ran smoother and faster than XP (and still does!) on all the machines I installed them on. However, there were certain features of Windows XP that became a requirement for business use, namely Remote Desktop. So I've accepted that Windows XP is probably the best option for those business users who need a Windows machine. But Windows Vista? I have yet to find one thing about Vista that makes it a better option than Windows XP.
People have come to accept that their computers will become obsolete within a few years -- but why? The only reason a system becomes obsolete is if the software you wish to run on it needs better hardware. If properly taken care of, the hardware will last a very long time. But perfectly working hardware is useless if the software you need runs slow, if it even runs at all. The solution? Write better software that requires less processing power. But wait, that's not advantageous to software and hardware vendors. The more they can sell you, the better. And after all, "newer is better", right?
I use Apple OS X Tiger on my MacBook Pro and even though Leopard has been released, I don't plan to upgrade. The only thing that would force me to upgrade is if there was some piece of software that required the newer Operating System. But thats a whole other issue altogether -- software vendors updating their software to work with newer operating systems and dropping support for the older systems. I'm discovering that a great portion of the Mac user-base tends to jump on the newest OS X, which causes developers to drop support for the previous version, ugh!
When I use vi, cat, grep, ssh, or any other Unix command, I don't wonder if they're going to be compatible with my system. I don't fear that running one of those commands will crash my entire operating system. Why? Because they're small, proven pieces of software that do their job and do it exceptionally well. That's the way software should be -- it should just work.
The comments in a recent Slashdot article prompted me to write this post. Read the comments and you'll see how many people are sick of software vendors releasing crappy software.
My workplace is switching from CVS to Subversion for source-code version control so I need to pick up Subversion rather quickly. It took me awhile to get comfortable developing with CVS and now I need to learn stuff all over again. I even have scripts setup to help with the deployment of my project using CVS -- now they need to be modified to work with Subversion. Oh well, I'm sure its for the best.
I've been reading the awesome, and free, Subversion book a lot lately and it has really helped with my understanding of how Subversion works. Since Subversion is not installed on OS X by default, we need to install it before using it from the command line. I downloaded the easy-to-install Subversion .dmg distributed by Martin Ott.
After running the .pkg-installer I was able to run svn help from the command line to confirm it was installed properly. If that command doesn't work after installing, you may need to add this line to the .profile file (in your home directory):
export PATH=$PATH:/usr/local/bin
Now you should be able to run all the SVN commands from your Mac OS X command line. If you prefer a GUI interface to SVN, check out svnX. I do all my development from within Eclipse, so I'm using an SVN plugin for Eclipse called Subversive. I prefer it over the more commonly known Subeclipse plugin because Subversive has a friendlier, and seemingly more configurable, interface.
Checking out a project from the command line over SSH is really simple, however while searching Google I was unable to find this "simple" answer. If I had found the free Subversion book before searching for this answer, I probably wouldn't be writing this:
svn checkout svn+ssh://svn.dev82.org/projects/myproject
That's it! The syntax for checking out a project is very similar to CVS, however SVN has the concept of "URLs" to specify the location and type of connection to your repository. If you have SSH Client Keys setup, you can run SVN commands over SSH without the password prompt (which is necessary for the deployment scripts I use).
Raam's MacBook Pro Specifications Operating System
Mac OS X v10.4 TigerMotherboard and CPU
2.4GHz Intel Core 2 Duo processor, 4MB on-chip shared L2 cache running 1:1 with processor speed
2GB4GB of PC2-5300 (667MHz) DDR2 memory; two SO-DIMM slots support up to 4GB800MHz frontside bus
Battery
60-watt-hour lithium-polymer battery (with integrated charge indicator LEDs) providing up to 6 hours of battery lifeNetworking
Built-in 10/100/1000BASE-T Gigabit Ethernet (RJ-45 connector)Built-in AirPort Extreme Wi-Fi wireless networking (based on an IEEE 802.11n draft specification); IEEE 802.11a/b/g compatible
Display
15.4-inch (diagonal) TFT LED backlit display with support for millions of colors; glossy widescreen versionVideo
NVIDIA GeForce 8600M GT graphics processor with dual-link DVI support, 256MB of GDDR3 SDRAMDual display and video mirroring: Simultaneously supports full native resolution on the built-in display and up to 2560x1600 pixels on an external display, both at millions of colors
DVI output port
VGA output using included DVI to VGA adapter
Built-in iSight camera
Storage
160GB 5400-rpm Serial ATA hard drive8x slot-loading SuperDrive (DVD±R DL/DVD±RW/CD-RW)
When work offered to buy me a new laptop, I had the option of getting a Mac or a PC. My co-worker had recently switched from a Windows-based laptop to a new MacBook Pro and although I already had a PowerBook G4, something urged me to opt for a new Mac. There were a couple of things driving my decision, namely the fact that Apple switched to Intel CPU's (instead of PowerPC) and NVidia Video controller's (instead of ATI). I'm a strong follower of Intel and NVidia, so having both packaged together with a Unix-based operating system was a hard thing to pass up.
It was arguably the best computing decision I've ever made.
I purchased an older PowerBook G4 from a friend a few years ago specifically to become more familiar with the OS X operating system. More and more people were beginning to ask me for help with OS X issues and since I had basically no experience with OS X, I wasn't very much help. The PowerBook was nice, but it still left me hanging when I really needed to use Windows. When Apple switched to Intel CPU's, everything changed.
Windows XP on Mac OS X
Now I can use VMWare Fusion to run Windows XP on my Mac while I'm running OS X. I can seamlessly switch between the two -- it's like having two computers in front of me. Files can be dragged between the OS X and Windows XP, with VMWare automatically handling the transfer between operating systems.
With BootCamp, I created a separate partition on my hard drive, inserted the Windows XP CD, rebooted the MacBook, and the Windows XP installation started as if I was installing on any other computer. Now I can hold down the 'Option' button on my keyboard during boot-up and select the Windows partition to boot my computer right into Windows -- OS X never even starts and Windows has full system resources, including full control of the NVIDIA GeForce 8600M GT video controller, which allows for GAMING!
Gaming on the MacBook is not only possible, it's better than any other solution!
The excitement that followed my discovery of how well gaming works on my Mac is what finally drove me to finish writing this post. With BootCamp, Windows is given full system resources. This means you're running a Windows machine with an Intel 2.4ghz Core 2 Duo processor, 2GB of RAM, and an NVIDIA GeForce 8600M GT video card with 256MB of GDDR3 SDRAM. And yes, any game you install won't know the difference between your Mac and your desktop PC gaming rig!
OK, so you probably think my excitement is a little overdone. I've been looking for a good balance between stability, performance, and entertainment for a long time. With a MacBook, you can setup a partition for Windows and install your games on that partition (Update 2007-11-28: Due to the large space requirements for some games (World In Conflict requires 8gb!), I've started installing games on an external USB 2.0 drive. They still run awesome!). Then for general use, including work, you'll boot into OS X and feel safe and secure about your game-free environment (and less distracted!). When you're ready for some entertainment, simply reboot into Windows XP and start your favorite game.
I believe this separation makes gaming on the MacBook better than any other solution. I have played two of Valve's new games (Portal and Team Fortress 2) and they run awesome. Here are some other games that are known to work (there are bigger lists, but I'm trying to save space):
* Age of Empires III (1440x900)
* America's Army 2.6 (1440x900) (1680x1050)
* Battlefield 2 (small artifacting)
* Battlefield 2: Euro Force (small artifacting)
* Call of Duty 2 (1440x900) (1680x1050)
* Civilization IV (1440x900)
* Counter-Strike: Source (1440x900)
* Doom 3 (Enter this into the console: r_mode -1 r_customwidth 1680 r_customheight 1050 vid_restart. This will enable 1680x1050 resolution. Replace with 1440 and 900 to enable 1440x900 resolution)
* F.E.A.R. (1440x900)
* Far Cry (1440x900)
* Flight Simulator 2000
* Flight Sim 2004 - Century of Flight
* Grand Theft Auto: San Andreas (1440x900)
* Grand Theft Auto: Vice City
* Half-Life 2 (1440x900)
* Portal
* Team Fortress 2
* Quake 3
* Quake 4 (1440x900 and 1680x1050)
* Return to Castle Wolfenstein
* Return to Castle Wolfenstein: Enemy Territory
* Splinter Cell: Chaos Theory
* UT2004
* World of Warcraft (1440x900)
For a long time, my thought-process was "Linux is good for servers, Windows is good for gaming and general use, and OS X is good for video and graphics design artists". I've been using my MacBook Pro for a couple of months now and my thought-process has changed to "Linux is good for servers, Windows is good for gaming, and OS X is good for everything else including general use".

Firefox or Chrome (web browser)
Thunderbird or GMail (email)
Cyberduck (FTP, SFTP, etc.)
iTerm (an awesome tabbed terminal I use)
OpenOffice (Office for Mac)
GeekTool (used to add stuff to your desktop, such as the IP info and server monitoring in my screenshot, very cool!)
Quicksilver (application launcher, and more!)
XCode (from Mac OS X Install Disc 1)
Fink (Debian package management tools)
wget, rsync (using Fink)
VMWare Fusion (for Windows XP, Linux, whatever!)
Macromedia Dreamweaver 8 (Web design, *cough* BitTorrent)
Eclipse (programming IDE)
TextWrangler (I recently switched to TextMate) (nice quick code editor)
VLC (video/media player)
Skype (Chat, Phone, SMS, Video Conference)
Transmission (BitTorrent client)
Adobe Photoshop CS3 (photo editing on your Mac, *cough* BitTorrent)
Audacity (lightweight audio editor)
Witch (awesome application switcher)
InsomniaX (used to prevent MacBook from sleeping when I close the lid)
USB Overdrive (a must have if you use an external USB mouse!)
Some tips and other things I've done:
Added
set term=linuxto my~/.exrcfile to fix theUsage: [[problem when using arrow keys in vim with iTerm (thanks Isaac)Changed my OS X Hostname to eris (thanks bcrow):
sudo scutil --set HostName erisReplaced the default OS X Command+Tab application switcher with Witch.
Changed the default Utility Lock background to this picture with this quote as my password prompt: "Linux is what you get when a bunch of PC hackers try to port UNIX to the PC. BSD is what you get when a bunch of UNIX hackers try to port UNIX to the PC."
There are lots of good post-installation tips here too.
And here is a good list of apps on LifeHacker.
There is a great plugin for Eclipse called SQL Explorer, which "is a thin SQL client that allows you to query and browse any JDBC compliant database". I have a local LAMP (or in this case, MAMP) environment setup on my Mac for development purposes. Up until now I have been using phpMyAdmin through an external web browser to view/edit the MySQL database (Eclipse's built-in web browser sucks -- I cannot even copy/paste from it!). Since I do everything else from within Eclipse, moving outside the Eclipse window just to view tables/data in the database really interrupts my work-flow (not to mention the distractions that come with using a web browser 😉 ).
SQL Explorer is really nice, once you get it working. I assumed it would be as simple as downloading the plugin and creating the connection to my local MySQL database -- but that didn't work. You can download and manually install the plugin, but choose to use the built-in Eclipse Install and Update functionality to download and install the plugin. Here is how it's done:
'Help -> Software Updates -> Find and Install' from the menus'Search for new features to install' option and click Next'New Remote Site', enter 'SQL Explorer' in the Name field and 'http://eclipsesql.sourceforge.net/' in the URL field and then click OK'SQL Explorer' in the list of 'Sites to include in search''SQL Explorer' and click Finish'SQL Explorer'. After selecting it, click NextThe SQL Explorer plugin should now be installed and available as a new perspective. You can start using it by selecting it in the Open Perspective list (Window -> Open Perspective -> Other...). Once you have opened the SQL Explorer, you will need to add a new connection. In the Connections tab, click the 'New Connection Profile' icon or right click anywhere inside the empty list and choose it. This will open the 'Create New Connection Profile' window.
This is where there is no documentation explaining what is really needed to connect to a MySQL database. You would think it would be as simple as selecting the MySQL Driver from the list, entering your database connection information and saving the connection. But upon doing this, I received the following error:
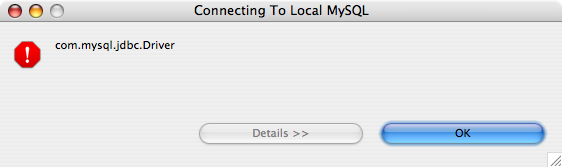
I don't know about you, but I have definitely seen more informative error messages than com.mysql.jdbc.Driver. After a little research, I discovered that we actually need to install the MySQL JDBC driver before using SQL Explorer to connect to a MySQL database. I didn't see this information anywhere in the SQL Explorer documentation or on the website. The fact that the Create New Connection window shows me a huge list of database drivers to choose from is very misleading!
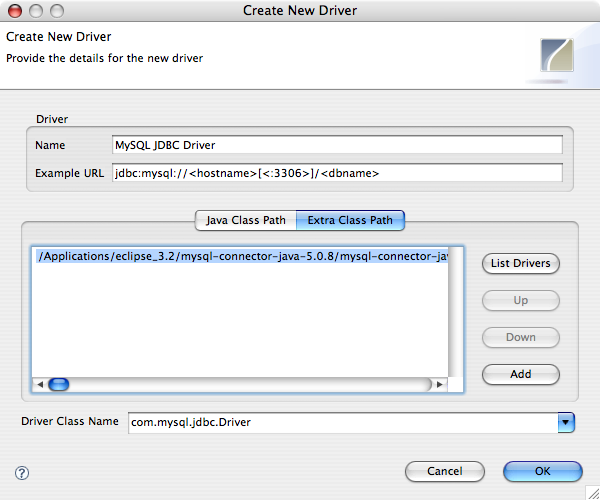
Before we add the new driver, we need to download the MySQL JDBC Connector. You will want to copy the mysql-connector-java-5.0.8-bin.jar file somewhere permanent, since the new driver we create will look for for this file whenever we connect to a MySQL database.
mysql-connector-java-5.0.8-bin.jar file some place permanent (I stored it in my /Applications/Eclipse/ directory)'Create New Connection Profile' window in SQL Explorer, click the New Driver button'Create New Driver' screen fill in the Name field with something like 'MySQL JDBC Driver'jdbc:mysql://[<:3306>]/ mysql-connector-java-5.0.8-bin.jar file you downloaded'com.mysql.jdbc.Driver'At this point, you should have a window that looks like this:
Click the OK button. This will bring you back to the 'Create New Connection Profile' window. Now you should be able to select your new 'MySQL JDBC Driver' from the list of drivers, fill in the URL field with something like 'jdbc:mysql://localhost:3306/test_database', and enter your MySQL Username and Password details (if you're using MAMP, the defaults are root/root). Click OK and then double click on the new connection in the Connections list. Assuming your MySQL database is running and the connection details are correct, you should see the Database Structure tab populate and allow you to view the contents of your database.
For those who might want to know exactly what versions of software I am using, here is the list:
Mac OS X 10.4.10 on a MacBook Pro
Eclipse 3.2.2
SQL Explorer plugin 3.0.0.2006
MySQL JDBC Connector 5.0.8
I've only started to explore the possibilities of what can be done with SQL Explorer, but I can already tell it will make my development process much smoother. I was surprised that there wasn't more readily available documentation explaining how to do what I have explained here, but hopefully someone will find this mini-tutorial useful.
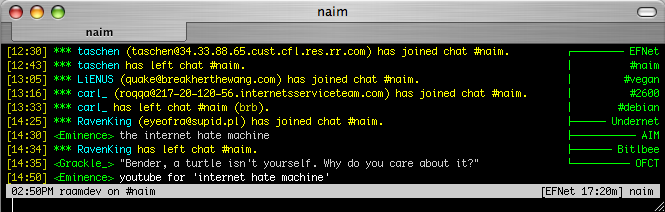
I've started using iTerm as my terminal client on Mac OS X. Previously, I was using the Terminal.app which comes with OS X, but that has its limitations. It also doesn't look as pretty as iTerm does when I'm using naim, the console based messaging client I use to talk on IRC, GoogleTalk, and AIM.
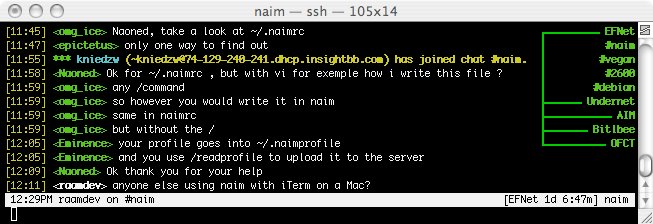
Out of the box, iTerm works really well and there wasn't very much I customized to make it look the way I wanted. I didn't see an option in Terminal to disable bold fonts, however iTerm has that option and it makes naim look much nicer:
Of course, I can't forget to mention one of the best features of iTerm: tabs! Yes, I can have five or six terminal windows open, and they will only take up the space of one window. Detaching a tab is as simple as dragging it away from the main window. OK, back to the point of this post.
When I started using a G4 Mac several months ago, I was using Terminal to access naim. After a lot of digging around on the web, I finally discovered how to map the keys in Terminal so they work as expected to control naim (changing screens, scrolling through the buddies list, etc). I documented my discoveries on the NaimWiki. However, to my disappointment and frustration, iTerm's default key bindings did not work with naim out of the box. I figured it would be as simple as following the steps I followed for Terminal, but that wasn't the case.
There were two problems I needed to solve: Fix the backspace key and the home, end, page up, and page down keys. The backspace key was Yfixed with the help of this blog post. I simply modified the 'delete' key mapping for the iTerm Keyboard Profile I was using and changed the hex code being sent from 7f to 0x08.
I then needed to add new entries for the other keys to work properly. For each of these keys, add a new mapping, select the key, choose 'Send escape sequence' for the action and enter the appropriate sequence:
[1~ (home)
[4~ (end)
[5~ (page up)
[6~ (page down)
That's it! You should now be able to change connections (IRC, AIM, etc) by holding down fn and pressing delete. To scroll through your buddies, or through channels on IRC, simply hold fn and press home or end. To page up and down through the conversation window, use fn and page up or page down.
You can find my addition of this information to the NaimWiki here. If you have your own tips for using iTerm, please let me know!
I've been using the Remote Desktop Connection for Mac from Microsoft to connect to my Windows machines on my Mac. I've used the open source client rdesktop on Linux machines in the past, but I figured since Microsoft provided a free client I might as well take advantage of every free thing I can get from the company that loves to charge for everything. But then I heard about how the performance of the Microsoft Remote Desktop client on the newer Intel Rosetta Macs was not that great, and that rdesktop worked much better.
So I installed rdesktop using MacPorts (sudo port install rdesktop) which installed rdesktop in /opts/local/bin/. Then I had to start X11 (I already installed X11 from my Mac OS X CD) and using the X11 terminal run rdesktop from the command line to connect to my Windows PC (running open-x11 /opt/local/bin/rdesktop my-server-ip from iTerm did not work). Obviously this was a lot of work to simply open a connection to my Windows server, so I searched for a simple workaround. I found one here. For sake of maintaining a consistent source of information, and because I modified some of the steps, I'll recreate the steps here:
1) Create ~/my-windows-pc.sh (important difference in this step is the addition of the -K option):
#!/bin/sh

/opt/local/bin/rdesktop -K -f -a 16 my-windows-pc-ip
2) Make the file executable:
chmod +x ~/my-windows-pc.sh
3) Apparently the default xinitrc settings get in the way when running rdesktop full screen, so lets place a copy in our home directory and make some changes to it:
cp /etc/X11/xinit/xinitrc ~/.xinitrc
Edit the file and remove the line that says xterm &
4) Finally, we can do some cool stuff. Lets create a single .app (Mac's application file) that can do all the work of opening X11 and running our my-windows-pc.sh script. Start by opening the Script Editor (Finder -> Applications -> Apple Script -> Script Editor). You should be presented with an Untitled script editor window (if not, choose File -> New). Type the following into the editor window:
do shell script "open-x11 ~/my-windows-pc.sh &"
Choose File -> Save As. Then change File Format to Application. Type a name to save your application (such as My Windows PC), select a place to save the application (such as your home directory or Desktop), and click Save. Now you should be able to double click on the My Windows PC file to open your Remote Desktop connection.
The first major difference between this method and using Microsoft's Remote Desktop client was that I could not press Apple+H to hide the Remote Desktop connection window, and then Apple+Tab to switch back to it, while running Remote Desktop in full screen mode (the -f option in the rdesktop command). Also, in full screen mode the Apple+H shortcut doesn't work by default. The -K option (keep window manager key bindings) we added to the rdesktop command allows us to still use the Apple key to do things while we're connected to the Windows PC (including Apple+H), however it doesn't work the way it's supposed to! Another huge annoyance is that when running Remote Desktop in full screen mode, its not truly full screen because we still see the Apple Dock and the X11 bar across the top.

The way to fix these problems is by enabling full screen in X11 (X11 -> Preferences -> Output -> Enable the Enter Full Screen menu). Keep in mind, Alt+Apple+A switches between full screen and windowed mode in X11 (in full screen X11 mode, you can't see the X11 menu bar to get back into the Preferences without changing back into windowed mode!). Also, I can't remember, but I might have also checked the "Enable keyboard shortcuts under X11" option. Now, if you start your full screen Remote Desktop connection, it should really look full screen (nothing visible except your Windows PC).
Finally, it would be really nice to be able to switch between the Remote Desktop connection and applications running on the Mac. I currently use Witch as my application switcher, instead of the default application switcher that comes with the Mac (so I can't tell you if this issue applies if you're not using Witch (and if you're not, you should be!)).
To make the X11 application show up in the Witch list, choose System Preferences -> Witch -> Behavior. Then enable the "Show an Activate Item for windowless/hidden applications". Now when you're inside a full screen Remote Desktop connection, you can press Apple+H to hide the full screen window, and you should see an "Activate X11" option in your Witch list, which you can use to switch back to the full screen session. This method also works if you're using a windowed rdesktop session.
Mac OS X has a very limited application switcher built-in, so limited in fact that it's been driving me crazy. You cannot use Command+Tab to switch between multiple windows of the same application; you must use another keyboard shortcut: Command+`. Another huge limitation is the inability to switch between minimized applications. Once an application is minimized, I have no way of restoring it with the keyboard; that's actually not true: you can hold the Option key after highlighting the minimized application to restore it.
A very nice replacement application switcher is a program called Witch, developed by Peter Maurer. The only problem is that OS X prevents you from replacing the keyboard sequence Command+Tab. I could learn another keyboard shortcut, but why? I've been using Alt+Tab (the Windows version of the same shortcut) for years and I don't want to be relearning things unless absolutely necessary.
The solution is to use two other programs, PullTab and Unsanity Application Enhancer, to disable Command+Tab. Then you can bind Command+Tab to launch Witch. Although this sounds complicated, its really not. There is a nice video tutorial that explains how to do all this, however I'd rather read directions than watch them.
Step 1: Download and install Unsanity Application Enhancer. It's very straightforward. After downloading, mount the image, and double click on the installation program.
Step 2: Download and install PullTab. This is a little less straightforward. After downloading and mounting the image, you need to copy the PullTab.ape file to one of two places:
To install for all users on your Mac, copy the file here:
LibraryApplication Enhancers
To install for only yourself, copy the file here (if the directory doesn't exist, create it):
Users
Step 3: Logout and then back in. Command+Tab should now be disabled.
Step 4: Download and install Witch. After mounting the image, simply double click on the Witch.prefPane file. This will install a new panel in your System Preferences. Now that Command+Tab is disabled, you can bind it from within the Witch preferences panel to activate Witch!

My Debian GNU/Linux server Pluto, which is located in my apartment in Cambridge, is running on a Mac Mini (PowerPC). Over the past few days, I've had several power outages. When the power comes back on, my Windows computer turns back on and, if I need to, I can remotely connect to it from the office. Pluto however, does not automatically turn back on. I need to physically turn it on when I get home from work. This is not acceptable!
On a PC, there is a BIOS option called PWRON After PWR-Fail. This simply turns the computer back on if the power goes out while it is running. Great, but the Mac Mini doesn't have a standard BIOS; it has OpenFirmware! I did lots of Googling and came up with solutions specific to Mac OS X, but that doesn't help me since I'm running Linux. I even discovered the command line utility pmset which can be used to modify power management settings from within OS X (and a nifty option called autorestart which causes the Mac to automatically restart after power failure). I thought maybe I could find the pmset utility for Linux and install that, but that turned up nothing as well.
Eventually, I found the answer in this forum post on an Ubuntu forum. It's amazing how the Ubuntu operating system has created such a huge wealth of information for the Linux community. This huge pool of questions and answers has made finding solutions to common (or not so common) Linux issues much easier over the past few years.
As root, execute the following command:
echo 'server_mode=1' > /proc/pmu/options
You can confirm the changes have been made by running:
cat /proc/pmu/options
If server_mode=1, then you're all set. You can try unplugging the power from your Mac Mini, waiting a few minutes, and plugging it back in. The Mini should turn on as soon as you plug in the power.
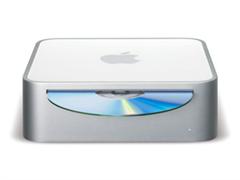
I now have two Mac mini's sitting on my desk. David (at Aerva) gave me the broken Mac mini that was sitting in the office unused. Here are the specs:
I brought it home, turned it on, and sure enough it wouldn't boot. So I went to MacEdge in Nashua, NH and gave it to them for repair, only to have the problem incorrectly diagnosed as bad 3rd party memory; or so I thought. Here's the letter I wrote to the Mac technician the second time I brought the computer in:
----------------------------------------------------------------------------------------------------
Dear Mac Technician:
I originally brought this Mac mini in for repair because it would not boot. I have the care plan on it, so I should be covered for another 2 years (purchased in Jun of 2005). A few days ago, a Mac tech called and informed me the problem was bad 3rd party memory. This being the case, it was not covered under warranty. So the Mac tech reinstalled the software, stuck the old memory back in the Mac and I paid $75 when I picked it up.
When I arrived home, I plugged the Mac in, fully expecting it not to work. However, it booted with the new software, asked for my registration information, and finally booted into the OS. I was then prompted to download updates, which I did, and then went to bed.
The next morning the Mac mini was still running. It had finished installing updates and asked me to reboot, so I did. After rebooting however, I received the following message:
“You need to restart your computer. Hold down the Power button for several seconds of press the Restart button.”
I tried both warm and cold boots, and still receive that same message. I have another Mac mini (also a G4 but 1.42ghz instead of the 1.2ghz ) which has been running flawlessly since I purchased it over a year ago. I removed the RAM from the broken Mac mini and put it in my original working Mac mini. It booted fine. I tried restarting it, installing updates, and using the software, and it works perfectly. Keep in mind this is while using the “bad 3rd party memory”.
Puzzled, I took the RAM from my original Mac and put it in the broken one. After booting, I received the same message asking me to restart.
So it appears as though the problem is not bad 3rd party memory, but rather another issue, possibly a bad motherboard, which would be covered by the care plan.
----------------------------------------------------------------------------------------------------
The second time I brought in the computer, it did not have the "bad 3rd party memory", it had my known good memory inside. About a week later, I picked up the Mac mini again and the tech's notes said that there was nothing wrong with the computer. He reinstalled the software, rebooted several times, left it running for over 48 hours, ran a couple of CPU and memory intensive applications, and never once did anything go wrong. Luckily, I did not have to pay anything the second time, since they did not discover any problem.
The tech's notes also gave me a very helpful clue: He said that installing the OS with bad memory could corrupt the Kernel of the OS. That means that replacing the bad memory with working memory would not fix the problem because the kernel itself is corrupt. So I concluded that I should be OK to use the memory, as long as I don't install the OS using that memory.
I tested my theory by attempting to upgrade my original Mac mini (1.42ghz) from Panther to Tiger, using the Tiger upgrade CD I accidentally found in my Mac mini box yesterday and the "bad" memory. Sure enough, I couldn't even get the install to start. It kept giving me weird errors and would not allow me to proceed with the upgrade. As soon as I took out the bad memory and added my original memory, the install worked flawlessly.
I'm a bit nervous using the "bad" memory in my other working system, only because I don't feel confident that it will continue working forever. The system could one day decide to crash out of the blue. Since I don't use the Mac mini for anything besides becoming familiar with the OS, this shouldn't be a problem. However, I do plan to use my other Mac mini (the slower 1.25ghz one) as a Debian Linux server, so I'll have to make sure it has the good memory inside.