Struggling with Online Photo Organization

I've been seeing so many WordPress blogs with integrated Flickr photo streams showing off their photos and it's really making me want to do something similar with my photos. If I had an easy way to share photos I think I would do a lot more quality photography (just as this blog allows me to easily write and publish anything).

I created a Flickr account awhile back and uploaded some photos to my account to try out the features. Flickr is OK, but I hate the idea of relying on someone else's service. Plus, there's the whole paying-for-extra-storage thing that I really don't want to think about. I'm sure I could modify the script powering my current gallery to make it integrate more nicely with this blog and perhaps even take some design lessons from Flickr.

Upgraded to WP 2.5 and Changed Theme

Yup, I did it! I've upgraded this blog WordPress 2.5 and, as I'm sure you can see, I've changed my theme. It's quite a change from the previous theme, but I like change and change is good. I spent quite a bit of time modifying it to my liking and there are still a few things to be done, such as adding the search bar (I couldn't find a nice place to put it and I didn't think it was really necessary to get the theme out there).

Another major addition that you'll soon notice is my use of Asides. Sometimes I want to post something on my blog but I feel it's not quite worthy enough for an entire post. Then if I do decide to post it, I'll end up trying to make the post long enough to feel like an actual post, which usually just ends up degrading the quality of everything.

You can think of an aside as a little sticky note. I might post an aside saying where I've been, what I'm doing, or just some random thought I had. My Twitter account is hooked up to WordPress using the Twitter Tools plugin so I can even post asides via SMS from my phone.

An aside post won't look like a normal post, but you can still comment on them like regular posts. An aside will look like this:

  • With all the technology we have, we still can't solve a problem as simple as traffic congestion. (0)

If you want to read more about asides, check out Matt's post on them. He's the one who started WordPress and his blog is where I first saw asides in use. He uses them a lot on his blog, so if you're still confused as to what they are, check out his page.

Feel free to give me your thoughts on the new theme. It was a really hard decision to go with something so dramatically different from the "clean and white" look that I usually try to stick with. I realized that if I had to design something in the physical world, these are the colors I would use. My online blog should reflect that. 🙂

Planning for the upgrade to WP 2.5

I spent this past weekend setting up a copy of this blog in my local development on my laptop. I wanted to see if upgrading from WP 2.3 to 2.5 would break my current theme and as I suspected, it did. What broke wasn't obvious (category browsing I believe), but it was enough to make me decide to change my theme. There's nothing wrong with the current theme, it just feels like it's time for a change.

Setting up a local copy of my blog was really easy. I only needed to modify two WordPress settings and even then, that was only because I choose to use a different domain name locally. The basic process looked like this:

  • Copied all of the WP files for my blog to my laptop
  • Exported the live WP database and imported it into the local MySQL database using phpMyAdmin
  • Created a database user to match the one on the live site (with the same password)
  • Created a VirtualHost entry in my local httpd.conf:
  • 
       ServerAlias blog.raamdev.dev
       DocumentRoot "/Users/raam/workspace/raamdev.com"
       ServerName www.blog.raamdev.dev
    
    
  • Added an entry to my local hosts file (/etc/hosts) so that blog.raamdev.dev would resolve to the local web server:
  • 127.0.0.1      blog.raamdev.dev
    
  • Opened the local phpMyAdmin and modified the following database entry, changing the URL to my local development address: wp_options -> siteurl = http://blog.raamdev.dev
  • I was then able to login to my WP admin page at http://blog.raamdev.dev/wp-admin/ and modify the second setting: General Options -> Blog Address = http://blog.raamdev.dev

Now I could type in http://blog.raamdev.dev in my local web browser and use my blog on the local machine. This is great because it allows me to test themes and make changes without screwing up my blog.

Four Characters That Break WordPress

I was trying to write a post about some code for generating HMAC signatures without PEAR or PHP5 and I discovered that I was unable to post anything that contained these three characters (without the space):

chr (

When I clicked "Save and Continue Editing", I received a 404 error. It took me a good 30-40 minutes of blaming the iG:Syntax Hiliter plugin before I discovered it was actually WordPress. It breaks even if those three letters are enclosed in pre or code tags and I also confirmed this problem occurs when posting a comment.

I'm using WordPress 2.33 so I upgraded one of my other blogs to WordPress 2.5 just to see if this problem was gone (and to maintain my sanity) and was glad to see that it had been fixed*. The new WP looks very spiffy, except for the missing "Save and Continue Editing" button and the annoying lack of a preview feature (the Preview Frame plugin fixes this and I was glad to see it supports the latest WP).

I don't like fixing what isn't broken, so I've been holding off upgrading this blog to the latest WordPress. Besides, I'm pretty sure my customized theme will break with the new version and I simply don't have the time to be fussing around with my theme. If I'm going to fuss around with it, I'd rather change it altogether. This site is due for a new look anyway.

*UPDATE: I don't know if I'm losing my mind or what, but after upgrading this blog to WP 2.5 I'm having the same exact problem with creating a post containing those four characters!

UPDATE UPDATE: I did some Googling and discovered that the Apache mod_security might be doing something because apparently the chr () function is commonly used in exploits. This blog post explains 10 ways to secure WordPress and if you search for chr you'll see that it's part of the SecFilterSelective THE_REQUEST line.

CONFIRMED: I tried disabling mod_security for my entire account by adding SecFilterEngine Off to a .htaccess file in my root web path. I was then able to post those four characters without any problem. After creating a post containing chr(), I removed the .htaccess file to enable mod_security and as expected the post still displayed fine.

So, since this is only a problem when submitting a post, and since permanently disabling mod_security isn’t a great idea, I’ll just temporarily disable it in those rare situations when I need to create a post containing chr().

WordPress MU and BuddyPress

I have a lot of big ideas in my head for different types of sites that I think the masses would find very useful. What I've been struggling with over the past few months is deciding where to start with these sites. There is so much involved in making a site successful and even more involved in running a successful site.

What I really wanted was some type of platform that allowed me to turn my idea into a reality without worrying about basic things like the underlying user account database structure or basic functions like creating a blog post.

A few weeks ago I was pleasantly surprised to learn about WordPress MU, which basically allows you to run hundreds of thousands of blogs using a single installation of WordPress (it runs wordpress.com). And then it got even better.

Today I came across BuddyPress, which takes WordPress MU one step further by developing a collection of plugins that turn your WordPress MU installation into a social networking platform (see John's post about the differences between the two). BuddyPress is just getting started, but I already see the huge potential behind it.

I can see the Internet eventually being full of little social networks covering every niche imaginable -- much like the huge mess of web pages and forums on the Internet are today. The best way to find what you're looking for on the Internet now is to either know of a forum or website, or to search Google and hope you find what you're looking for. Imagine being able to join or browse an area of the Internet that has been designed, authored, and created by the very people who have the same interests as yourself.

Maybe that isn't the final goal of BuddyPress, but I can definitely see how WordPress MU combined with the BuddyPress plugins will make bringing my ideas to life that much easier. WordPress MU + BuddyPress basically solve 75% of the problems for many of the sites I have in mind, so besides making me feel comfortable about scale, they will definitely save me time.

Pretty Image Borders with CSS

You may have noticed a lot of the pictures I've been posting lately have a little border around them. I started doing this after I saw Raf's site and realized how easy it is to do with a CSS class.

One of the big annoyances I used to deal with when posting images was that I would always need to add border="0" to the <img> tag to prevent the ugly blue borders that appear when the image is surrounded with a link tag. Although it's possible, I didn't even think to disable all image borders in CSS. By why only disable them when we can make pretty borders too?

Here is the CSS I use (place it in your style.css file if you use one):

[sourcecode lang="css"]
.photo img, .photo a img {
border:1px solid #CCCCCC !important;
padding:5px;
margin-bottom: 10px;
}
[/sourcecode]

And here is how I use it when I'm writing a post in WordPress (keep in mind that I don't use the visual editor):

[sourcecode lang="html"]
<div class="photo">
<a href="http://raamdev.com">
<img src="http://images.raamdev.com/DSC_1112_640.JPG">
</a>
</div>
[/sourcecode]

And here is an example of the output:

The CSS border adds a touch of style to the image and without it the image border would appear sharp and out of place. Since I added .photo a img to the class definition, even images that are linked to something will appear with the nice border.

There are already buttons for creating links and adding images in the WordPress editor, but adding the <div> tags around the image does take a bit of time. Eventually I'd like to write a quick plugin for WordPress that adds a little photo button to the editor bar to automatically add the DIV tag with the proper CSS class already specified.

Uppercase table tags create extra whitespace in WordPress

When creating tables inside a WordPress post, using uppercase TABLE and/or TR tags causes additional whitespace to appear above the table. I say and/or TR tags because uppercase TABLE tags alone don't seem to create additional whitespace, however uppercase TR tags do. If you combine the use of uppercase TABLE and TR tags together, they create even more whitespace!

First, lets see what normal output looks like:

[html]
This is a simple sentence used to demonstrate an odd spacing effect when uppercase TABLE and TR tags are used in a table.

[/html]

WordPress output:

And now, if we copy the exact same content and make the TABLE and TR tags uppercase, look what happens:

[html]
This is a simple sentence used to demonstrate an odd spacing effect when uppercase TABLE and TR tags are used in a table.

[/html]

WordPress output:

I'm running the latest version of WordPress (v2.3.1 as of this post) and I have confirmed this oddity appears on multiple platforms (Mac OS X 10.4.11, Windows XP SP2) with multiple browsers (Firefox 2.0.0.11 on Windows and OS X, Internet Explorer 6.0.29 and Opera 9.22 on Windows, and Safari 3.0.4 on OS X).

Upon closer inspection of the actual output produced by WordPress in my browser (using view source), I discover the problem:

Browser output of the lowercase example:

[html]

This is a simple sentence used to demonstrate an odd spacing effect when uppercase TABLE and TR tags are used in a table.

[/html]

Browser output of the uppercase example:

[html]

This is a simple sentence used to demonstrate an odd spacing effect when uppercase TABLE and TR tags are used in a table.

[/html]

It appears that WordPress is looking for the <table> and <tr> tags and when it finds them it doesn't automatically add <br /> and <p> tags around them like it does with the rest of your post. (I don't use the visual editor, so I'm able to easily add hand-written HTML directly to my post.) However, the search for <table> and <tr> must be case sensitive which causes problems if your tags are anything but lowercase.

I would normally report this as a bug to WordPress, but I'm sure the reply will be that all XHTML must be lowercase and so the problem is not relevant. I say that's bad backwards compatibility. 😐

Upgraded to WordPress 2.3 – Growing Pains

I generally like to wait awhile before upgrading things, especially since most bugs (serious or otherwise) come out after the new version has been released. A little over a month had passed, so I decided it was time to upgrade my WordPress installation to version 2.3.

How can we make upgrading as quick, painless, and safe as possible?

I found a really nice way of upgrading WordPress: The Automatic Upgrade plugin. It basically automates the process of backing up your existing WordPress installation (including the database), downloading the latest version of WordPress, and installing it. I don't like the idea of putting my entire blog in the hands of a plugin and I would never have even considered using it if there wasn't a backup feature included. I was happy to see a zip file of all my WordPress files, as well as a backup of my entire database, delivered to me through the browser before any upgrading began.

The upgrade to WordPress 2.3 went smoothly with Automatic Upgrade. In the future, it would be really nice to see something like the Automatic Upgrade plugin included directly in WordPress, since upgrading to a newer version is always going to be a necessary evil. The WordPress developers seem to have started down this path by including an Upgrade Notification feature in this version (which I discovered while writing this post):

WordPress Upgrade Notification

What happened to inline preview!?

After upgrading, I immediately noticed something very annoying with post Preview. The inline preview box at the bottom of the post editing window was gone! Instead, there was Preview link next to the Title field which opens an entirely new window to preview the post:

WordPress 2.3 Preview Link

The ability to preview your post from the edit page after clicking 'Save and Continue Editing' seems to make a lot more sense to me (at least from a work flow perspective) than saving the post, clicking preview to open a new window, previewing the post, and then closing the window.

I read somewhere on the WordPress forum that the decision to remove inline preview was based upon speed and performance concerns. However, in the 500+ posts I've created prior to WordPress 2.3 I have not once experienced a performance issue with the inline preview. If the developers wanted to remove inline preview, they should have at least created an option to enable/disable it and simply made the default disabled.

I found a really nice plugin that fixes the missing inline preview problem by adding a the inline preview back onto the edit page. It's called Preview Frame and is created by Rob Miller.
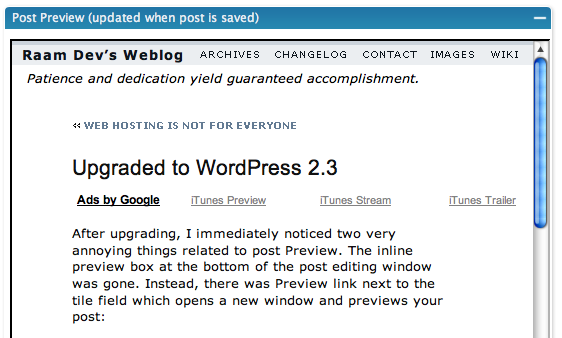
Ah, sweet familiarity! It's so nice being able to preview my post without leaving the editing window! Hopefully a future version of WordPress will bring back the option to preview inline, but until then, thanks Rob!

Drafts: My start-but-not-finish habit is finally (at least somewhat) hidden!

If you're like me, you probably have dozens of drafts saved up for a rainy day. Perhaps there was something interesting you found and wanted to blog about but simply didn't have the time to write a fully polished post, so you jotted down some stuff and saved it as a draft. Once in awhile you'll finish a draft, but otherwise the pool continues to grow.

Prior to version 2.3, when you clicked on "Write" you would be presented with a big blob of your drafts, probably about 15 - 20 of them, which would take up about 1/3 your screen. Of course, this was very unnecessary. Version 2.3 fixes this in two ways. First, the list of drafts has been shortened to three:

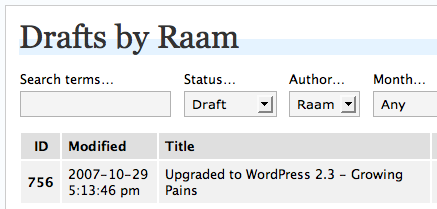
Secondly, clicking the "more" link brings you to the Manage Posts section where you're now able to filter posts by their status, sorted by Modified Date (see the timestamp bug below!):
Tagging and Tag Clouds: Should I follow the crowd?

Another big addition to WordPress 2.3 is the support for tags. Some people believe that tags are a better solution to categories (the Web 2.0 solution). I'm still trying to decide if I agree with that statement, since I really like the organized method of current category design.

The idea behind tagging is that you "tag" each post you write with multiple words, similar to selecting a category or multiple categories for the post. Then, using the new wp_tag_cloud() template tag available in WordPress 2.3, you can display a tag cloud:

Tag Cloud Example

A tag cloud is basically a way of visually displaying the most common tags and allowing the user to click on any tag to bring them to a list of posts containing that tag. If you tag a lot of posts 'Publication' and a few posts 'Security', then the security tag will appear smaller in the cloud (as in the example above). There is an alternate way to implement a tag cloud without using the tags feature by using the existing categories instead. This blog explains in detail how it can be done.

Until I find a good reason to start tagging my posts, I will continue using categories and leave the Tags field empty.

Everything has bugs!

I've found at least two bugs so far. I don't know if they've been fixed with 2.3.1, since I haven't installed that yet. The first is less of a bug and more of a usability issue, but both are related to the post timestamp.

When you start writing a new post, clicking Save does not save a timestamp. This means it won't show up at the top of your drafts list! If you click "Save and Continue Editing" or "Publish", the current timestamp is written and everything works as expected -- or does it?

I had another issue with timestamp. After publishing a post, I decided I wanted it to show up tomorrow instead of a few hours from now. So I modified the timestamp and re-published the post, fully expecting it wouldn't show up until tomorrow. However it still showed up when the original timestamp date passed, even though the current timestamp showed a later date!

As with any type of bug, replication is a requirement. I performed a couple of tests to see if I could duplicate the second timestamp issue, but I was unable to. Raf suggested a possible plugin conflict, but I disabled all plugins and still had the same problem. I discovered the second timestamp bug before the first and now I'm wondering if the two are related.

Obligatory Summary

WordPress is definitely morphing into a better piece of software. I like the new features, though I'm a bit surprised at the remove of inline preview and the obvious timestamp bug. I've been using WordPress since the first 2.0 version and I really like the way things are designed. In determining what to use as a CMS for the website of my web hosting company, I've decided WordPress is an ideal candidate due to the ease of customization and the power provided through the templates.

Reversing WordPress Comments Order

After creating the Comment History page, I realized the Recent Comments Plugin was listing the comments in order from newer-to-older, instead of older-to-newer (which is how the comments on my post pages were ordered). I thought that I should probably change the ordering of the comments on my post pages to match the Comment History ordering.

The solution, I discovered, was rather simple. Just open the comments.php file in your theme's home directory, find this line:

<?php foreach ($comments as $comment) : ?>

and immediately above it add this:

<?php $comments = array_reverse($comments, true); ?>

Save the file and your comments will be ordered from newer-to-older. However, after making the change I realized my original older-to-newer ordering made more sense. Why? Because when someone is reading a post, the first comment they read might not make any sense unless they have read a previous comment.

So to make reading the post page more user-friendly, comments should be ordered from older-to-newer (the WordPress default). For a Comment History page however, ordering comments from newer-to-older makes more sense because the visitor is probably viewing the Comment History page to check for the most recent comments on a post they have been following.

Comment History with Get Recent Comments Plugin

My Dad and I have been going back and forth quite a bit in the comments on a recent post I wrote about Consumption. This filled up the Recent Comments list on the sidebar rather quickly and I wasn't able to see other recent comments. I realized a comment history or archive page, similar to my post archive page, would be very useful.

After looking around a bit, I found a really nice plugin by Krischan Jodies called Get Recent Comments. It has a ton of features and lots of configuration options. It has been updated as recently as last month and even supports the new widgets feature of WordPress 2.3 (it also works with older versions of WordPress as far back as 1.5).

By default, the instructions included with the plugin explain how to add recent comments to your sidebar. They don't, however, mention anything about creating a comment history page. In the instructions there is a snippet of PHP code which you are supposed to use in the sidebar.php file of your WordPress template. I thought great, I simply need to create a new page in WordPress and add that snippet of code to the page using the runPHP plugin to execute the PHP on that page. This worked, partially. At the top of my comment history was this error:

Parse error: syntax error, unexpected $end in /home/raamdev/public_html/blog/wp-content/plugins/runPHP/runPHP.php(410) : eval()’d code on line 1

I thought perhaps it was because my runPHP plugin was outdated, so I upgraded it to the latest version (currently v3.2.1). I still received the error, so I decided to play around with the snippet of PHP code provided by the Get Recent Comments plugin. I was able to modify it slightly to get rid of the error as well as output some additional text. Here is the snippet of code I use to create my new Comment History page:

<?php
if (function_exists('get_recent_comments')) {
   echo "(Showing 500 most recent comments.)";
   echo "<li><ul>".  get_recent_comments() ."</ul></li>";
}
?>

In the plugin options, I configured the plugin to group recent comments by post. This created a very readable Comment History page. After adding the ID of the new page to the exclude list in my header.php file to prevent the page from showing in the header (wp_list_pages('exclude=704&title_li=' )), I added a 'View comment history' link to the bottom of the Recent Comments list on the sidebar.

The Get Recent Comments plugin is really powerful and I'm a bit surprised that the plugin doesn't include basic instructions about how to create a comment history page. If you receive a decent amount of feedback from your visitors (in the form of comments), this is a great way to see all that feedback on a single page. If you have Trackback's and Pings enabled, this plugin can even show those.

Installed reCAPTCHA Plugin

SecureImage is nice, but the problem is that SecureImage doesn't work well with wp-cache, the cache plugin I use to insure a speedy experience for my visitors. So only a few minutes after installing SecureImage, I found another solution: reCAPTCHA.

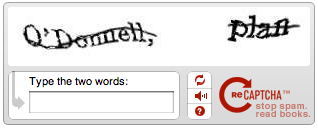
The idea behind reCAPTCHA is very cool. It works by asking you to read two words, one which the computer generated and one that is part of a scanned page from a book, a word that the computer was not able to decipher. If you can understand the computer generated word, chances are that you'll also be able to decipher the scanned word. This helps digitize books! If you want to learn more about reCAPTCHA, I suggest you visit their site and read the "What is reCAPTCHA?" page.

I had to do a little tweaking to get it positioned properly with my custom WordPress theme, but that wasn't too bad. I'm really liking reCAPTCHA. Not only does it work with wp-cache, but it also fixes the annoying problem where your comment data would be lost if you enter the wrong information in the captcha. Of course, the captcha will be used by you, my visitors, more than anyone else, so please leave me your comments!

Installed SecureImage Plugin

A few months ago I installed the Challenge plugin, which presents a math question for anyone wanting to post a comment. It's been working great and I have not received a single spam comment... until this morning. I woke up and checked my Blackberry for new email: 49 new email messages. They were all comment notifications. Apparently a spam bot managed to get around the Challenge plugin and posted 49 spam comments throughout my blog!

After deleting the spam, I decided to install the same plugin I've installed on a couple of other WordPress blogs, SecureImage (the developers site is down and that is the best URL I can find for SecureImage). It's a simple captcha plugin that generates an image containing a string of letters. Other captcha plugins required GDLib, which I couldn't seem to find on my web server (or at least didn't bother spending much time looking for it). SecureImage requires ImageMagick, which is readily available (read: default /usr/bin/convert path worked fine). After installing a TrueTypeFont (FreeSansBold.ttf) I was up and running.

Upgraded WordPress

Well, I took the plunge and upgraded my WordPress installation from 2.0.1 to version 2.1.2. I few weeks ago was going to do the upgrade to version 2.1.1, but I decided to wait a bit longer. Damn good thing I waited -- only four days later it was discovered that someone cracked the 2.1.1 WordPress files and allowed dangerous code to be executed.

Now it's been a few weeks since the updated version was released, so I feel comfortable about upgrading. During the upgrade process I forgot the step to disable all the plugins. When I copied the new files to my web server, my whole blog installation was screwed up. So, praying to god that the backups I made would work, I deleted everything and restored the backups.

Long story short, I eventually got everything working with the latest version of WordPress. I had to install a new plugin called RunPHP, so that I could get the SRG Clean Archives plugin working again. The entire blog feels a bit more responsive, which is always good.

Please let me know if you notice anything broken or anything that doesn't look right!

Replaced Akismet plugin with Challenge 1.1

I'm sick of scanning through the list of comments caught by Akismet to see if there are any false-positives -- I have had a few false-positives, namely from DJT.

So I've deactivated Akismet and installed Challenge 1.1. It works by asking the commenter a question. If the correct answer is provided, the comment is posted. I can customize Challenge to ask any question, however I'm currently using a simple, random math problem. Hopefully this plugin will save me from scanning through hundreds of spam comment posts.

One thing I would like to fix, though I don't think it will be an easy fix, is to save the contents of the users comment in case he enters the wrong answer. Right now, if you enter the wrong answer and click Post, it gives you a message saying you entered the wrong answer. However, when you press the Back button in your browser, you have to retype your comment. So get the answer right the first time!

Go ahead and leave a comment to try out the new system.

EDIT: After deactivating Akismet, I started getting a lot of TrackBack spam. Since Akismet doesn't have any option to only filter TrackBack's, I've decided to disable link notifications altogether.

SimplrRaam – Modified Simplr Theme

As you can see, I am now using a modified version of the WordPress Simplr theme by Scott. It took me a good 4 1/2 hours to modify and to make sure everything was working the way I wanted it to.

Changes:

  • The sidebar has been moved from the bottom to the right.
  • Single post pages are shown without any sidebar to make room for actual post content when you're reading the post.
  • Each of the pages (About, Contact, Archives, etc) also do not show the sidebar.
  • From the main page, when you click one of the categories from the sidebar to browse the posts in that category, you will be provided with a sidebar to further navigate via categories while you're reading posts.
  • The theme is designed to stretch with the browser window, so it should work on many different resolutions (even 640x480, though that wouldn't be very usable)
  • Moved the title of the blog into the top left corner, on the same line as the page links
  • Moved the tagline (my quote) to the right corner, under the page links

Important Installation Notes:

  • You can no longer use the Simplr Layout Width or Sidebar Layout options.
  • You MUST change Layout Width to 95% once you have activated the theme.
  • I recommend you set the Base Font Size to 75%
  • If you change the Base Font Size option to something greater than 75%, you may need to increase the following in style.css: div.postcontainer { margin-right: 330px; }
  • The rest of the Simplr options should work.

Screenshot:

Download: simplrraam.zip (379kb)

Keep in mind that I did this in a hurry, so many of my changes to the theme files are not documented. I also plugged in extra CSS styles where I needed to get things working. Please feel free to post comments, fixes, or suggestions to this theme below.

New Theme Installed

As you may have noticed, I installed a new theme for my blog. What do you think about it? Scott over at plaintxt.org has a bunch of really nice minimalistic themes for WordPress, one of which I am now using (Simplr). I made a couple of slight modifications to the theme, such as adjusting the number of recent posts and comments that are displayed.

By default, this theme lists all the pages across the top, including any sub-pages, so I simply hid the Before I Die, Style Changer (only applies to my previous theme), and the To Do List pages. I have not decided how to make use of the pages feature in WordPress. I have been creating posts for virtually everything, including very long posts, paginated into several pages such as the Basement Project. The main reason I have been avoiding using pages is because there is no easy way to organize them. With posts, I can simply assign multiple categories to them. This isn't possible with pages.

The other little modification I made was to the CSS file for Simplr. I really liked having the hierarchical list of categories, where sub-categories were indented below their parents. The Simplr theme did not come with support for this, even if the option was enabled using wp_list_cats, as I mentioned doing in this post. Using CSS, there are two methods of making this happen. You can either use text-indent: 25px or you can use margin-left: 25px.

I would prefer to use text-indent so that the background of each category stays the same width throughout the list. However, using text-indent means if you have any categories that are more than 2 levels deep (for example, General->Writing->Health) the text indent will stop after the first sub category; all sub-sub-categories will look as if they are just sub categories of the parent. The only way around this (that I know of) is to use margin-left. This keeps the list looking nice, however it changes the size of the background of each sub category as well, which doesn't look too pretty. I finally decided that if I only use a 10px indent, the resizing of the background's doesn't look quite as bad. Here's what I finally used:

[css]
div.sidebar ul.children li {
margin-left: 10px;
}
[/css]

Let me know what you think of this theme. By default only the newest post is shown on the front page. This can be changed, however if the list of posts is very long the categories list would appear way at the bottom, requiring you to scroll all the way down to view the categories, links, recent posts, and recent comments.

I also installed WP-Cache. It's supposed to speed up the browsing of my blog by caching static copies of each page once it has been viewed and serving the cached version to new visitors instead of querying the database. Let me know if you notice any speed increases.

Lastly, I installed Search Pages, a WordPress plugin that enables searching not only the titles of posts, but also the post content. This is very useful if you're looking for a previous post you read and only remember something from within the post and not the post title. I think this should be the default for searches in WordPress, but I guess it's not.

Coding a style changer for WordPress 2.0

I'm sure there are plugin's that take care of this function, however I decided to hardcode this right into my WordPress theme. Why? Because I don't plan to use any other themes. All style changes I make will be done through changing the CSS style sheet. I coded this so that I could work on a new style sheet offline, and when I'm finished, upload the file to my styles directory. It will then automatically show up in the drop down box on the Style Changer page.

So here is what I did. First I created a new WordPress page and called it Style Changer. On this page I put the following PHP code: Continue reading

Modifying the WordPress (more…) link

I found the more feature of WordPress to be very useful, however I wanted to change the link that was displayed. The default is "(more...)", and I wanted it to say something more useful, such as "Continued...". After doing some Googling and finding nothing, I dug through all the PHP files included with WordPress. Finally I found the following in template-functions-post.php, located in the /wp-includes/ directory: Continue reading

Blogging from a Text Only Web Browser (Lynx)

I'm laying in bed using my IBM Thinkpad 600e laptop running Debian Linux, connected to the internet using a WiFi connection, logged into my WordPress dashboard using a text-only web browser (Lynx). Lynx allows me to open my favorite console text editor, which happens to be vi, and once I'm done typing my post, I just quit vi, and it returns me to Lynx with my whole post entered in the form. Blogging couldn't get any more geeky than this!

The fact that the WordPress administration pages are even usable via a text-only browser is awesome. I also setup a plugin for WordPress that allows me to submit posts via email. I setup a secret email account which I send an email to containing the title of the post in the subject and the content of the post in the message body. I have a cron job setup to run a script every 5 minutes that checks the secret email account for any emails. Once it finds one in the mailbox, it adds a post to my site containing the contents of the email! This allows me to submit posts right from my Blackberry, no matter where I am. I could even attach pictures, if my Blackberry had a digital camera.

Giving In

I have always been against using someone else’s code for my personal site. I told myself it made more sense to design everything from scratch, programming and all, so that I’d be able to easily add new features while having a clear understanding of how everything works. I thought it made more sense to do all the programming myself because I would gain valuable programming experience in the process. Well, gaining experience to create this site from scratch also means I end up rewriting previous programming code to implement new features. This puts me in an endless loop of redoing the site over and over. I have come across dozens of different free blogging applications in the past, but they were either too bloated or didn’t contain the flexibility I was looking for.

Well today I found what I’ve been looking for. It’s called WordPress. It uses the exact two things I was planning to use for my blogging software: PHP and MySQL. What makes WordPress perfect for my site is that the features are setup almost exactly the way I planned for my site. This makes programming new features in building onto the site a breeze. All of the software is Open Source, so it’s licensed under the GPL. This means that I can freely add, delete, and modify to my heart’s content, any part of this software.

OK, enough justification. I just wanted to announce that I’ve finally given in to using blogging software that has been prewritten. I will still be working on new features to add to the site, as well as designing new themes to keep things looking fresh. Most importantly, you can look forward to a lot of new content and more frequent blog posts. Please feel free to post comments using the commenting feature.